This guide will walk you through the installation, activation, and usage of the User Dashboard addon for Quiz and Survey Master (QSM) on your WordPress website. This addon enhances the user experience by providing participants with a comprehensive overview of their quiz activity on your website.
It presents a comprehensive table of quizzes taken, detailing key metrics such as the number of correct answers, overall quiz percentage, and points earned. For added convenience, the dashboard includes direct links for certificate downloads, ensuring quick access to achievements. The addon also supports customizable text for buttons and result templates, allowing for a tailored experience that aligns with specific branding or user preferences.
Installation & Activation
If you haven’t already, install the User Dashboard add-on first. Please refer to the QSM’s Addon Installation Documentation. To get started, copy your license key from your QSM account on the website where you purchased the User Dashboard add-on.
Activate User Dashboard addon in QSM
- Step 1: Go to QSM > Addons > Installed
- Step 2: Click on “User Dashboard” from the list of add-ons and paste your Addon License Key.
- Step 3: Click the ‘Validate’ button to verify the entered license key.

Once the license key is validated, you can access the addon to configure the User Dashboard Settings.
Configuring User Dashboard Settings
Here’s what you can personalize in your user dashboard, which opens automatically after the license key is validated.

Here’s what you can customize in your user dashboard:
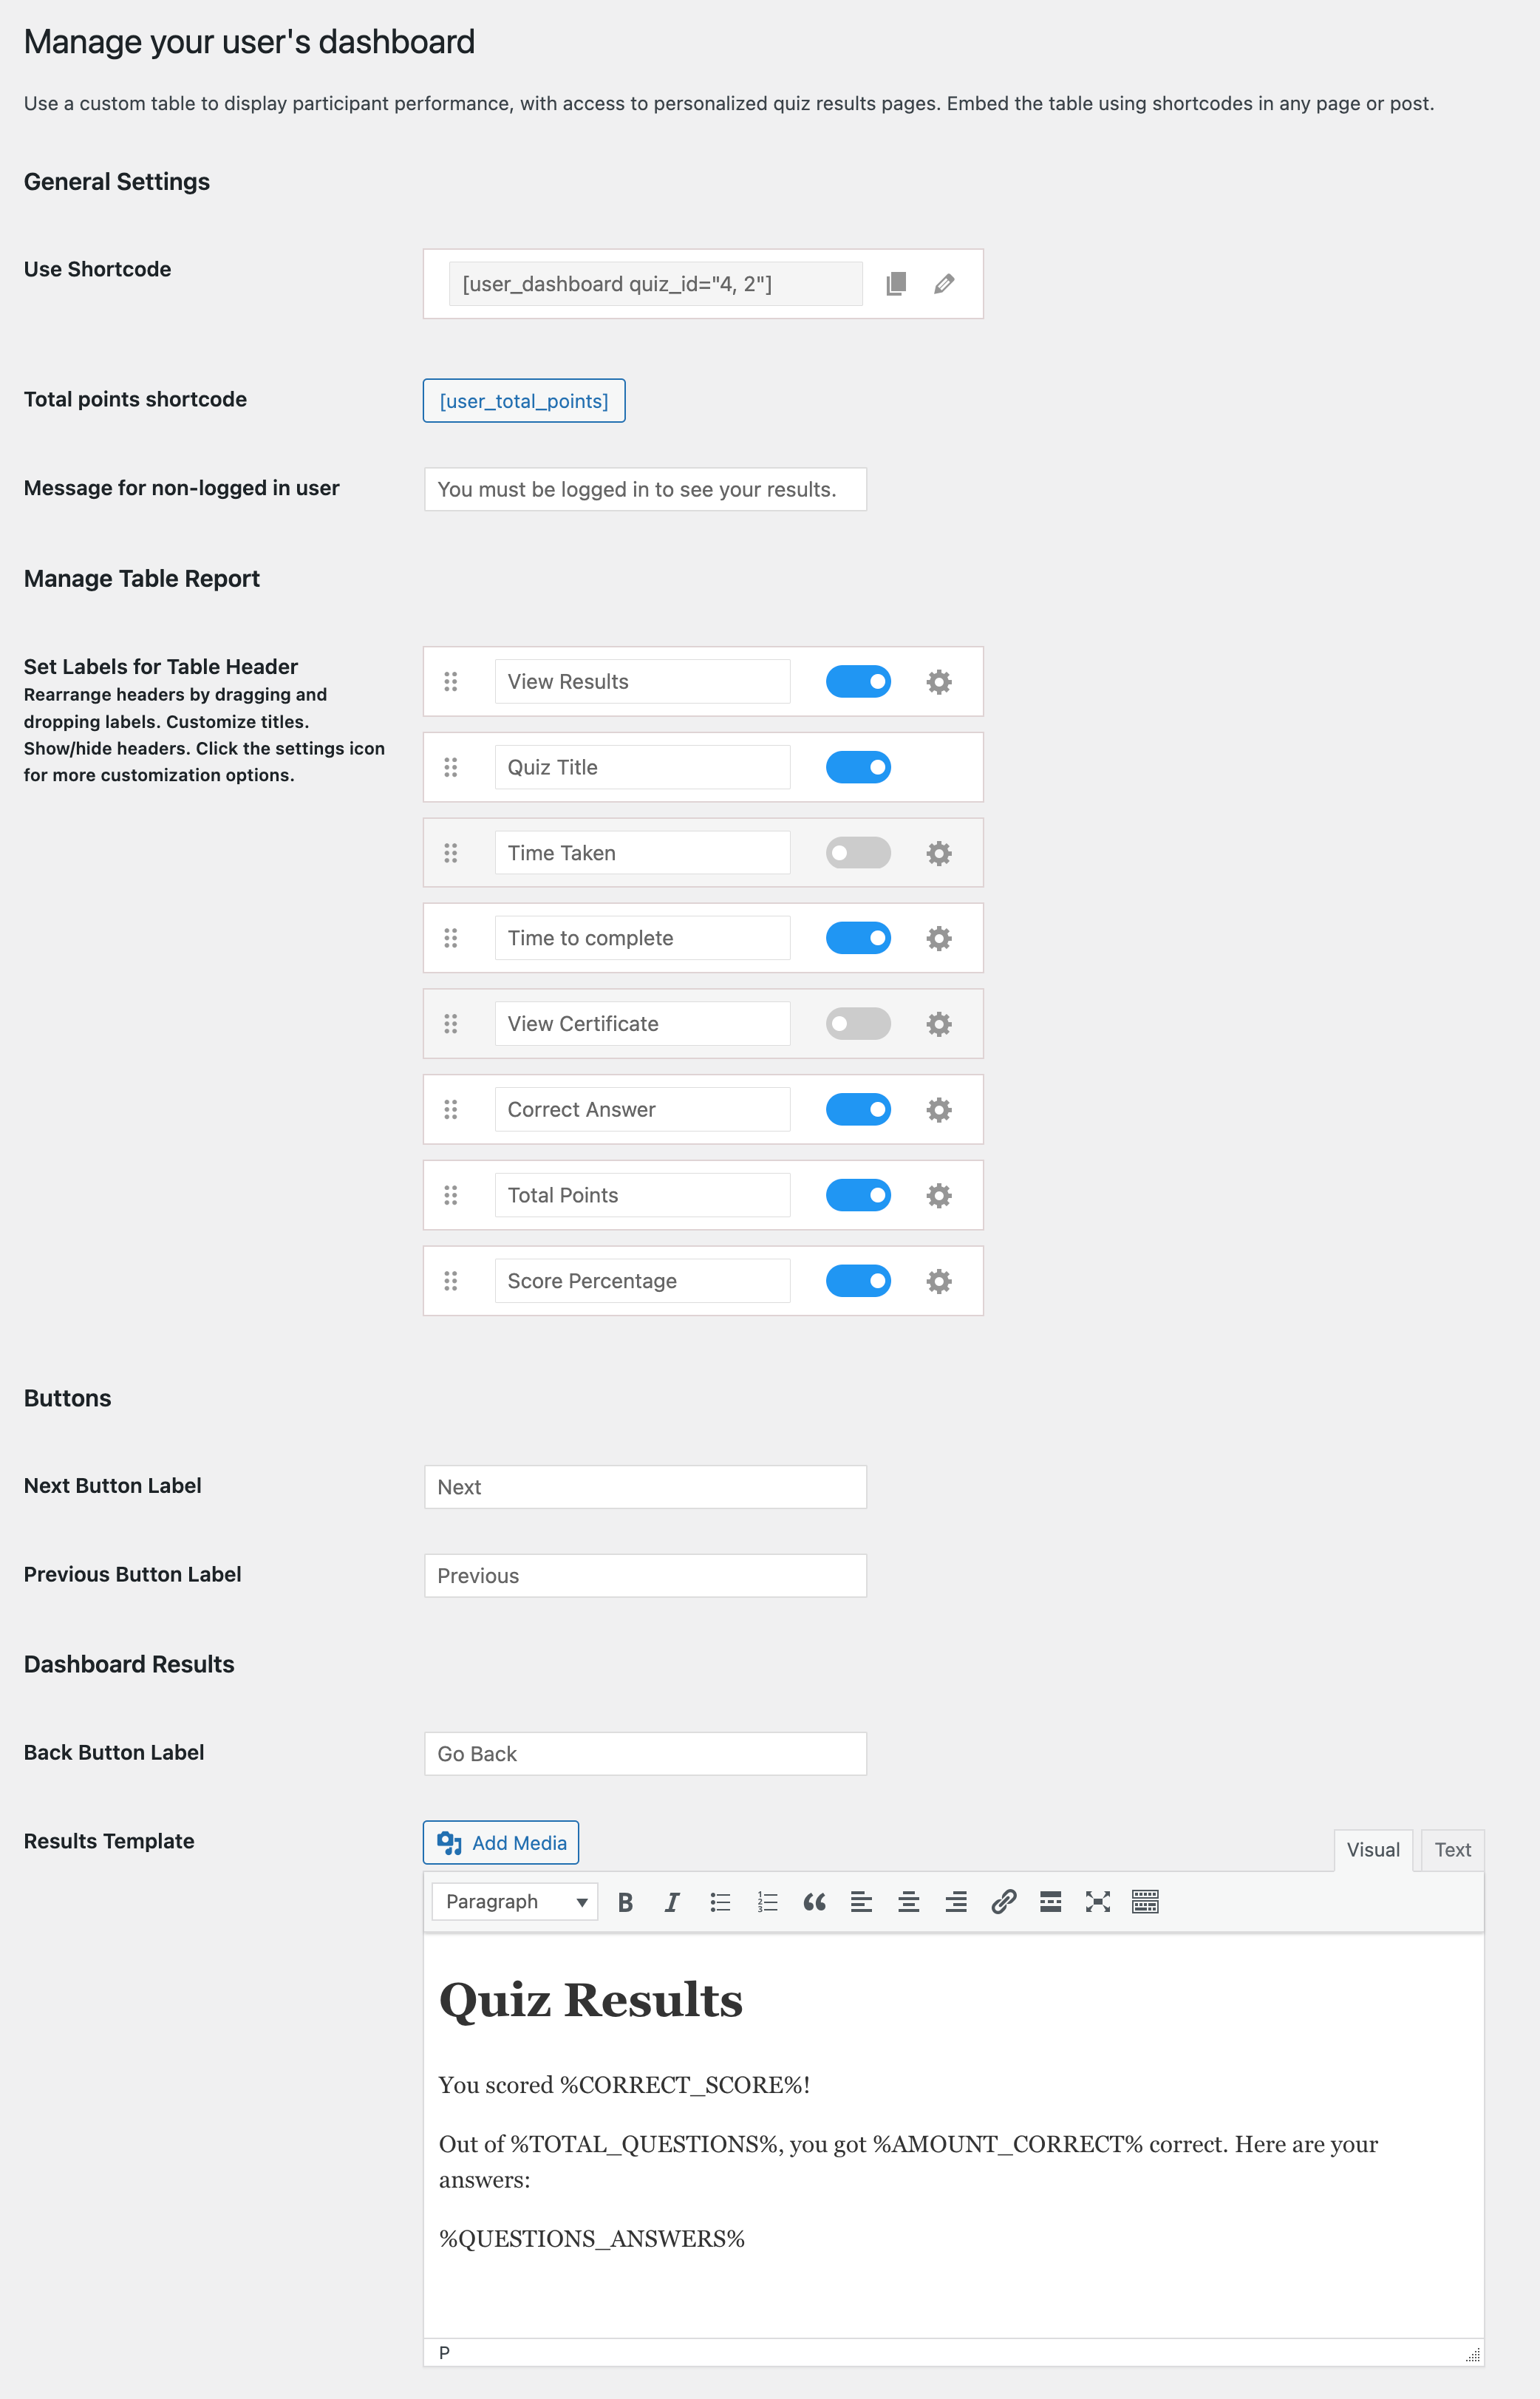
General Settings
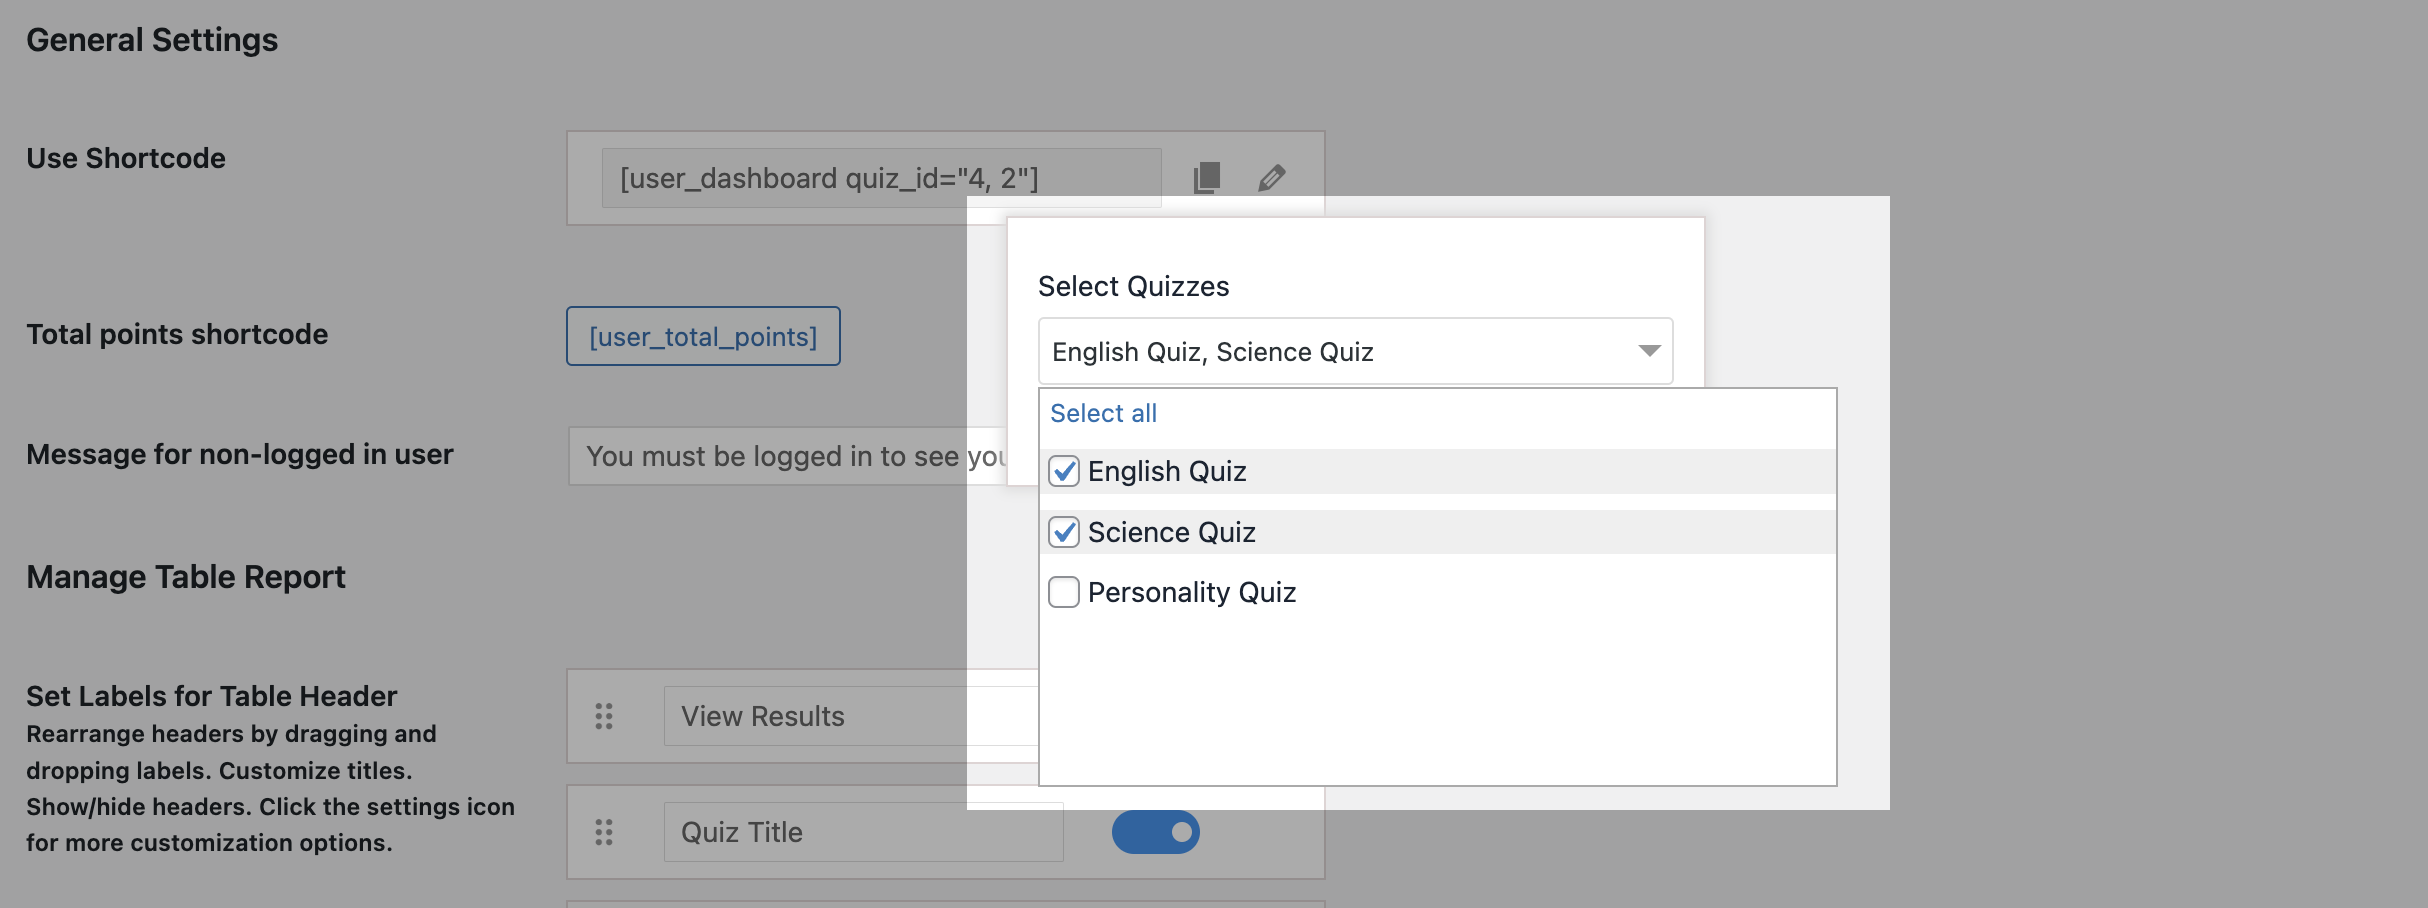
- Use Shortcode: The option provides a shortcode button to easily embed the table report of all quizzes into any post or page.
To include specific quizzes in the table, simply click the edit button, select the desired quizzes, and save your changes. Once done, copy the generated shortcode and paste it into your post or page.

- Message for non-logged-in users: The option offers an input field for adding messages for users who aren’t logged in.
Manage Table Report
You can customize the user dashboard by displaying the tabular report of the participants. From here, you can enable or disable the table column according to your preferences, custom set labels for all table headers, and drag-and-drop sections to assist in organizing the series of table headers.
- View Results – To view the results of the listed quiz, enable the ‘view results’ column. You can customize the result link text through additional settings accessed from the gear icon.
- Quiz Name – Enable this column, to display quiz names taken by the participants. You can also customize the column heading text from the settings to your liking.
- Time Taken – Enable this option, to show when the quiz is started by participants. You can further choose to display the start time from different date and time formats, including a custom option from the settings.
- Time to Complete – Enable this column, to display how long a user took to finish a quiz. You can customize how the time is displayed with different time format options in the additional settings.
- View Certificate – Enable this column, to view the certificate for a listed quiz. You can also customize the text of the anchor link.
- Correct Answer – Enable this button to show the number of correct answers given by the participant. You can also customize how the correct answers are presented in the dashboard from the settings option.
You’ll see the default text format as %AMOUNT_CORRECT% out of %TOTAL_QUESTIONS%. You can customize the text using these variables as you like, for example, You’ve got %AMOUNT_CORRECT% out of %TOTAL_QUESTIONS% correct’.
- Total Points – Enable this column to display the total points obtained by the participants. You can customize how the total points are presented in the settings. The default format of the text is
%POINT_SCORE%out of%MAXIMUM_POINTS%.
Score Percentage – Enable this column to display the participants’ score percentage in the dashboard. Then, from the settings you can manage the decimal places to include in the quiz score percentage.
Buttons
This section allows the quiz makers to enter the text on the Next and Previous buttons.
- Next Button Label – You can edit the label text of the next button that shows up on the top of the tabular report in the dashboard.
- Previous Button Label – Similar to the next button label, you can customize the label text of the previous button that is displayed in the dashboard.
Dashboard Results
- Back Button Label – You can customize the text of the back button, which allows you to return to the table dashboard from the result mode.
- Results Template – This section allows you to add a custom results page that is displayed when participants view the result from a tabular report. Similar to the text editor on the result page when creating a quiz, this text editor also lets you create customized result messages using HTML tags, variables, plain texts, images, and more.
Accessing User Dashboard
Via Shortcode: Embed the dashboard using the below-mentioned shortcode into any post or page.
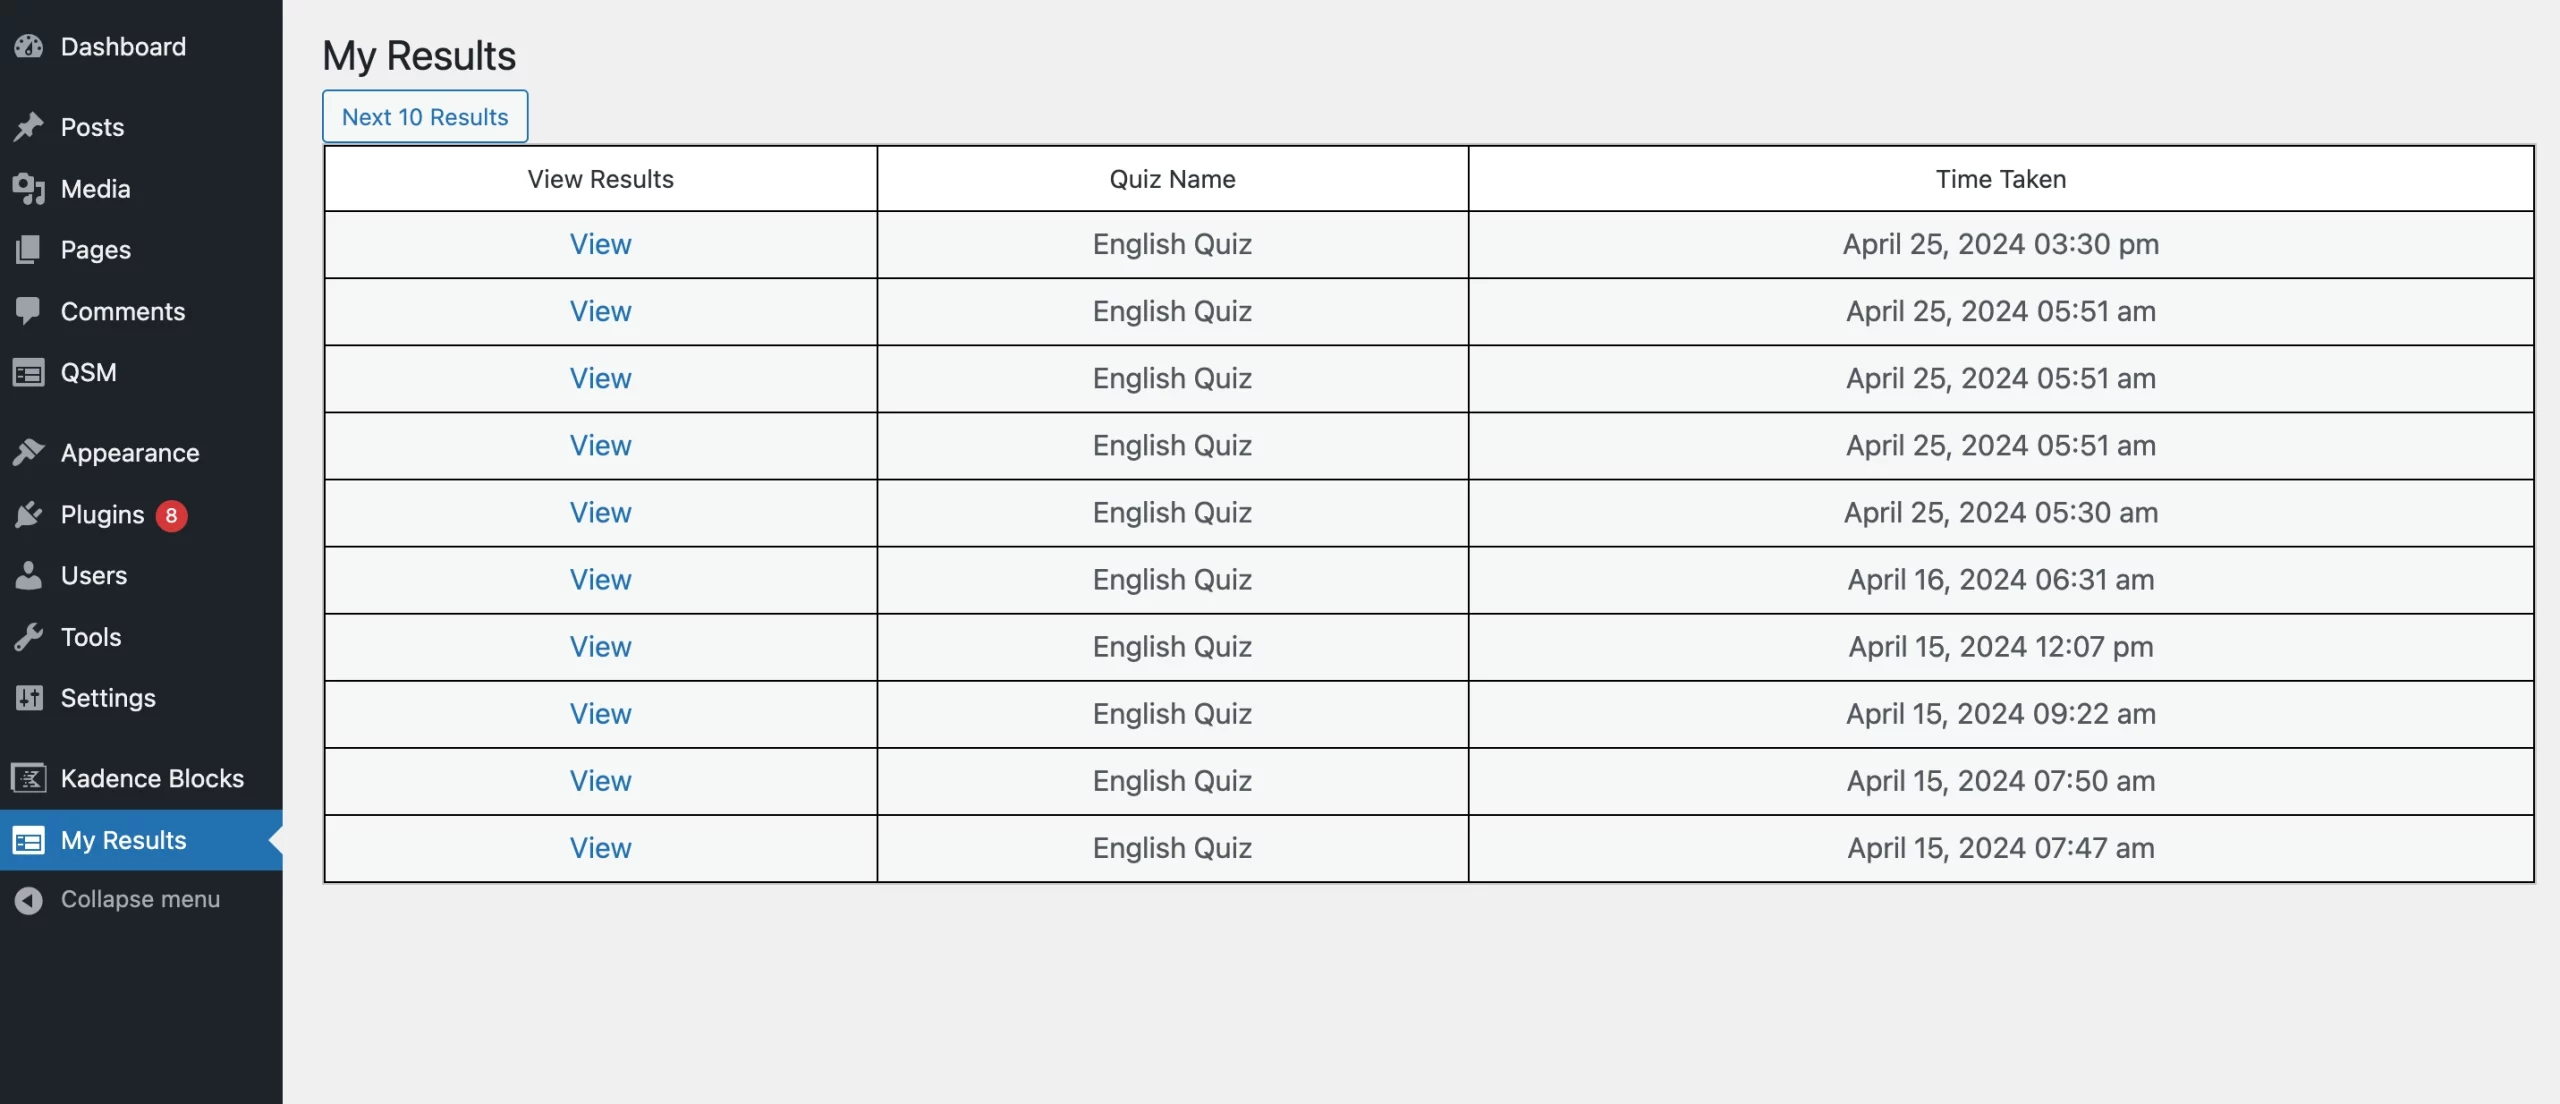
[user_dashboard]Backend Access: Users can view quiz submission data by navigating to “My Results” in the WordPress sidebar menu.

Show Live Results in Quizzes
Enhance the quiz-taking experience by enabling live results. Follow these steps to display live results in quiz:
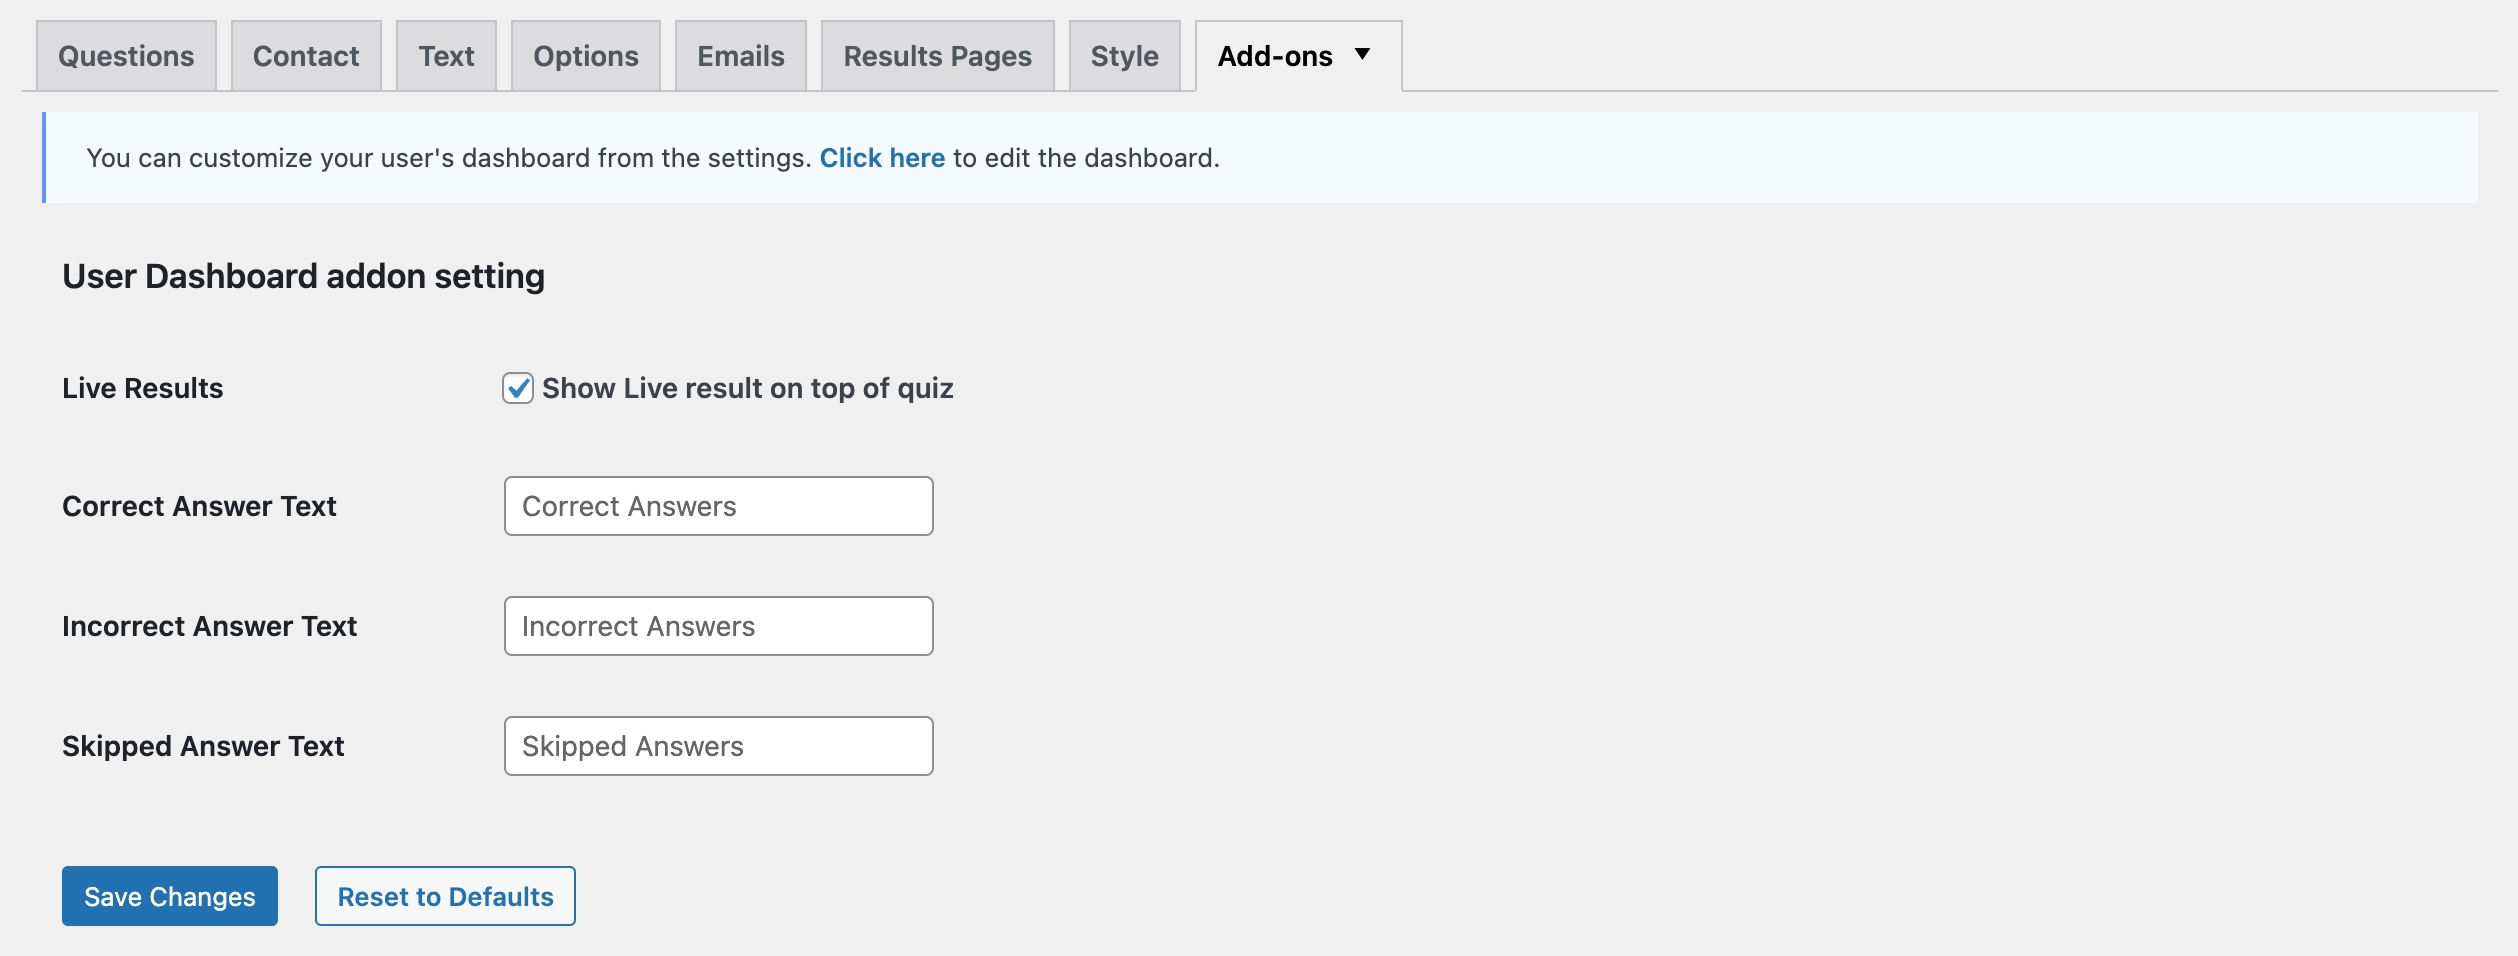
- Step 1: While editing a quiz, navigate to the Addons tab and click on “User Dashboard” from the drop-down
- Step 2: Click on the checkbox to enable live results.
- Step 3: Customize text labels for correct, incorrect, and skipped answers.
- Step 4: Click “Save Changes” to apply your live result settings.

Note: Live results work with Multiple Choice, Multiple Choice (Horizontal), Drop Down, Number, Short Answer, and Fill In The Blank question types. The “Skipped Answers” count won’t be visible on Single Page Quizzes.

By following this guide, you will be able to successfully configure the User Dashboard Addon for QSM, providing your users with a comprehensive view of their quiz activity. For any further assistance or inquiries, refer to our support resources or contact our support team.
Support and Contact Information
Contacting Support
For assistance, reach out to our support team on the Support Page or email us at [email protected]
Additional Resources
Find user guides and video tutorials on our Documentation Page and YouTube Channel.


