This guide will walk you through the installation, activation, and usage of the MailerLite Integration addon for Quiz and Survey Master (QSM) on your WordPress website. Boost your marketing activities by collecting crucial user contact information using quizzes and survey forms and using it to send targeted campaigns from MailerLite.
Installation & Activation
If you haven’t already, install the QSM MailerLite Integration Addon first. Please refer to the QSM’s Addon Installation Documentation. To get started, copy your license key from your QSM account on the website where you purchased the MailerLite Integration Addon.
How to Activate MailerLite Integration in QSM
- Step 1: Go to QSM > Addons > Installed
- Step 2: Click “MailerLite Integration” and paste your Addon License Key.
- Step 3: Add your MailerLite API Key
- Step 4: Click Save Settings

How to get an API from MaileLite account?
Follow the below-mentioned method to get the API key.
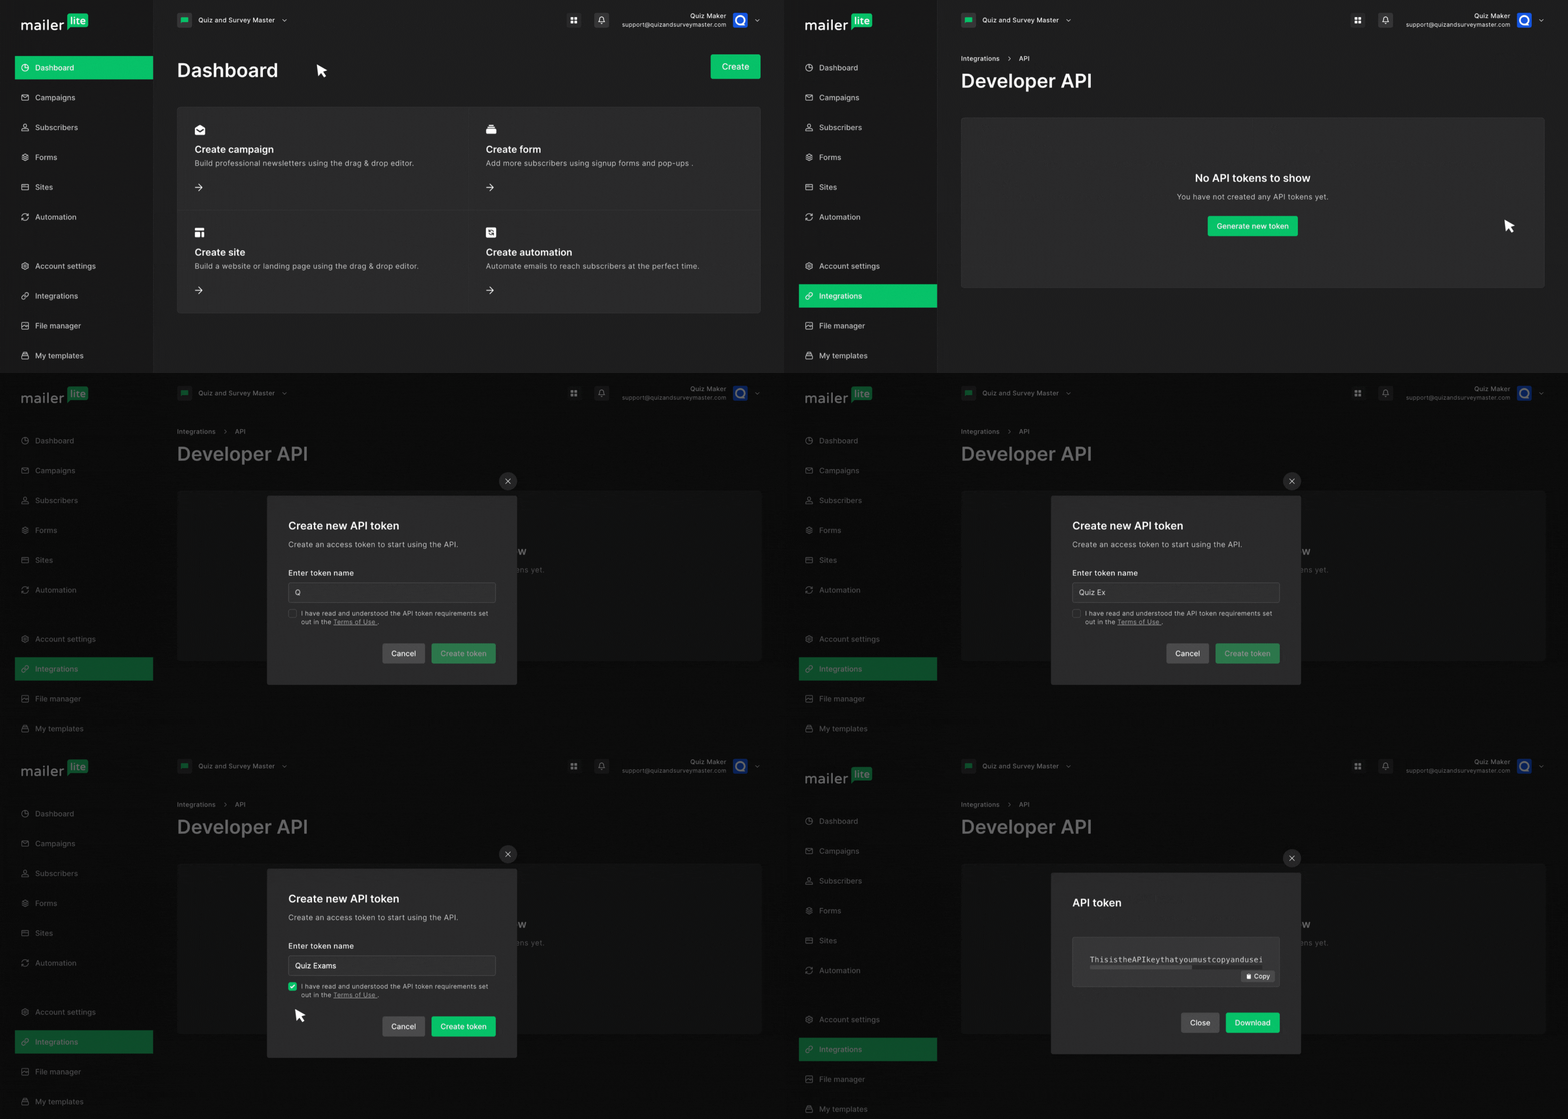
- Sign in to your MailerLite Account
- Go to Integrations > MailerLite API and click “Use”
- Click on “Generate New Token.”
- Enter the token name and click on “Create Token.”
- Copy the generated token and paste it into the QSM Addon Setting inside the MailerLite API key input field.

Integrating MailerLite

Enabling MailerLite
After successfully activating the MailerLite Integration add-on, you must enable the MailerLite integration to begin configuring it.
- Go to your quiz or survey and select “MailerLite Integration” under the Addons tab drop-down.
- To enable MailerLite for a particular quiz or survey, simply click on the checkbox. This will then reveal more customization options.
Selecting Subscription Modes
The add-on provides two modes for user subscriptions.
- Automatic Subscription: Enabling automatic subscription adds users to the subscription list without notification.
- Opt-in Subscription: Enabling the opt-in subscription will include a checkbox for the quiz taker to subscribe to your email list. You can customize the label to encourage users.
Selecting Subscription Groups
If you have created groups in your MailerLite account, the addon can add users as subscribers to the selected groups. To add quiz or survey users to specific groups of subscribers, use the drop-down menu to select a group.
If you haven’t created any subscriber groups, you can follow this simple guide by MailerLite to create your subscription group.
Once you have created a new subscriber group, come back to QSM > MailerLite Addon in your WordPress website and refresh the page. You will notice that you can now select your newly created group from the drop-down.
Data Collection Options
The QSM MailerLite Integration addon gives you a variety of data collection options to choose from.
- Collect All Questions and Respective User Responses: Gather comprehensive data on each quiz or survey by capturing questions and user responses. This data is automatically transferred to your MailerLite account for detailed user engagement insights.
- Collect User IP Address: Collect user IP addresses to add context to user interactions. It can be used to track user locations and identify potential problems with duplicate responses.
- Collect Score: Records the percentage of points earned by users during quiz participation.
- Collect Earned Points: Record the points earned by users while taking quizzes.
Using Custom Fields
MailerLite by default allows you to create custom fields to accept various types of responses (text, number, and date). If you have already created a custom field, with the QSM MailerLite add-on, you can map those fields to your quiz or survey response and store the responses.
If you haven’t created a custom field, you can do so by following this method by MailerLite.
Assigning Tags to Email Subscriptions
The MailerLite Addon enables you to tag subscribers based on the score or points conditions found in QSM’s Emails tab.
Here, we have created a quiz examination for students, and we would like to tag them based on their quiz scores. In this case, we will use three tags: Excellent, Passed, and Failed.
Excellent Tag: If the score is more than 60%, the student will be added to the subscriber list with the tag “Excellent.”

Passed Tag: If the score is between 35% and 60%, the student will be added to the subscriber list with the tag “Passed.”

Fail Tag: If the score is less than 35%, the student will be added to the subscriber list with the tag “Fail.”

Before you use tags, go to QSM ➝ Settings ➝ Process Emails in the background and set it to “No”
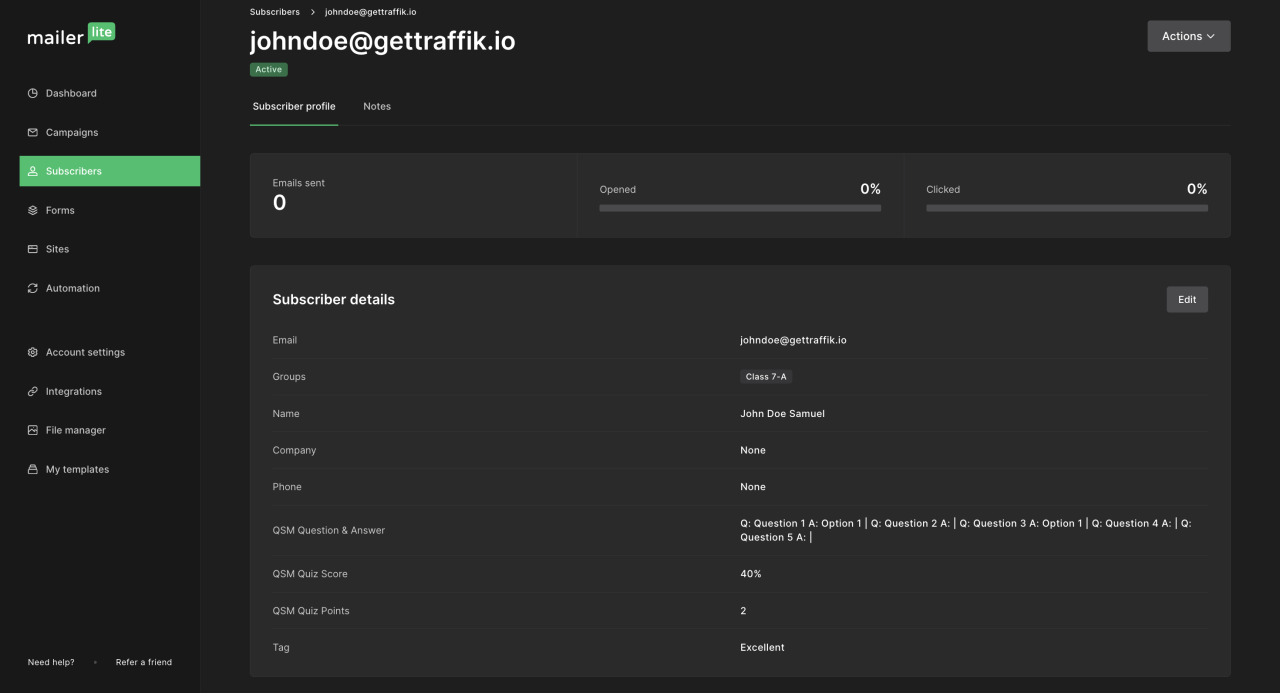
The following is the output we got on our MailerLite Account after submitting the demo quiz with some demo data, you can see the captured user data with the set custom fields and tags in the emails tab.

Troubleshooting
Common Issues and Solutions
If you encounter issues, ensure you meet the compatibility requirements:
- Use QSM Core 8.2.0 or higher.
- Activate your license key correctly.
- Add the MailerLite API key correctly.
Receiving Updates
Check your QSM account for the latest Quiz Proctor updates. Subscribe to our newsletter for release notifications.
Support and Contact Information
Contacting Support
For assistance, reach out to our support team on the Support Page or email us at [email protected]
Additional Resources
Find user guides and video tutorials on our Documentation Page and YouTube Channel.


