The Active Campaign Integration/addon allows Quiz and Survey Master to integrate with the Active Campaign service.
Installation/Setup
Once you have purchased the addon, you will have access to download the addon. You need to install and upload the addon as a normal WordPress plugin. To do so, go to the Plugins page and click Add New. Then, click Upload.
From there, upload the zip file that you downloaded when downloading the addon. Once the addon has been uploaded, you should now have the plugin QSM – ActiveCampaign Integration listed in your list of plugins. Activate that plugin. Once activated, the addon will add a new tab in the Addon Settings labeled “ActiveCampaign Integration”.
Settings/Configure
Before you can use the Campaign Monitor addon, we must first enter the Addon license key, Active Campaign API Key, Active Campaign API URL, Active Campaign Event Tracking Key, Active Campaign Event Tracking ID & Active Campaign Event Name.
Note that the addon won’t work without a valid license key.
Enter your license key from your account into the “Addon License Key” field on the “Active Campaign” tab of the “Addon Settings” in Installed Addons or from Addon Options inside the individual quizzes/surveys.
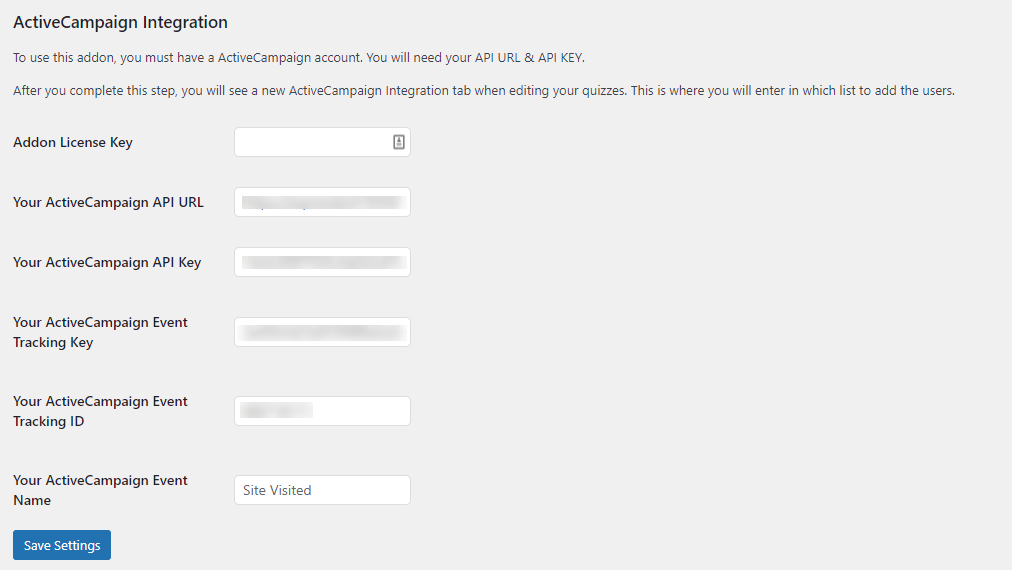
Once the license key is validated, you have to connect the plugin with your ActiveCampaign account to integrate the ActiveCampaign with your quiz/survey
Adding Your API URL and KEY
To get the API Access (API URL and Key) of Active Campaign you need to log in to your Active Campaign Account. Goto to Account Settings > Developer > API Access.
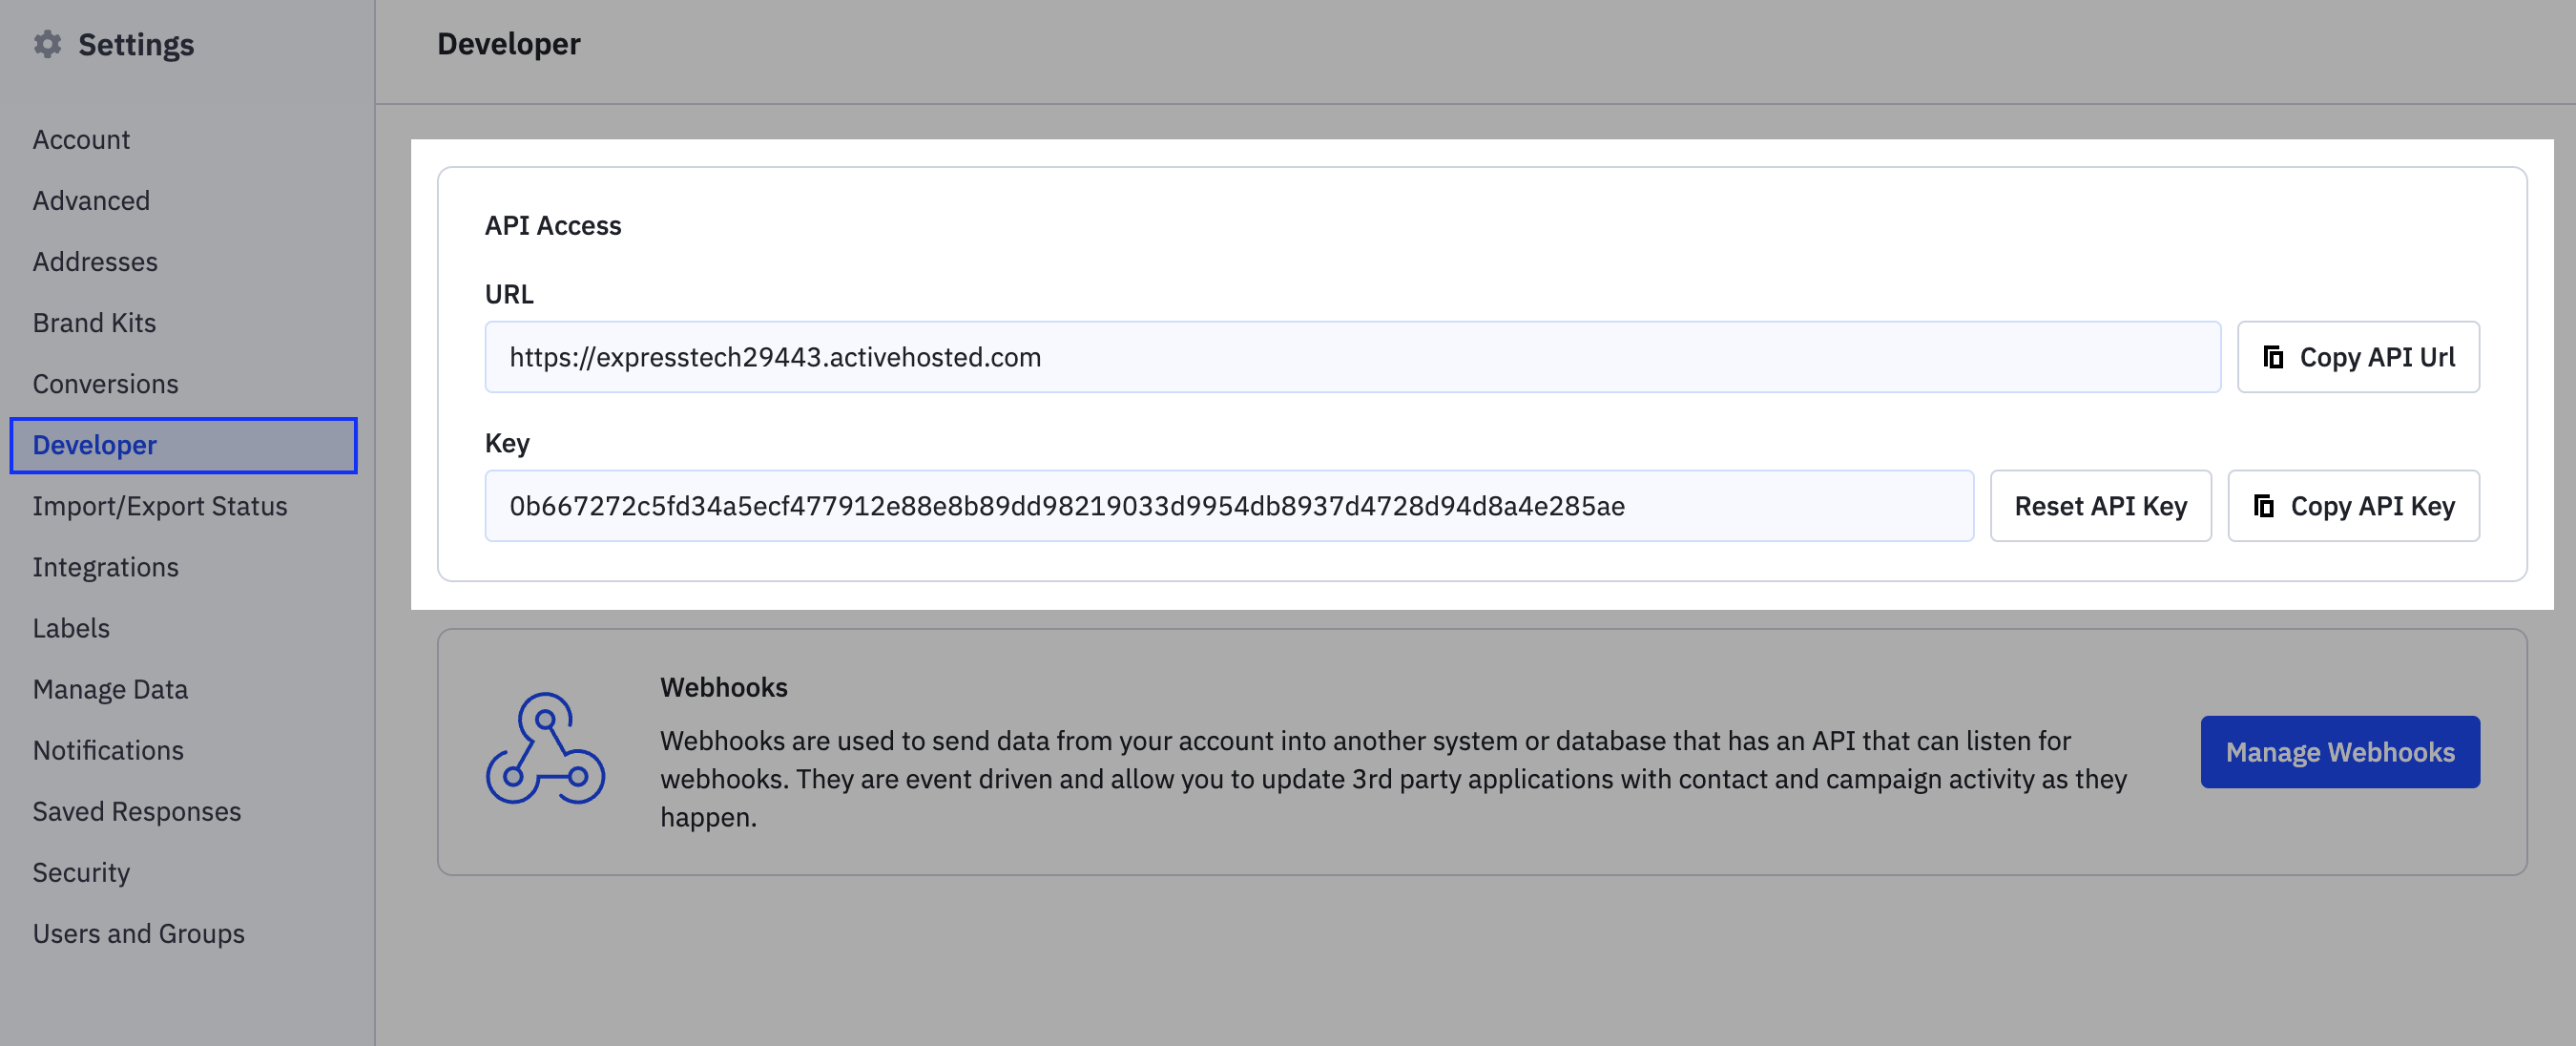
Copy the API URL and key and paste it into the Your Active Campaign URL and Key field respectively in the “Addon Settings” page.
Adding the Event Tracking Key
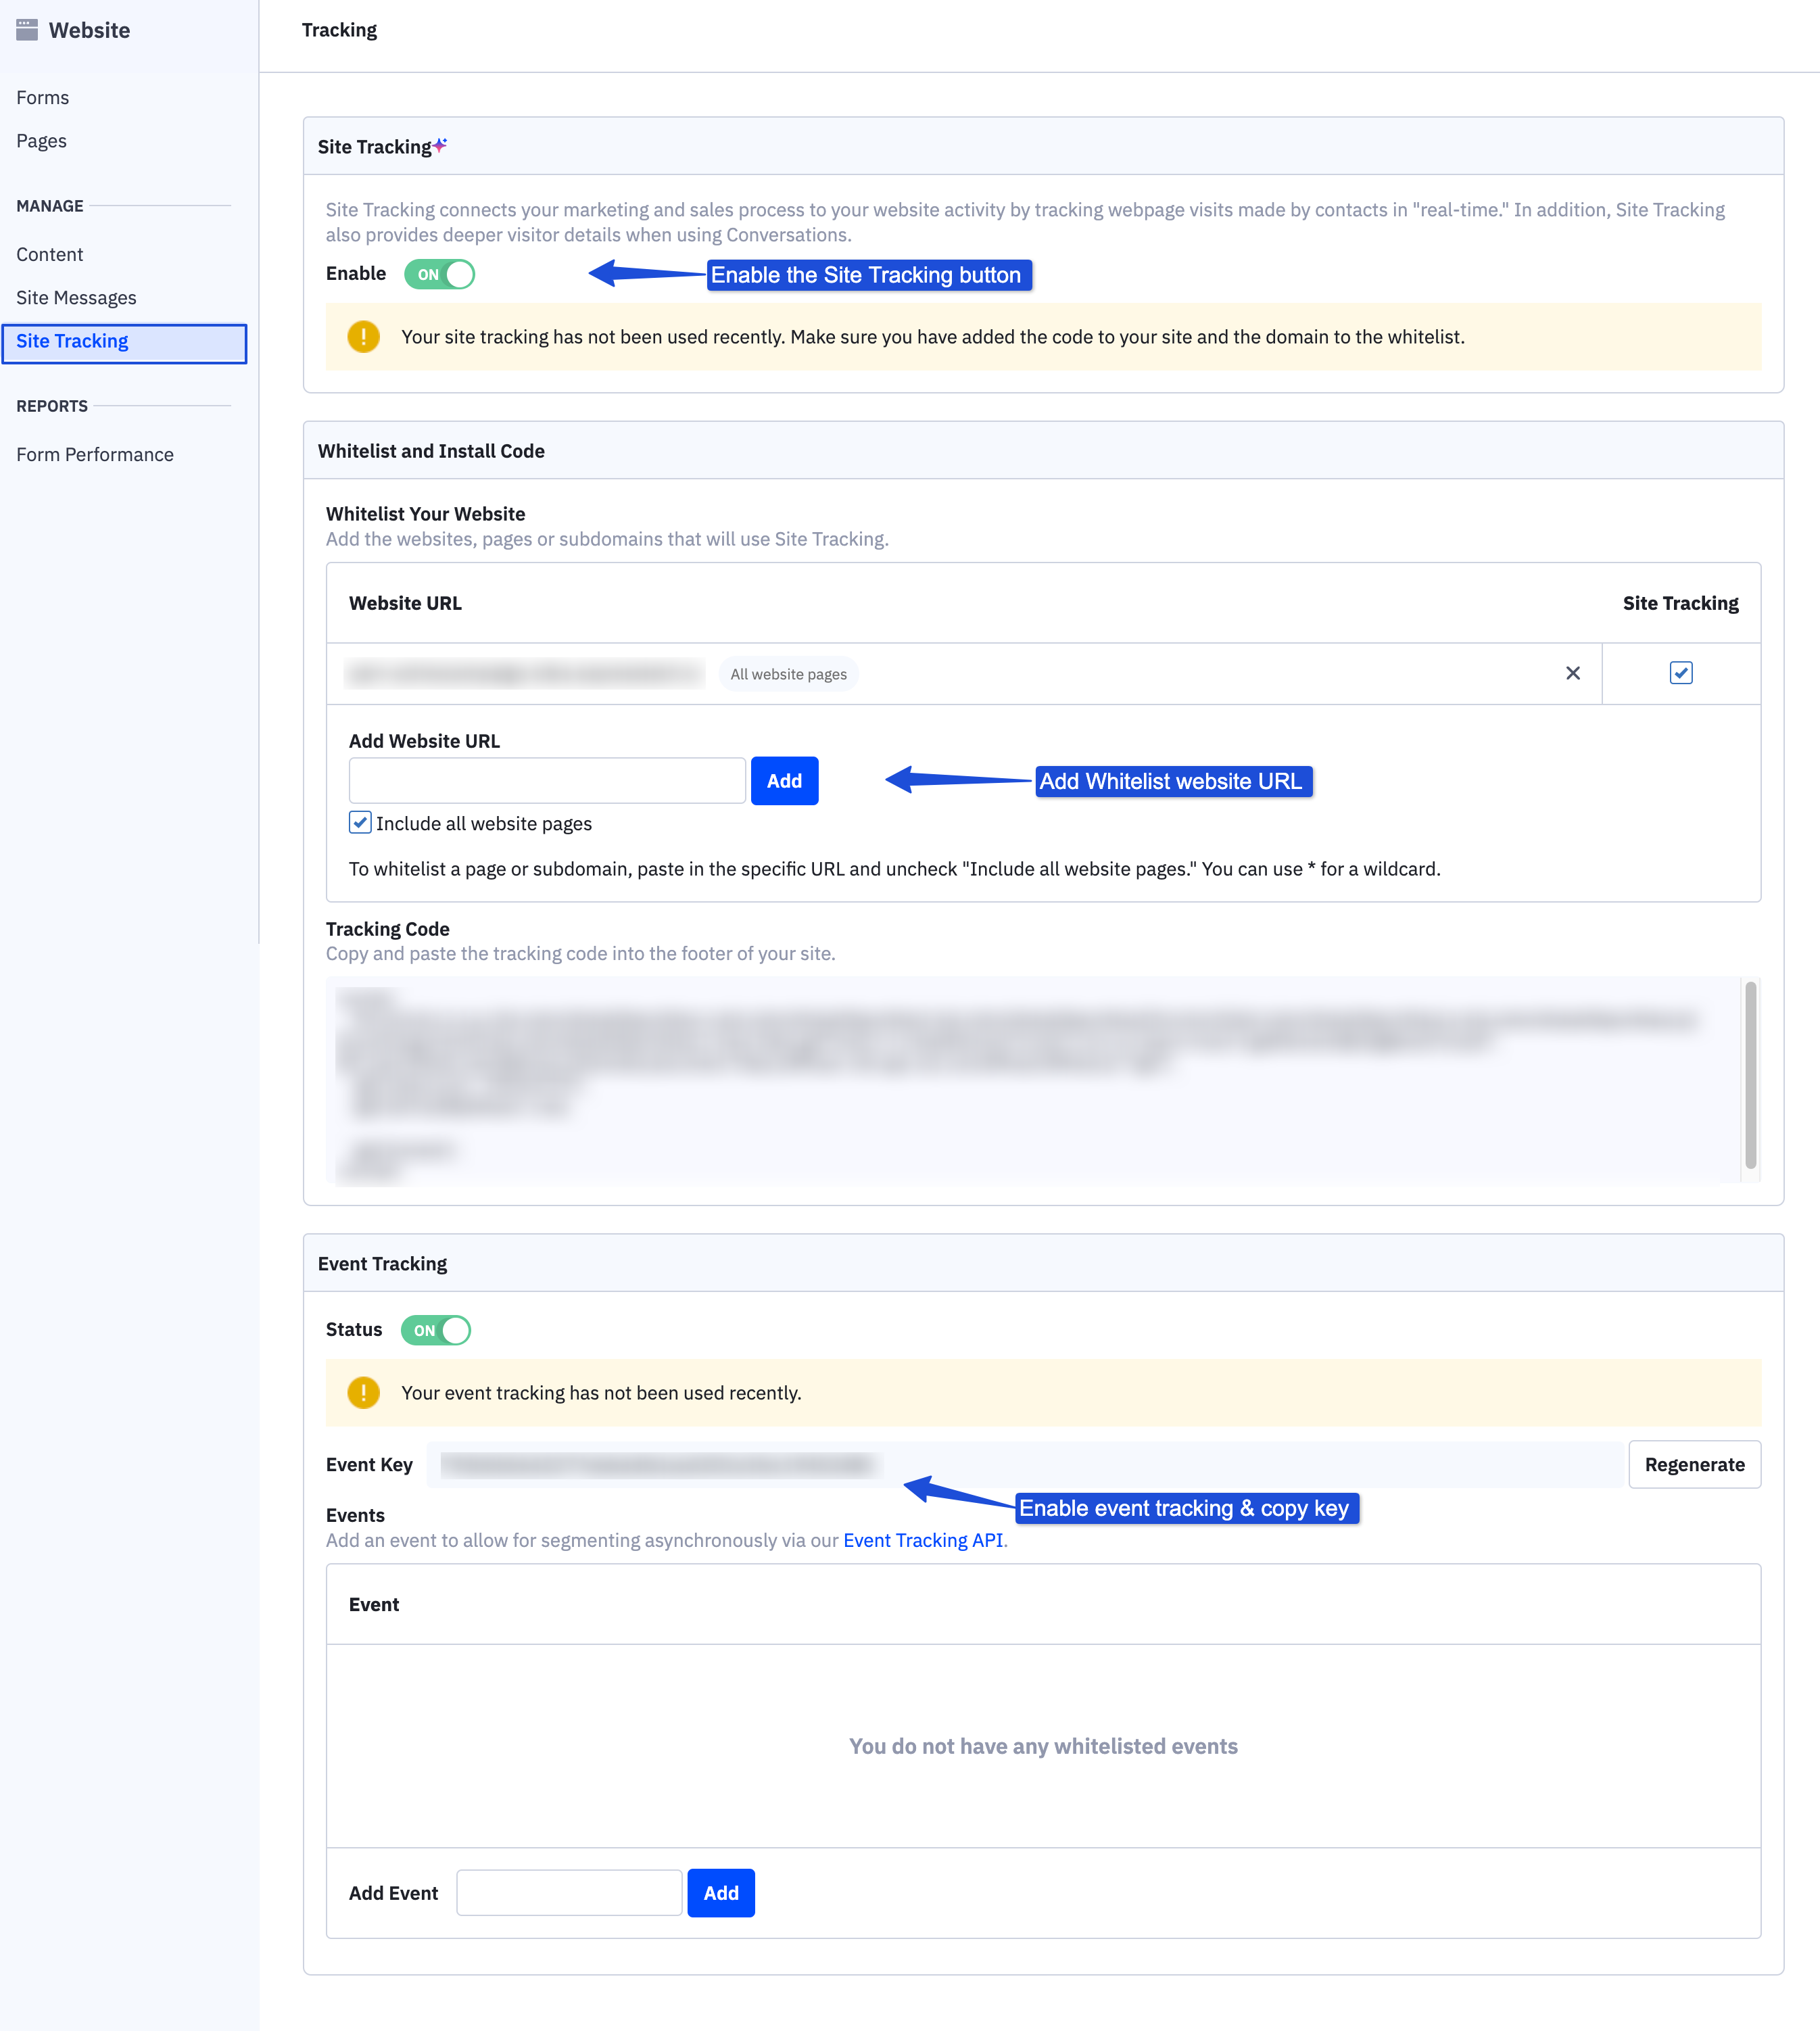
To add the Active Campaign Tracking Key & ID from your Active Campaign account go to Website > Site Tracking and enable the site tracking button.
Whitelist your website by adding the URL in the “Add Website URL” field and hitting the “Add” button.
After whitelisting, Enable the “Event Tracking” feature which will generate a unique Event Key, Copy the Event Key and paste it into the Active Campaign Addon Settings page.
Adding Active Campaign Event Tracking Name & ID
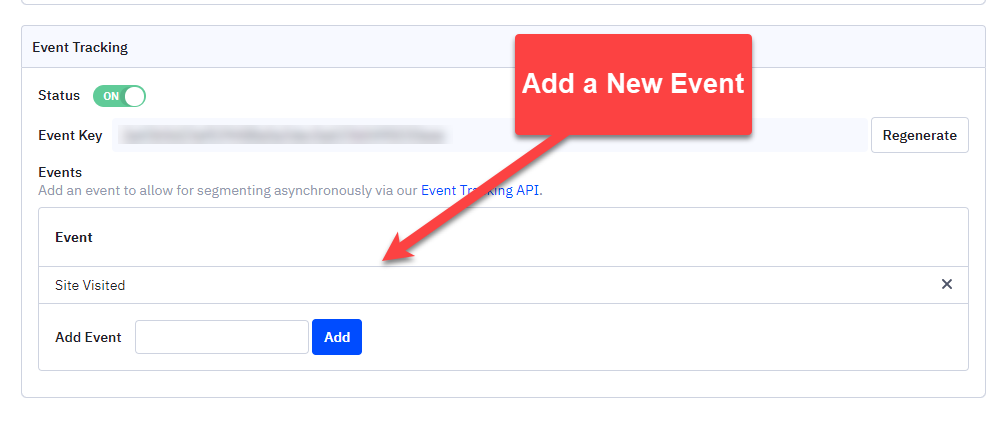
On the Active Campaign Settings > Tracking page. You need to add a new event, give the event any name, and hit the Add button.
Now, to get the Tracking ID, click on the blue link that says “Event Tracking API”. Clicking on it will open up a popup with the Event Tracking API that houses the Event Tracking ID. Copy the ID and paste it into the Addon Settings Page.
Once you have entered all the required data in the Addon Settings Page make sure to click the “Save Changes” button. If all goes well you will be notified with an integration success message.
ActiveCampaign Integration Setup
Once you are done with connecting QSM with your ActiveCampaign account, you can go to the “Active Campaign” settings from the Add-ons tab when editing or creating your quiz or survey.
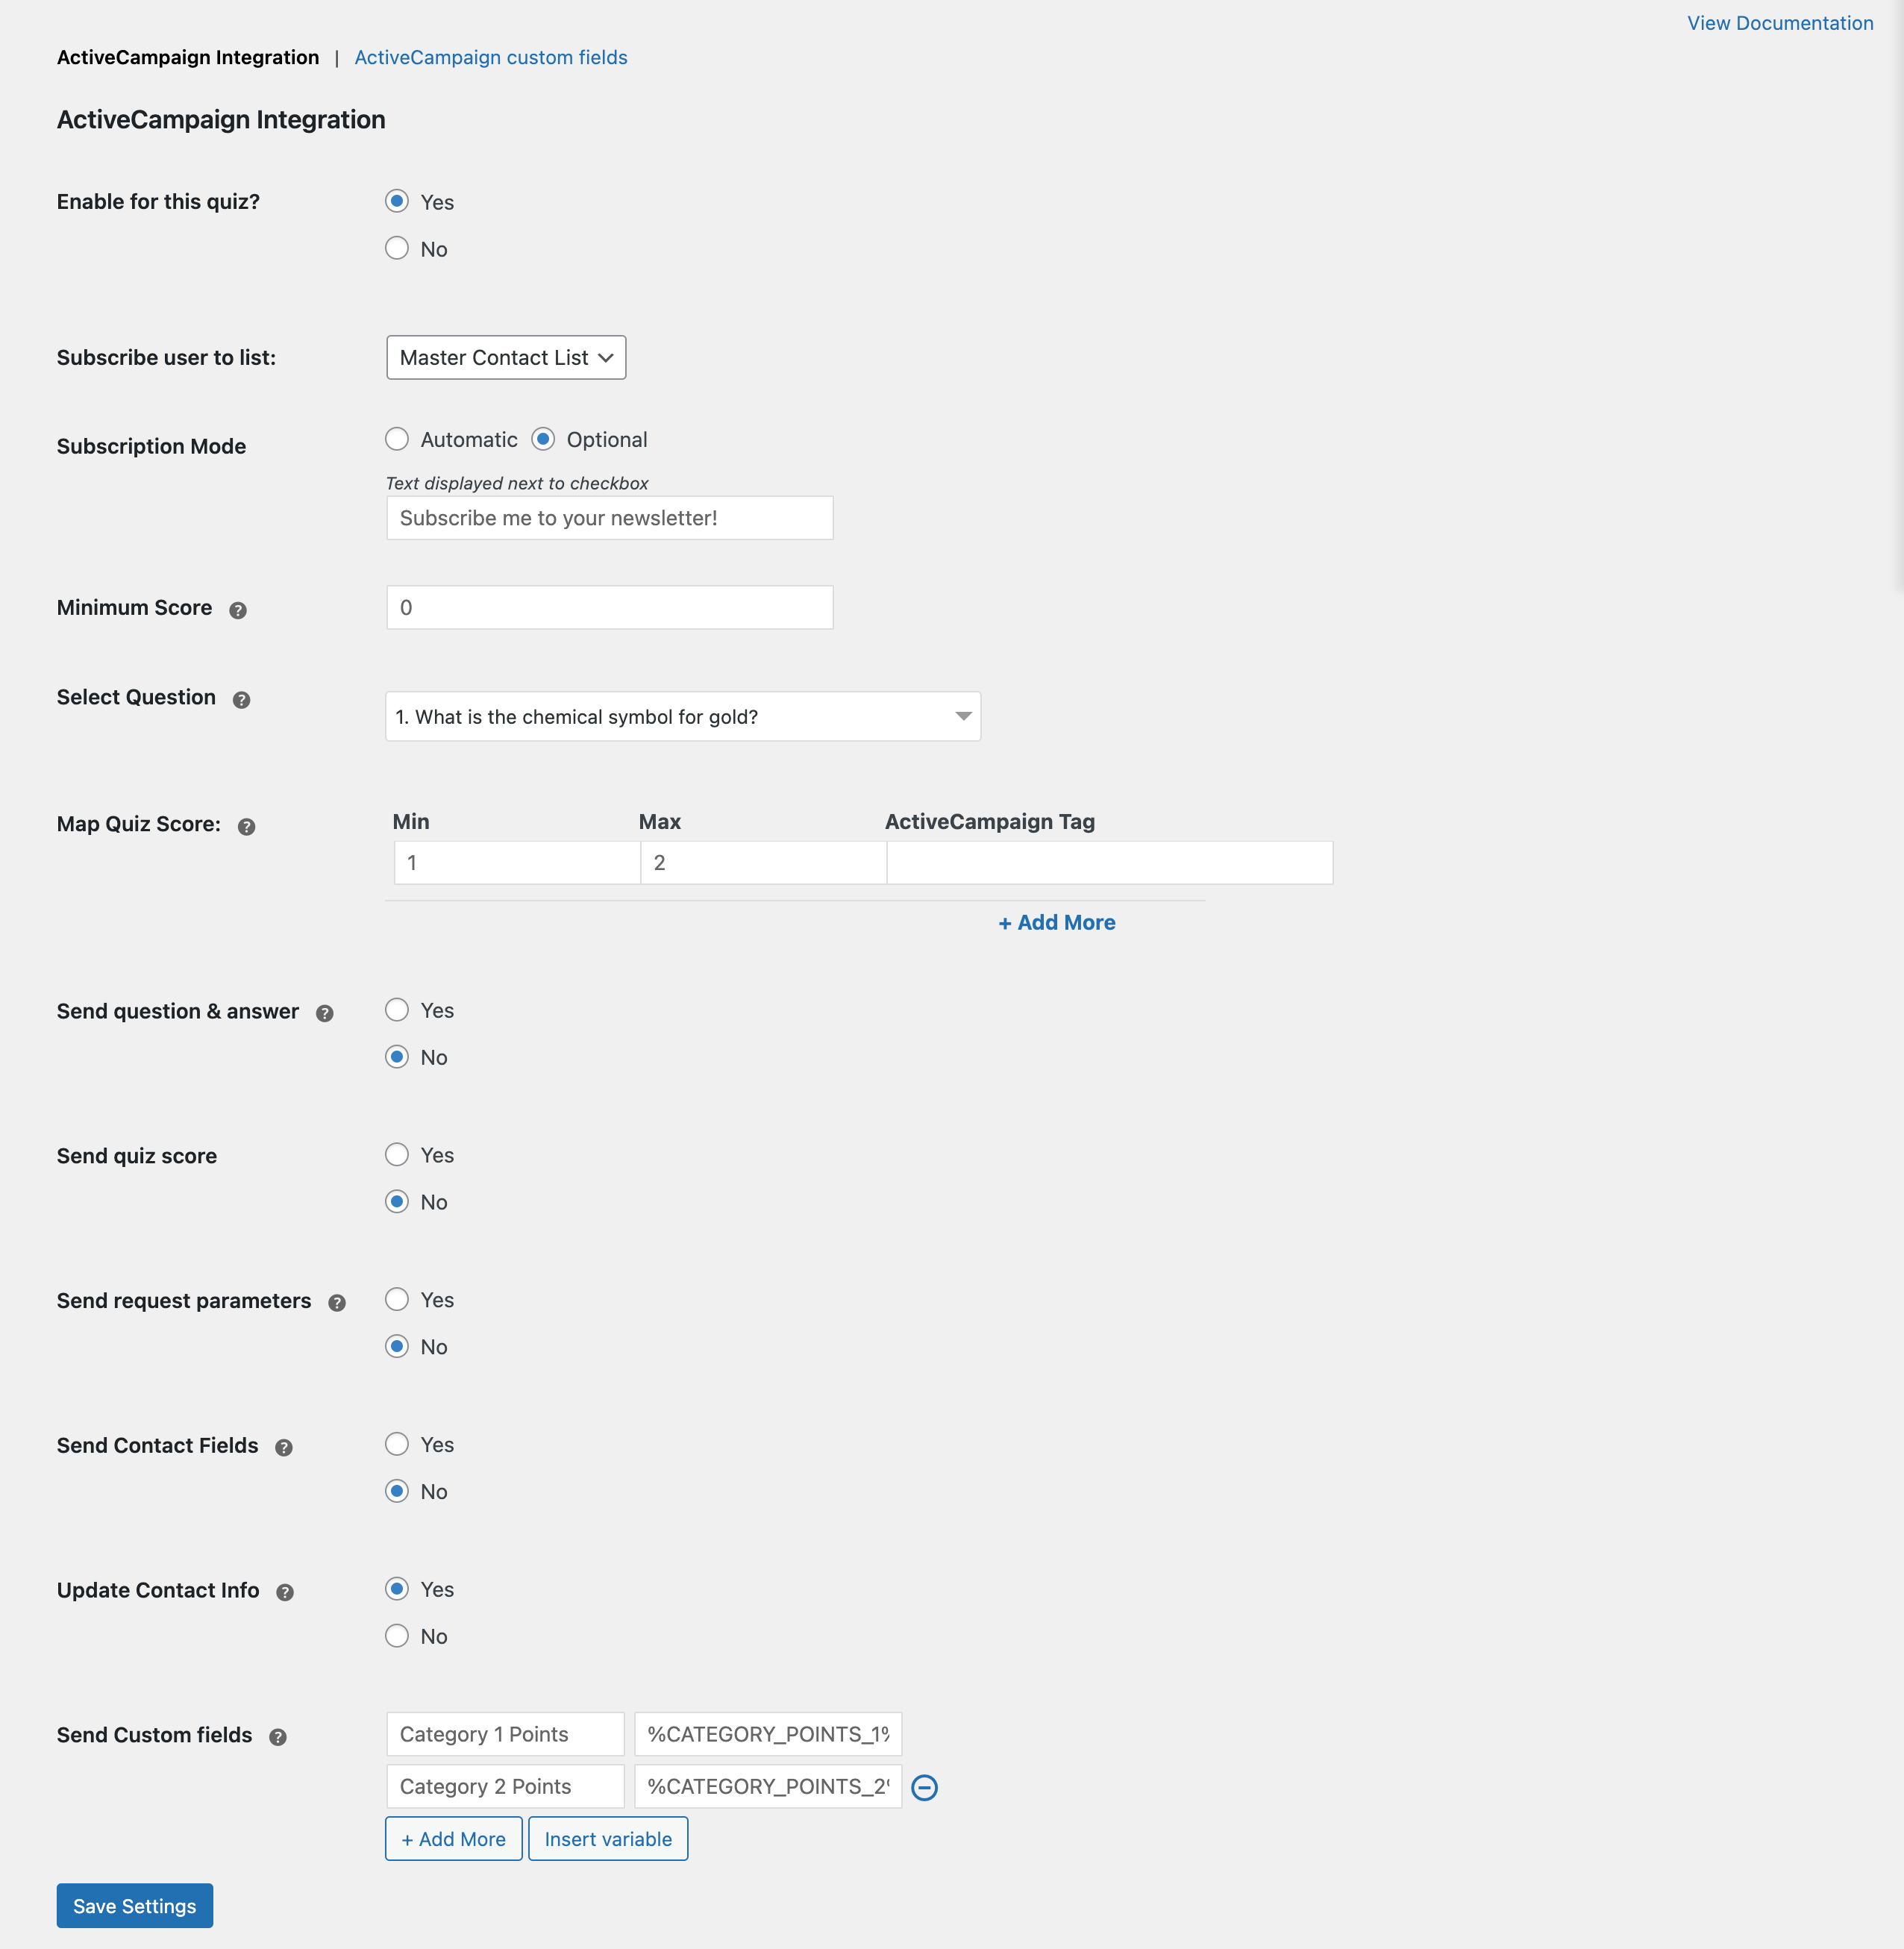
- Set “Enable for this quiz” to “Yes” to activate ActiveCampaign integration for the quiz.
- Use the “Subscribe user to list” option to select the email list where user emails will be added.
- In the “Subscription Mode” setting:
- Select “Automatic” to subscribe users automatically to the email list.
- Select “Optional” to display a checkbox for manual opt-in. You can customize the checkbox text in the provided field.
- Use the “Minimum Score” option to define a threshold score. Users will only be subscribed if their quiz score meets or exceeds this value.
- The “Select Question” dropdown lets you choose a quiz question to create unique tags for email contacts. Tags will be based on the user’s responses to the selected question.
Learn more about this feature in the Get all the answers as tags section below.
- Use the “Map Quiz Score” option to assign ActiveCampaign tags based on a defined range of quiz scores.
- Enable the “Send question and answer option” to send quiz questions and the user’s answers to ActiveCampaign.
- Enable “Send quiz score” to send the user’s total quiz score to ActiveCampaign.
- Enable “Send request parameters” to track and send URL (UTM) parameters passed with the quiz.
- The “Send Contact Fields” option enables you to send user-provided contact fields as tags to ActiveCampaign.
- By default, Update Contact Info is set to ‘Yes,’ allowing the system to update contact details. However, if you set it to ‘No,’ the system will not override the first name, last name, business, or phone details, even if you provide the updated contact details.
- The “Send Custom Fields” allows you to add custom fields and send any value associated with those fields to the ActiveCampaign.
For example, if you want to send the quiz’s individual category points, specify the name of the category and use the “Insert Variable” option to select %CATEGORY_POINTS_X%.
Get All the Answers as Tags
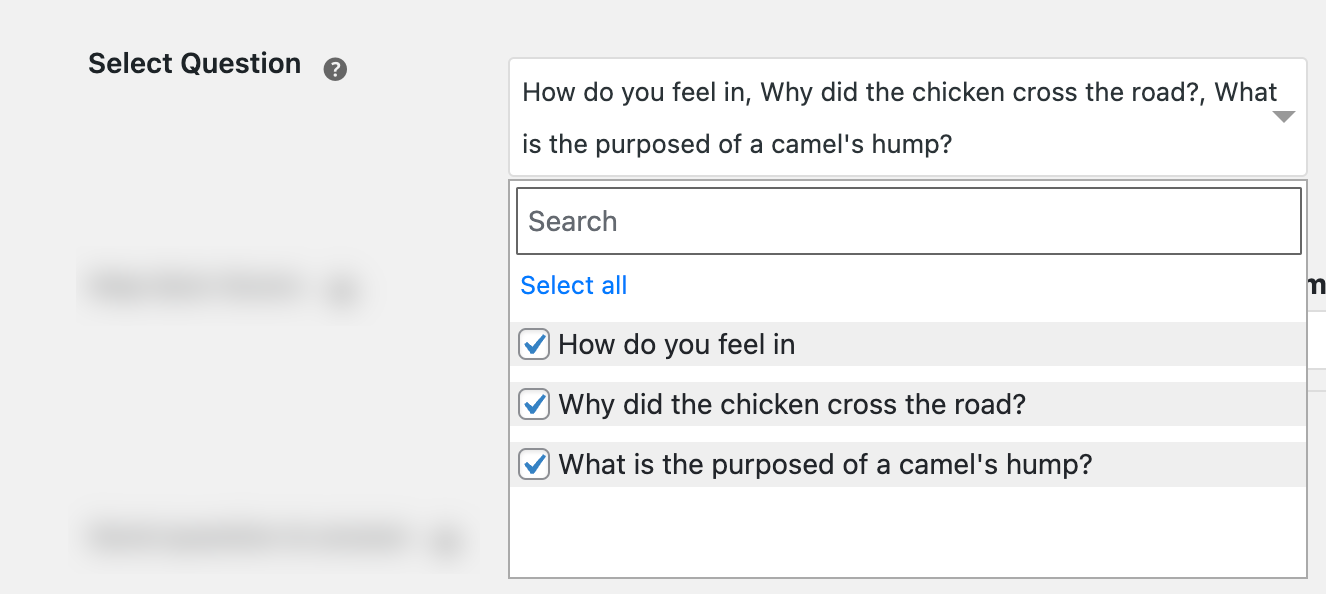
QSM Active Campaign Integration addon has this amazing feature to get all the answers submitted by the user as Active Campaign Tags.
To put this function to use, you first need to select the questions for which you want the tags to be generated. From the Active Campaign Addon go to “Select Questions” and select the required questions for the drop-down. Hit “Save Settings” to save your changes.
Once the user attempts the quiz and answers the questions, the submitted answers automatically get generated as tags in Active Campaign. You can verify this by navigating to your Active Campaign Account > Contacts > Individual Contact > Tags.
The length of the generated tags depends on the answers submitted by the user. If you have a question with a “short answer/paragraph” then the length of generated tags may increase as per the submitted answers.
Note: For this feature to work successfully, you must allow the user to check the Newsletter Subscription checkbox manually, and for that, you must set the Subscription Mode to “Optional” from the Active Campaign Integration settings.
Active Campaign Custom Fields
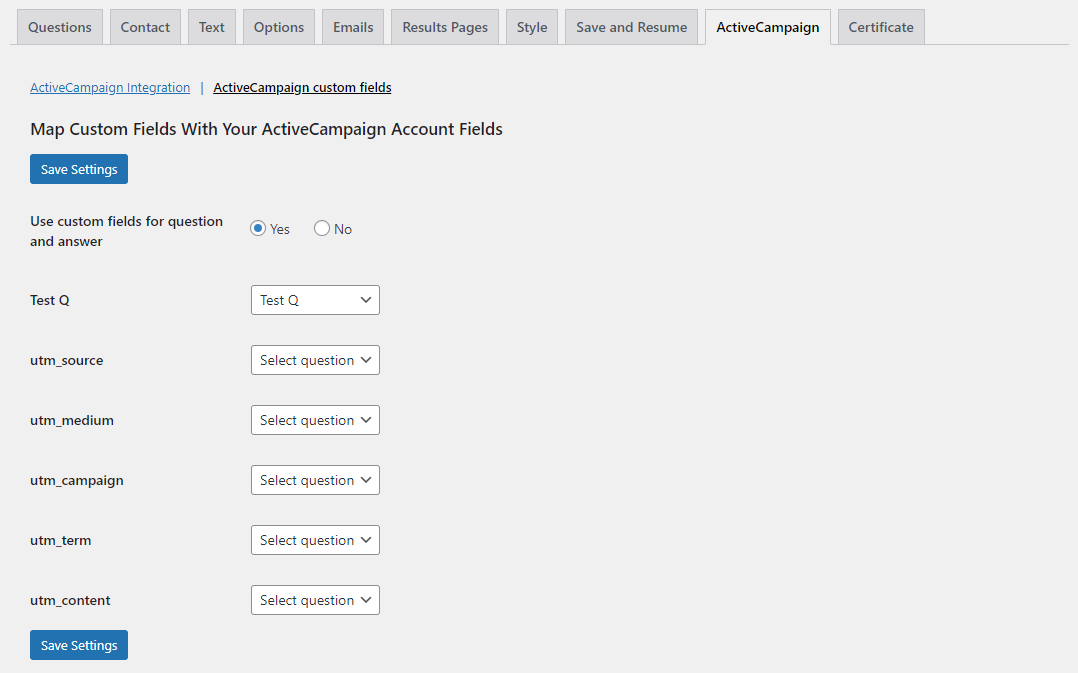
Active Campaign addon now lets you map custom fields with your ActiveCampaign Account fields via. the “Active Campaign Custom Fields” Tab.
To use this feature, you first need to enable the “Use custom fields for question and answer” option. After enabling this option you can now select any question from your quiz and pair them with the custom fields of your Active Campaign Subscription.
However, this requires you to first have a few custom fields created in your Active Campaign account. If you haven’t created then, from your Active Campaign account navigate to Contacts > Edit the Preferred Contact > Manage Fields > Add Field. Follow this document to create custom fields.
Once you are done creating custom fields, get back to the Active Campaign Addon. On the “Active Campaign Custom Fields” Tab you will see a list of all the custom fields and you can select the corresponding questions from the dropdown and associate it with each other.
Once you are done setting all the options, go ahead and hit the “Save Settings” button to save all the settings. Next, go to your Active Campaign account and view the collected user emails for that quiz.
Email Opt-in Status in Quiz Results
If you have enabled the Active Campaign subscription mode to Automatic or Manual opt-in then you can now see the user email subscription status inside the quiz results too.
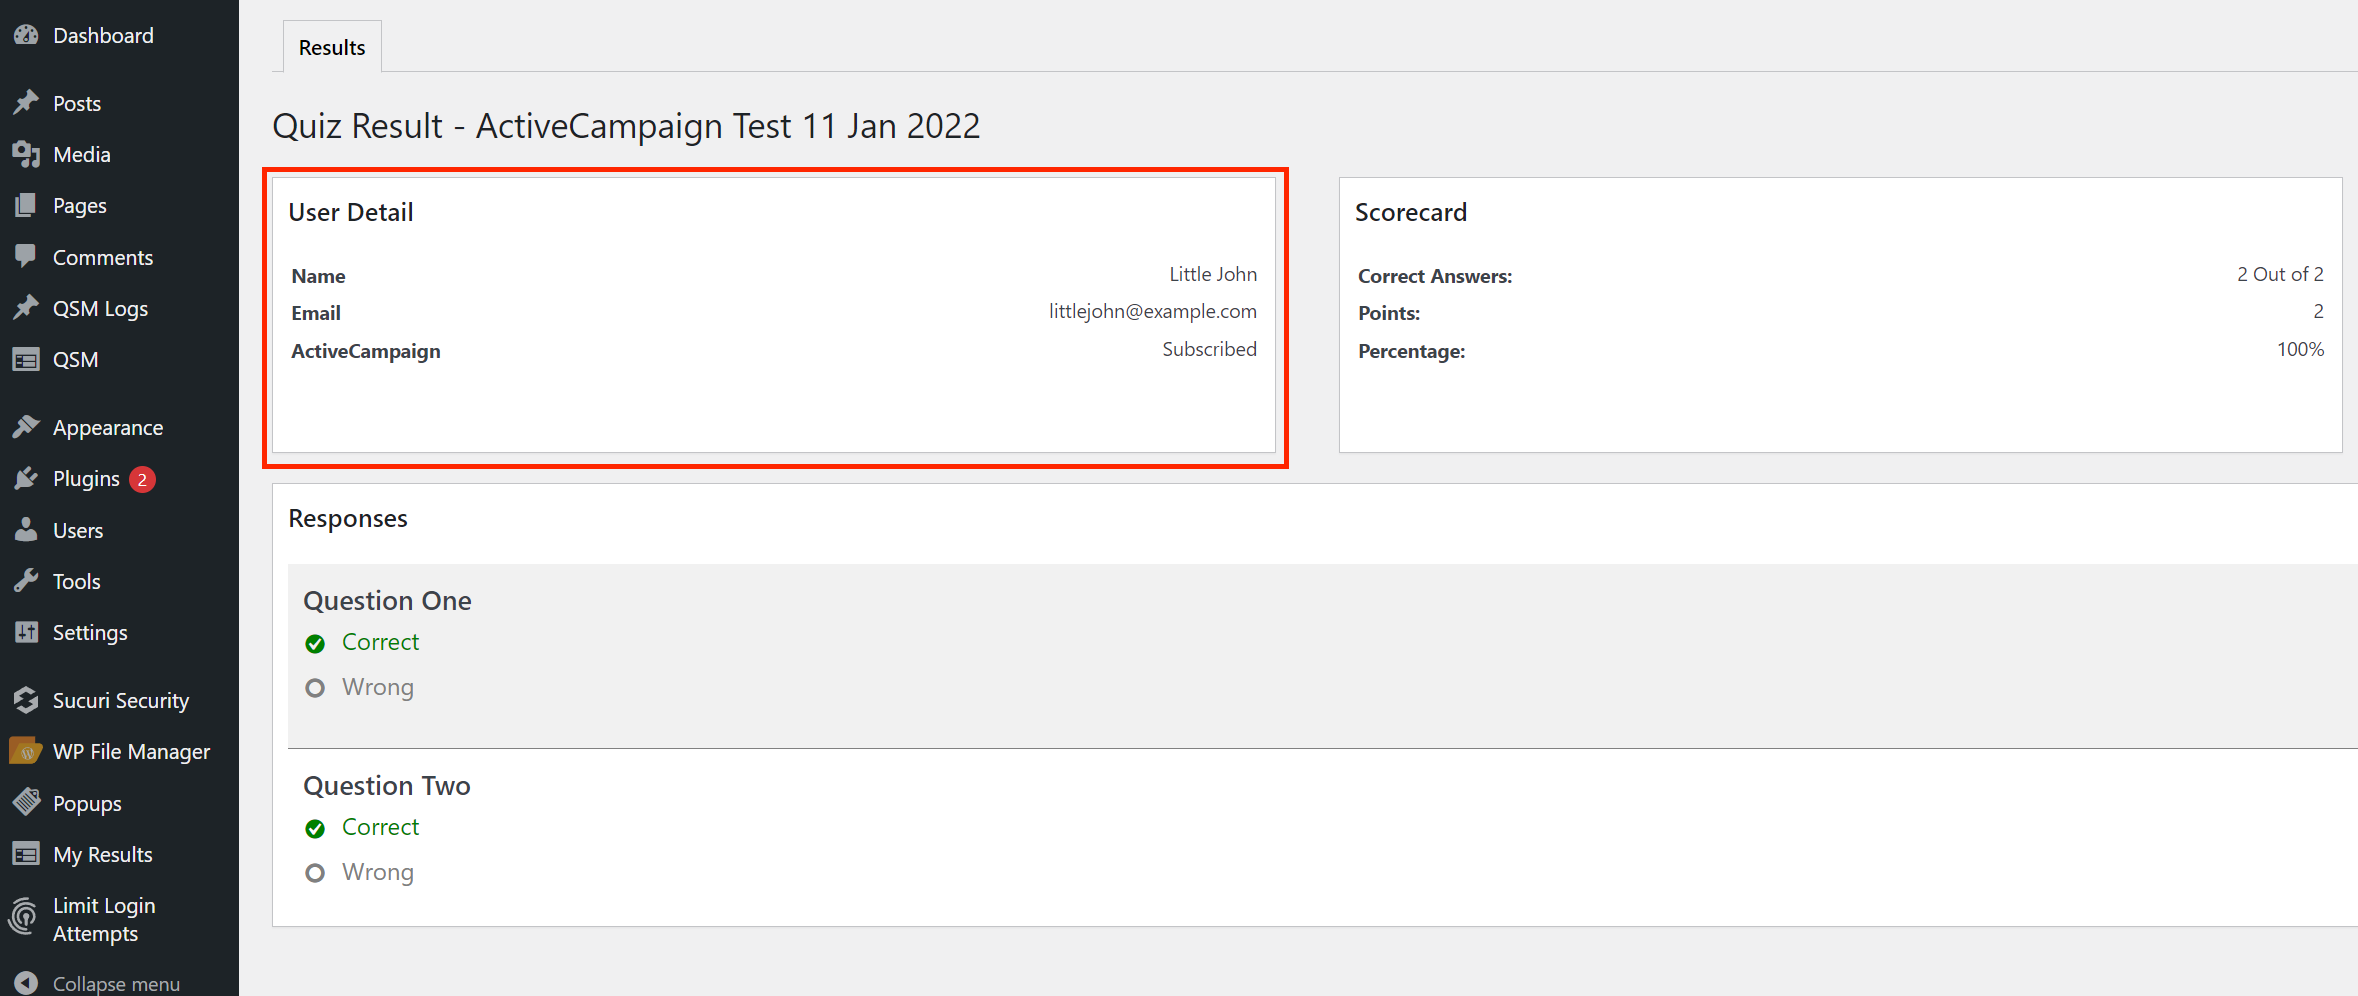
Once the user’s email is successfully added to the contact list. The text “ActiveCampaign Subscribed” will be visible inside the User Details section of the Results. This can be verified by navigating to QSM > Results > Quiz Results > User Details.
Note: This works in both the subscription methods Automatic and Manual.
If you have any trouble implementing the Active Campaign Integration Addon or have more questions about the process, please fill out a support ticket and our support guru will be able to help you.


