Integrate payment capabilities into your quizzes and surveys with our Payment Integration add-on. This add-on enables secure Stripe and PayPal transactions, allowing you to collect payments from users before they access your content.
Installation/Setup
Purchase the Add-on – Purchase the Payment Integration add-on from the QSM website. Upon completion, you’ll receive access to download the add-on as a zip file.
Upload to WordPress – Navigate to your WordPress dashboard, then go to Plugins > Add New > Upload Plugin. Select the downloaded zip file, install it, and activate the plugin.
Validate Your License – After activation, the add-on will appear in your Plugins page. To enable full functionality:
- Locate your license key in your QSM account on the website
- In WordPress, go to QSM > Extensions
- Click the “Settings” button for Payment Integration
- Select the “License” tab
- Enter and validate your license key
Once validated, you can begin setting up payment options for your quizzes and surveys.
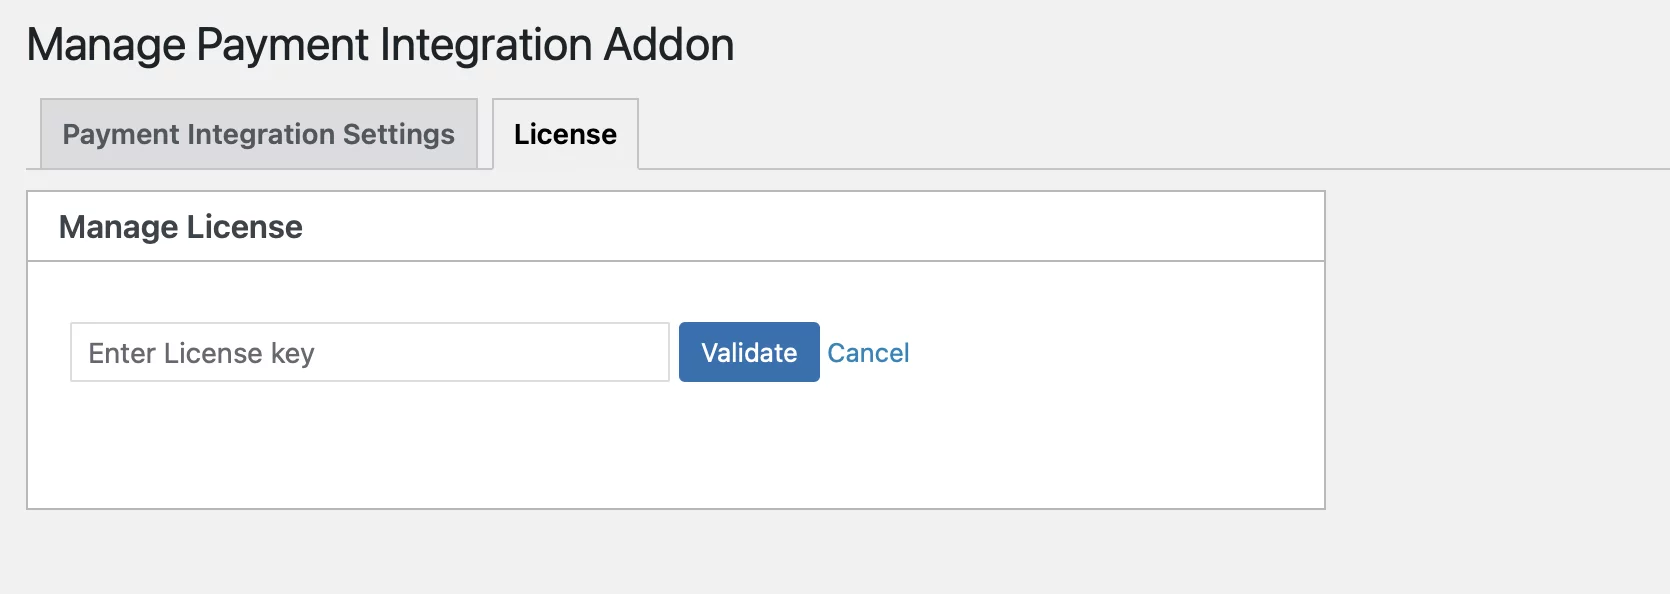
You can start configuring the addon by managing the Global Payment Integration Settings.
Global Payment Settings Page
Once the add-on is activated, you can first start setting up your payment modes with QSM. Navigate to the Payment Integration Settings, you’ll see the option opposite to the License tab.
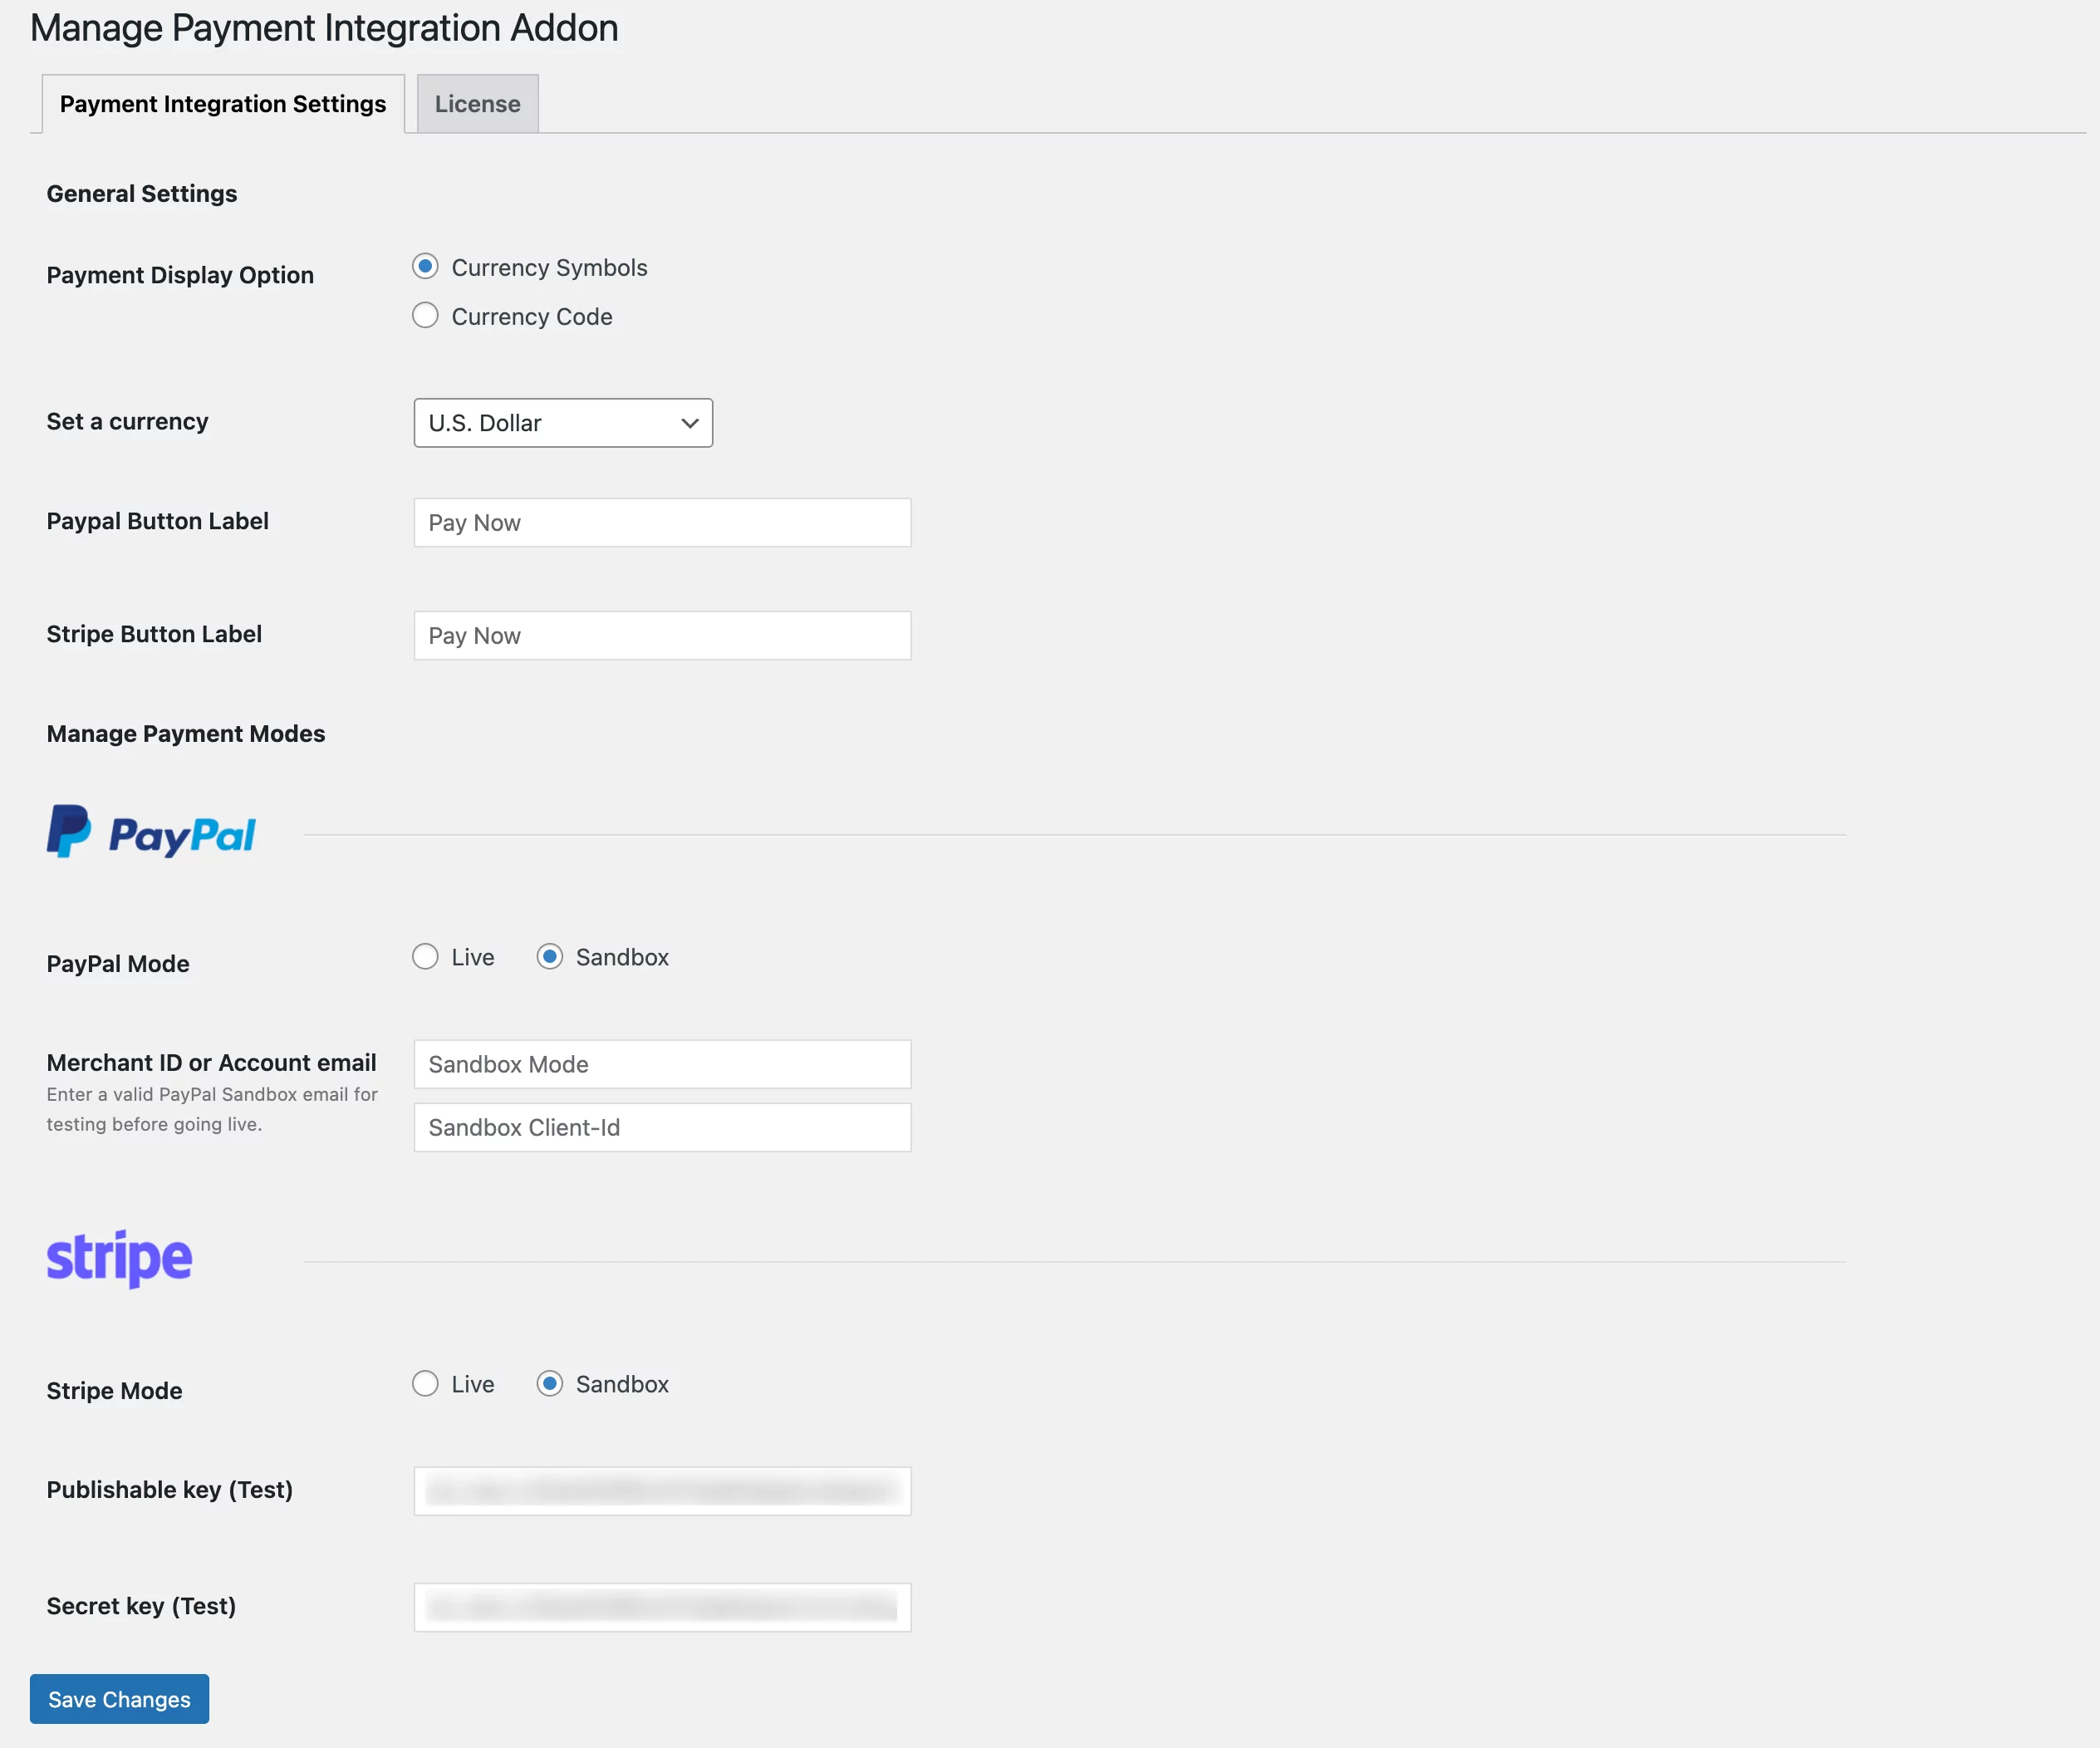
General Settings
Payment Display Options – Select how you want to display payment options to users: either using the Currency Symbol ($) or Currency Code (USD)
Set a currency – You can set a currency to make the payment in from the dropdown option.
PayPal Button Label – You can customize the PayPal button label name
Stripe Button Label – You can customize the Stripe button label name
Manage Payment Modes
Under this section, you’ll have two options for payment, you can set them accordingly –
PayPal
PayPal Mode: In this option, you can select the PayPal payment mode, either live mode or sandbox mode [if you are using the plugin for testing].
Merchant ID or Account Email: Enter a valid merchant ID or account email, as well as a client ID for authorization if you use a business email ID for the payment process.
If you are using a test site, then enter the Sandbox Account. This helps ensure that your PayPal account and settings are functioning correctly.
Stripe
Stripe Mode: In this option, you can select the Stripe payment mode, either live or sandbox mode.
- If sandbox mode is selected, the input fields for this mode will be – “Test Publish Key and Test Secret Key”
- However, if the live mode is enabled, the input fields will be for “Live Publish key” and “Live Secret key.”
You can get this information from your Stripe Dashboard.
- Go to your Stripe Dashboard and click “Get your test API keys”, which opens up with Test Publishable Key and Secret Key.
- Copy both the keys and paste them into the Addon text fields.
- Now, if your Stripe account is activated, you will get the Live API key and Secret key when clicking on the “Get your Live API Keys” dropdown.
- Again, copy both the keys and paste them into the Addon text fields.
Click on ‘Save Changes’ once you’ve set up the payment mode.
Payment Management Settings
Once the payment mode is set, you can manage the payment settings by following these steps:
- Navigate to a selected quiz from the Quizzes/Surveys tab,
- Click on the Add-ons tab, and select the “Payment” option.
From here, you can further manage the payment options
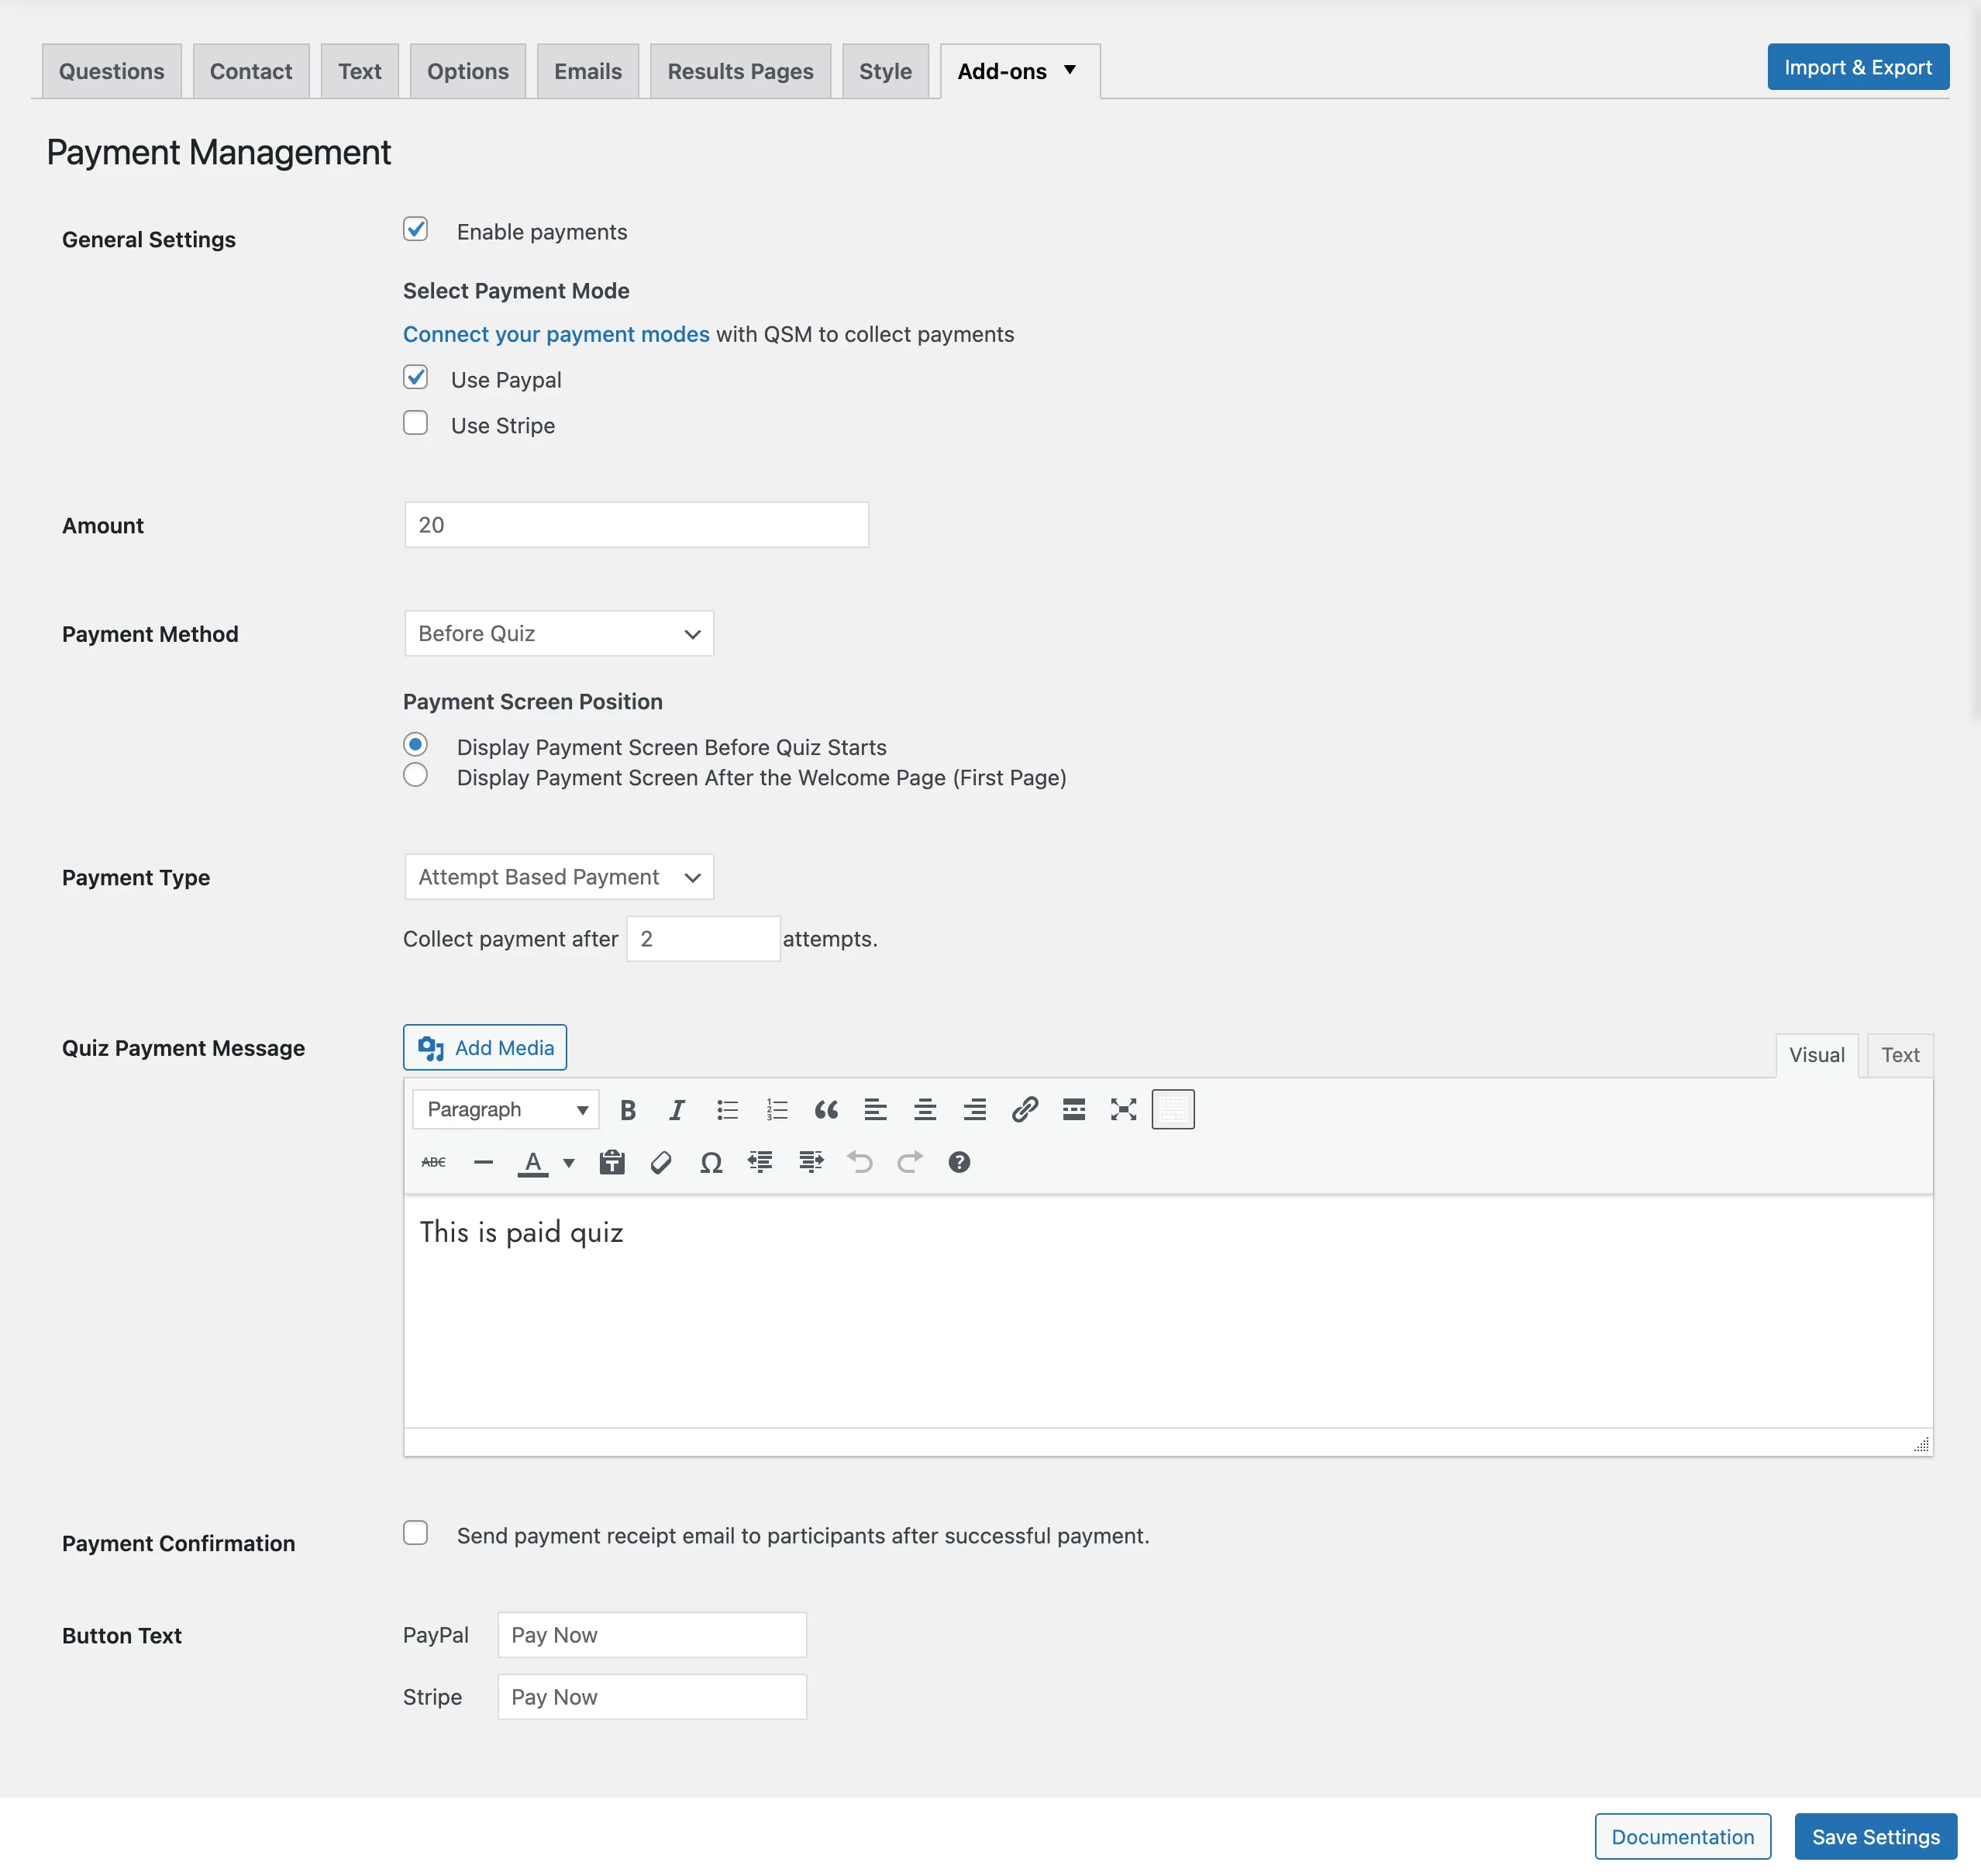
General Settings – To enable payments for a quiz or survey, check the “Enable Payments” checkbox.
In the “Select Payment Mode” section, choose the payment mode you configured in the Global payment settings. This will be the mode displayed on the payment form.
If you happen to enable both checkboxes, then the payment form will show both the PayPal and Stripe payment button options.
Note – If you want to go to the global settings payment page, then click on the “Connect Your Payment Modes” link.
Amount – Enter the amount you want to ask as payment from your users.
Payment Method – Choose when to collect the payment from the dropdown option, you get two options – either collect the payment “Before Quiz” or “After Quiz.”
If “Before Quiz” is selected, two radio options will be displayed:
- Display Payment Screen Before Quiz Starts: If this option is selected, the payment form will appear before the welcome page and only when the payment is complete will users be able to take the quiz.
- Display Payment Screen After the Welcome Page (First Page): If you select this option, the payment screen will be shown after the welcome message. Once the payment is completed, users can proceed to take the quiz.
If “After Quiz” is selected, two radio options will be displayed:
- Display Payment Screen Before Quiz Submission: If this option is selected, the payment screen will show before the quiz submission. Once the payment is completed, the quiz taker can submit the quiz.
- Display Payment Screen After the Quiz Submission (After Last Page): This option allows for collecting payment after the quiz submission. The quiz result page will not be shown if the payment is not completed.
Payment Type – Select how you want to collect the payment;
- One-Time Payment: If this option is selected, users only need to make a one-time payment to access the quiz anytime.
- Attempt-Based Payment: If this option is selected, an input box field appears to collect payment after a specified number of attempts. For example, if “2” is entered, the payment screen will appear after taking 2 attempts of the quiz.
Quiz Payment Message: Add a custom message in the WordPress text editor that will be shown in the payment form on the quiz page.
Payment Confirmation—Enable the checkbox to send the payment receipt email to the participants. If this checkbox is checked, a text editor will appear to customize the payment message.
Button text – You can customize the labels for the PayPal and Stripe payment buttons that will be shown in the payment form.
Manage Paid Quiz Bundles
You can sell multiple quizzes as bundles, allowing users to purchase and access related quizzes in a single transaction.
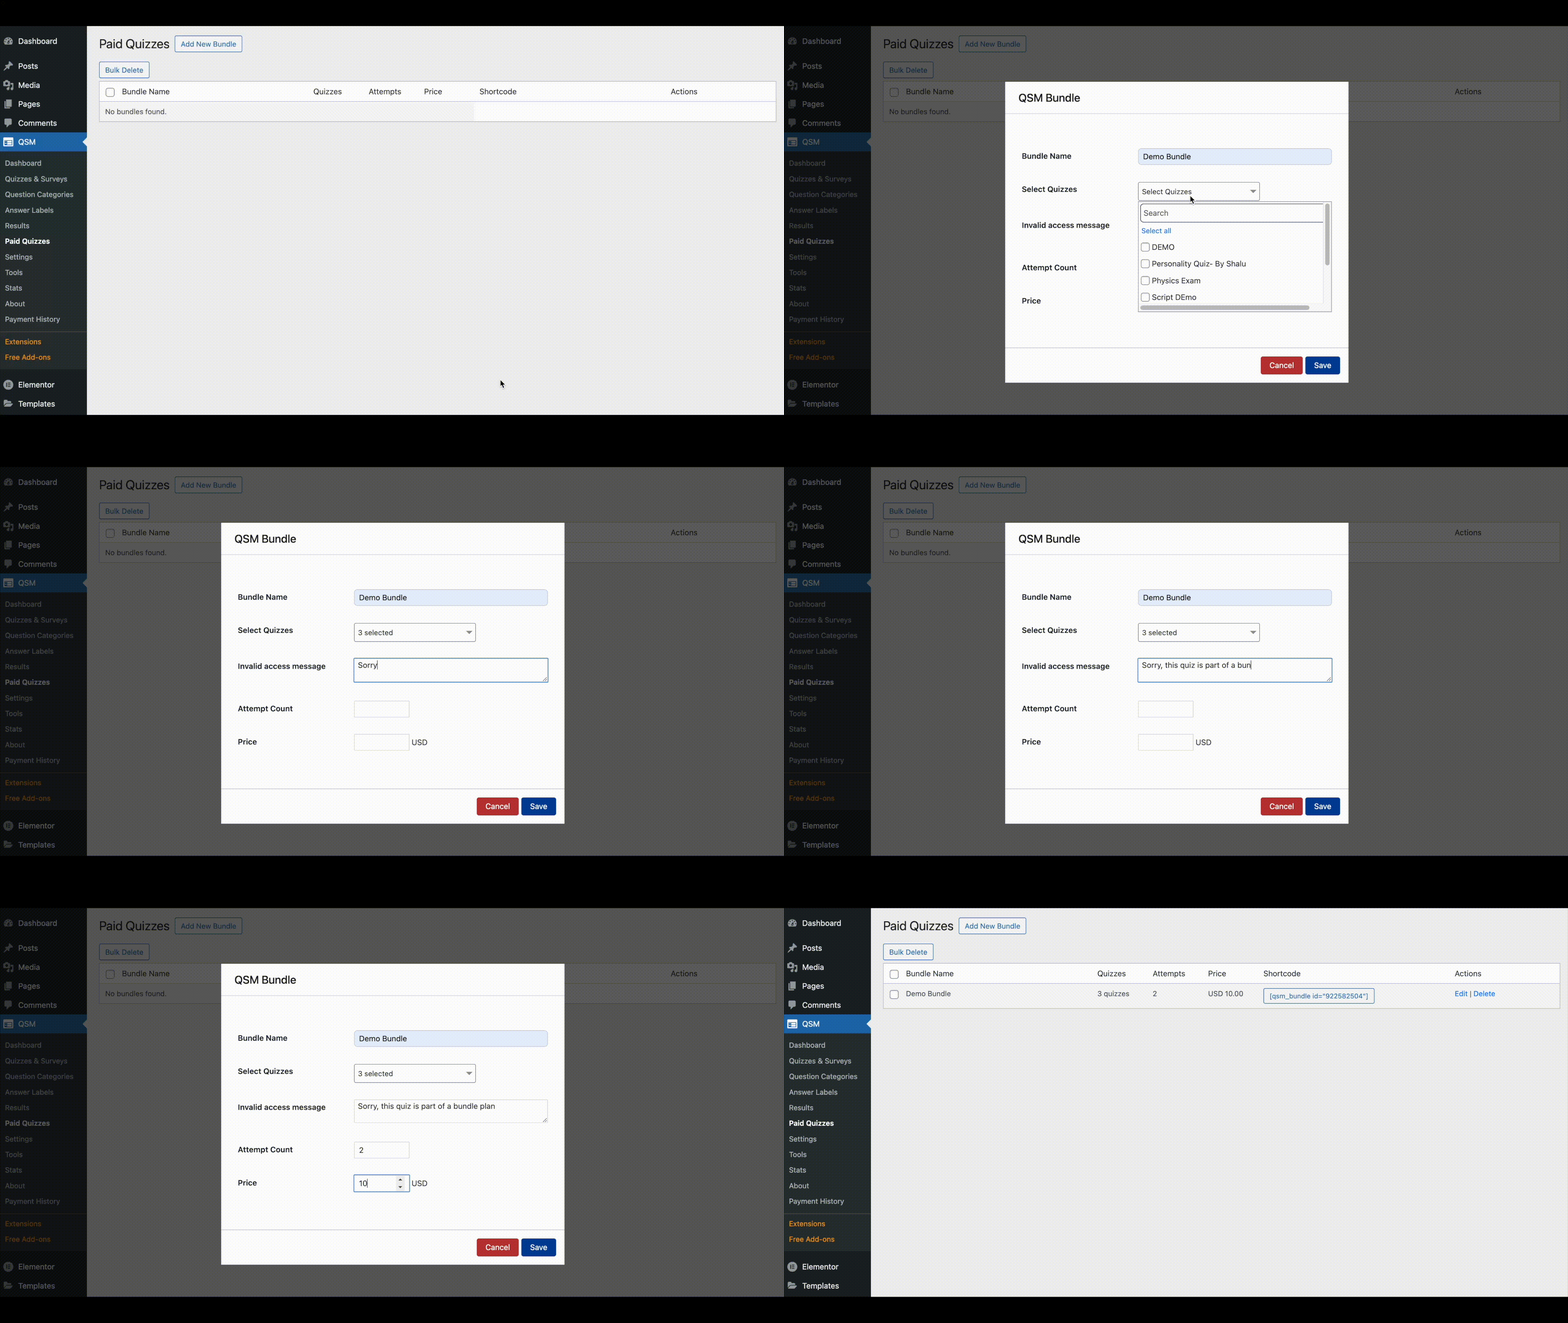
To create and manage quiz bundles:
- Go to the Paid Quizzes Page – Navigate to the QSM menu and open the Paid Quizzes tab.
- Create a New Bundle – Click on the Add New Bundle button to start setting up your quiz package.
- Enter Bundle Details – Provide a bundle name, select the quizzes to include, and enter an invalid access message. This message will be shown to the user if they try to access any individual quiz from a quiz bundle. Then, set the attempt count and define the bundle price.
- Save the Bundle – Once saved, the bundle details will be displayed, allowing you to edit or delete it as needed.
Shortcodes for Bundle Purchase
Each quiz bundle comes with a unique shortcode, displayed in the bundle details section. Click on it to copy and use it on any page or post. Example:
[qsm_bundle id=”818979687″]
This shortcode is mandatory for displaying the bundle purchase button on your site.
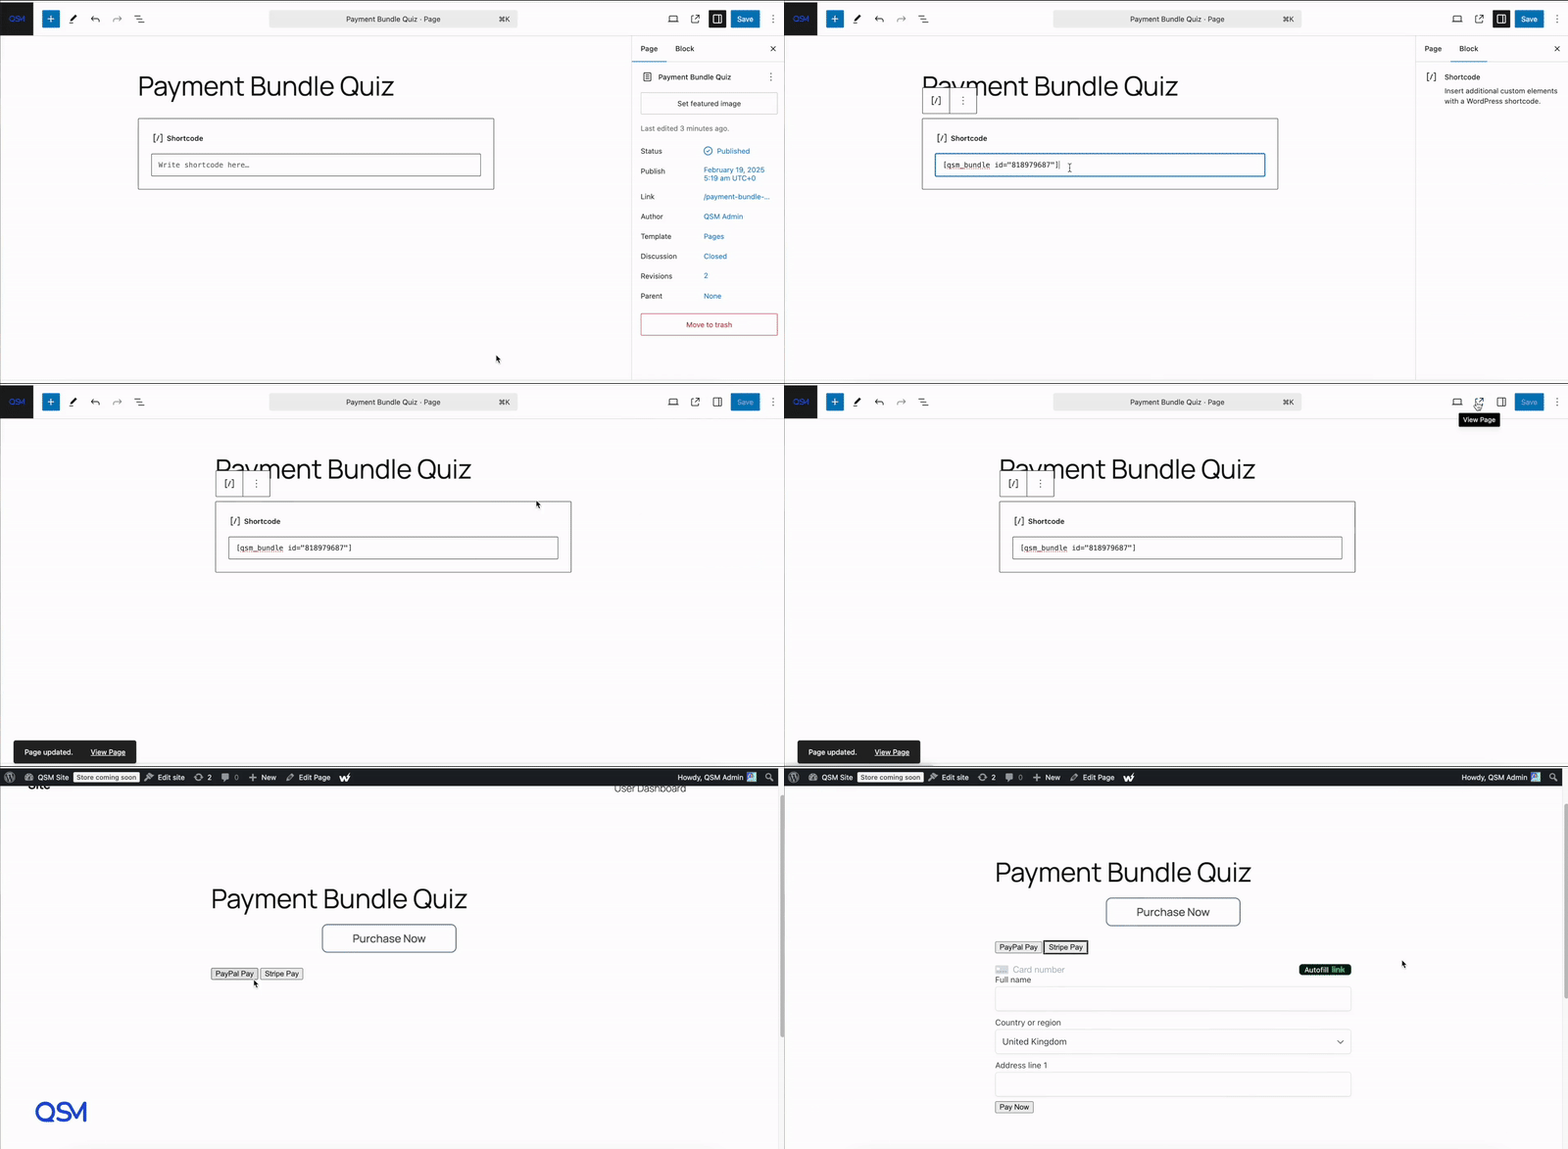
Along with the “qsm_bundle id” shortcode, there are additional parameters that can be included and customized according to your requirements, however, they are optional to use.
Below is the overall shortcode for purchase and purchase history
[qsm_bundle id=’1965737407′ redirect=’bundle-purchase-history’ purchase_text=’Purchase Now’ paypal_text=’PayPal Pay’ stripe_text=’Stripe Pay’]
Parameters:
- id: The unique bundle ID (mandatory).
- redirect: The page slug or ID where users are redirected after purchase.
- purchase_text: This parameter is used to set custom text for the purchase button.
- paypal_text: The parameter sets the custom text for the PayPal payment button.
- stripe_text: The parameter sets the custom text for the Stripe payment button.
Tracking Payment History Using Shortcode
To track all your user payment transactions, navigate to the Payment History tab from the QSM menu. Under the Transactions section, you’ll find a complete list of all purchases made by participants.
If you want participants to view their own purchase history, use the shortcode anywhere on a page or a post:
[qsm_bundle_purchase_history]
This shortcode should be used with the [qsm_bundle id] shortcode by setting it as the redirect parameter.
This ensures that users are automatically directed to their purchase history page after completing a purchase, making it easy to track their transactions and access all the quizzes in bundles
Logging Manual Payment Transaction
Paypal and Stripe Payment Integration Addon also have a feature to Add Missing Payment Transactions Manually.
Consider this scenario: A customer completes a payment through PayPal or Stripe, and the amount is successfully deducted from their account with a valid transaction ID. However, the customer does not gain access to the quiz.
In such cases, the quiz admin can manually log a payment transaction from the “Add a Transaction” tab inside the QSM’s Payment History Menu.
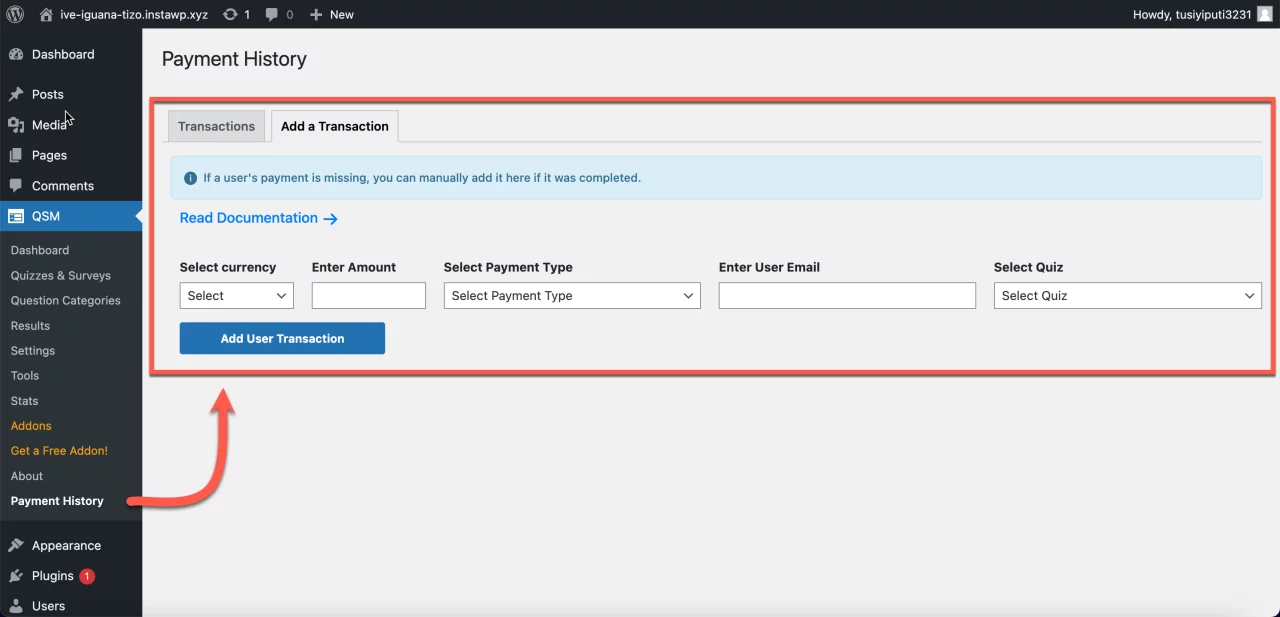
Select the appropriate currency Currency, Enter the Amount, Select Payment Type, Enter the user Email & select the Quiz, and hit the “Add User Transaction” button. This manually adds a missing transaction and the user can enjoy taking the quiz.


