The QSM Ultimate Add-On enhances quiz and survey functionality with advanced customization and user-friendly features. It allows you to improve participant engagement through real-time progress tracking, quiz retake customization, email signups, and interactive polls.
It also offers advanced role-based access control, enabling administrators to assign permissions for editing, publishing, and managing quizzes at both individual and global levels. Designed for users who require greater flexibility and control, the QSM Ultimate Add-On brings a new level of precision to quiz and survey management.
Installation and Setup
To install the QSM Ultimate Add-On, begin by downloading the plugin file from your QSM account after purchase. Once you have the zip file on your device, navigate to Plugins > Add New. From there, upload the downloaded zip file, click Install Now, and once the installation is complete, press Activate to enable the add-on on your site.
After activation, you need to enter the license key to fully activate the plugin. Go to Extensions > Installed Add-ons, then navigate to the Ultimate Add-on settings. Enter the license key that was provided with your purchase, which you can copy from your QSM account.
Installing via QSM Addon Installer
If you use the QSM Bundle Plan, installing the Ultimate Add-On becomes even easier with the QSM Add-on Installer. First, download the QSM Addon Installer from the QSM website and upload it to your WordPress site. After activation, go to the Extensions tab > Add-on Installer and enter your bundle plan license key. Then, from the “All Add-Ons” section, locate the Ultimate Add-On and install it to set up instantly.
For a more detailed guide on installing add-ons, refer to the Installation of Add-ons section
Set up Ultimate Add-On Features
Once activation is complete, you can start by configuring and using individual features offered by the add-on.
Note: The add-on organizes its features into different sections within QSM, with each setting placed in the most relevant tab.
1. Add Answers in Bulk
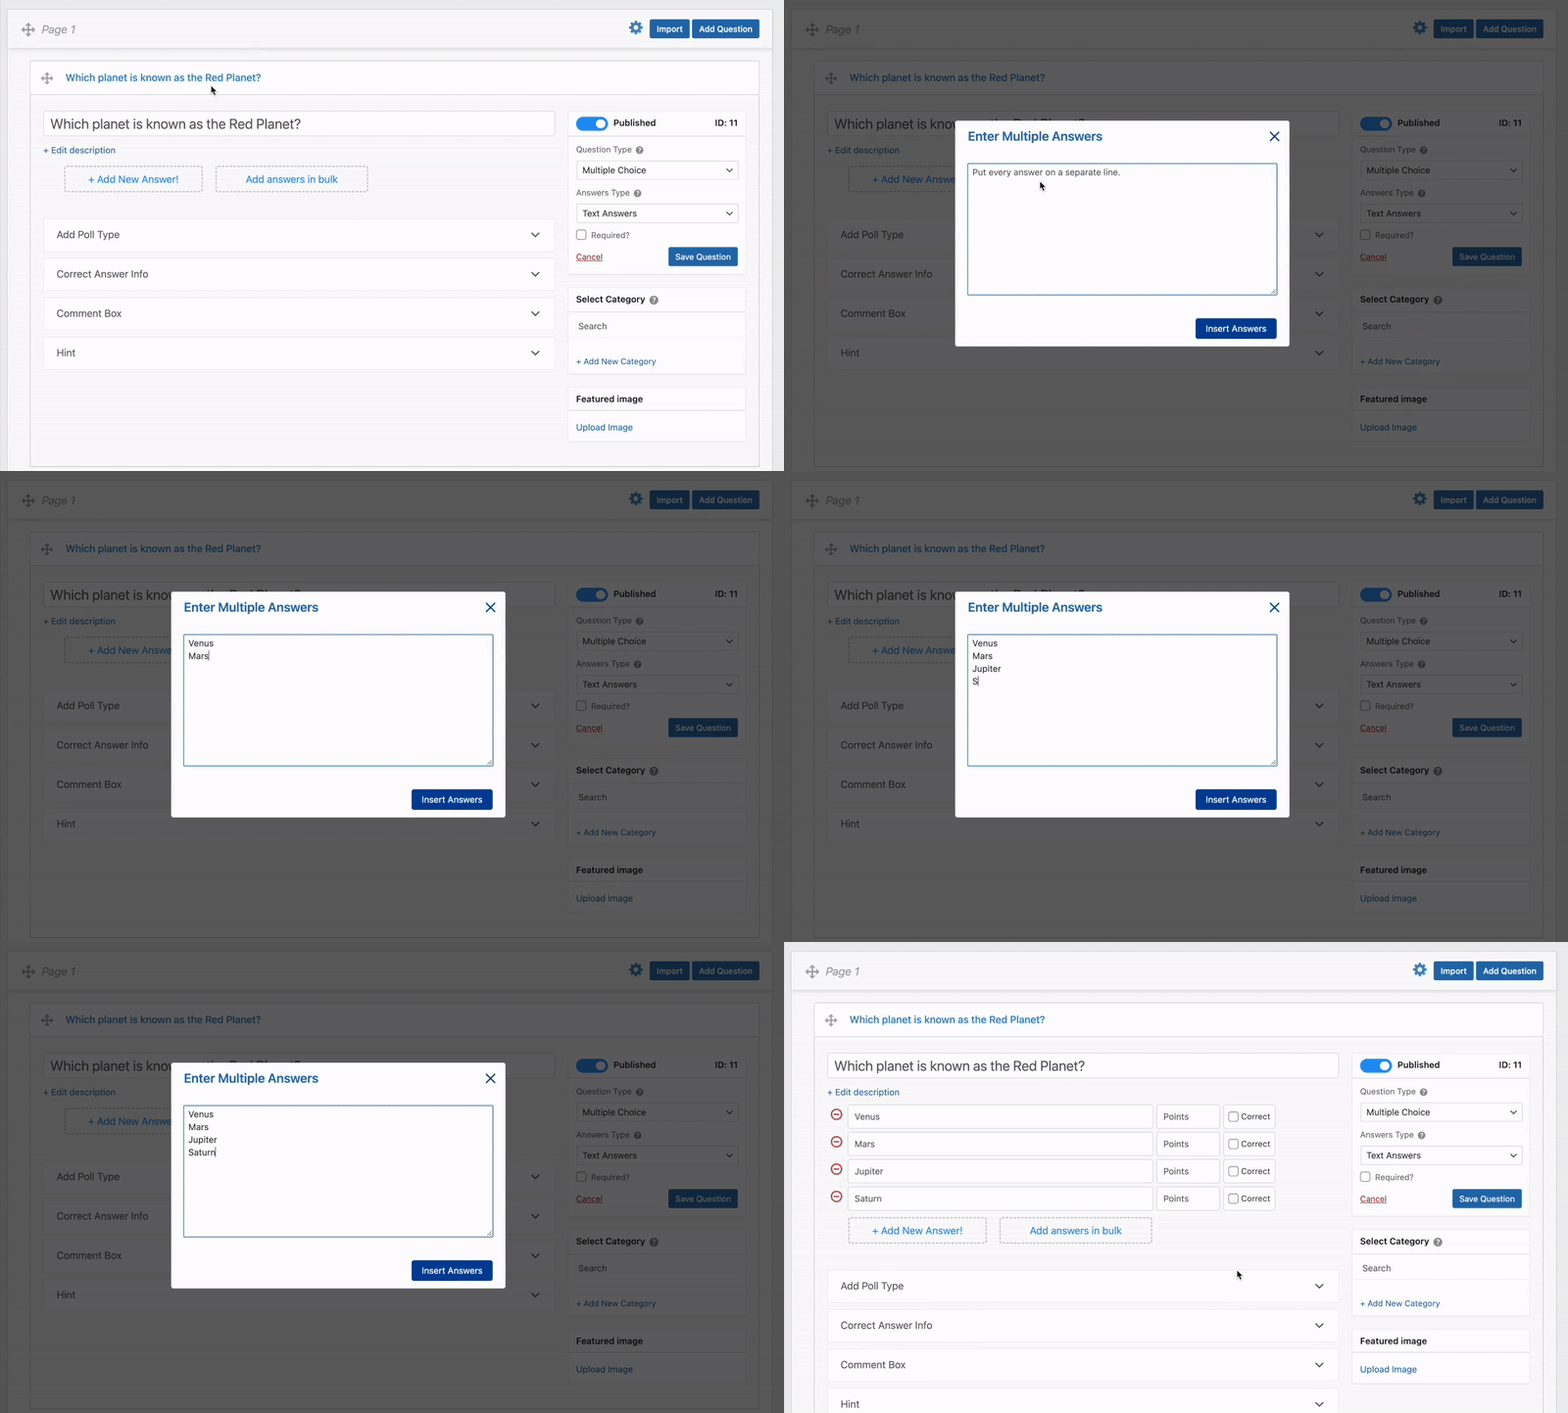
The Add Answers in Bulk feature allows you to quickly add multiple answer choices instead of entering them one by one.
To use this feature, go to the “Questions” tab, add a question, and click the “Add answers in bulk” option in the answer section.
In the “Enter Multiple Answers” pop-up box, type in your answer options, separating each in a new line.
Click the “Insert Answers,” button and your options will appear as entered.
2. Input Custom Answers in Multiple Choice
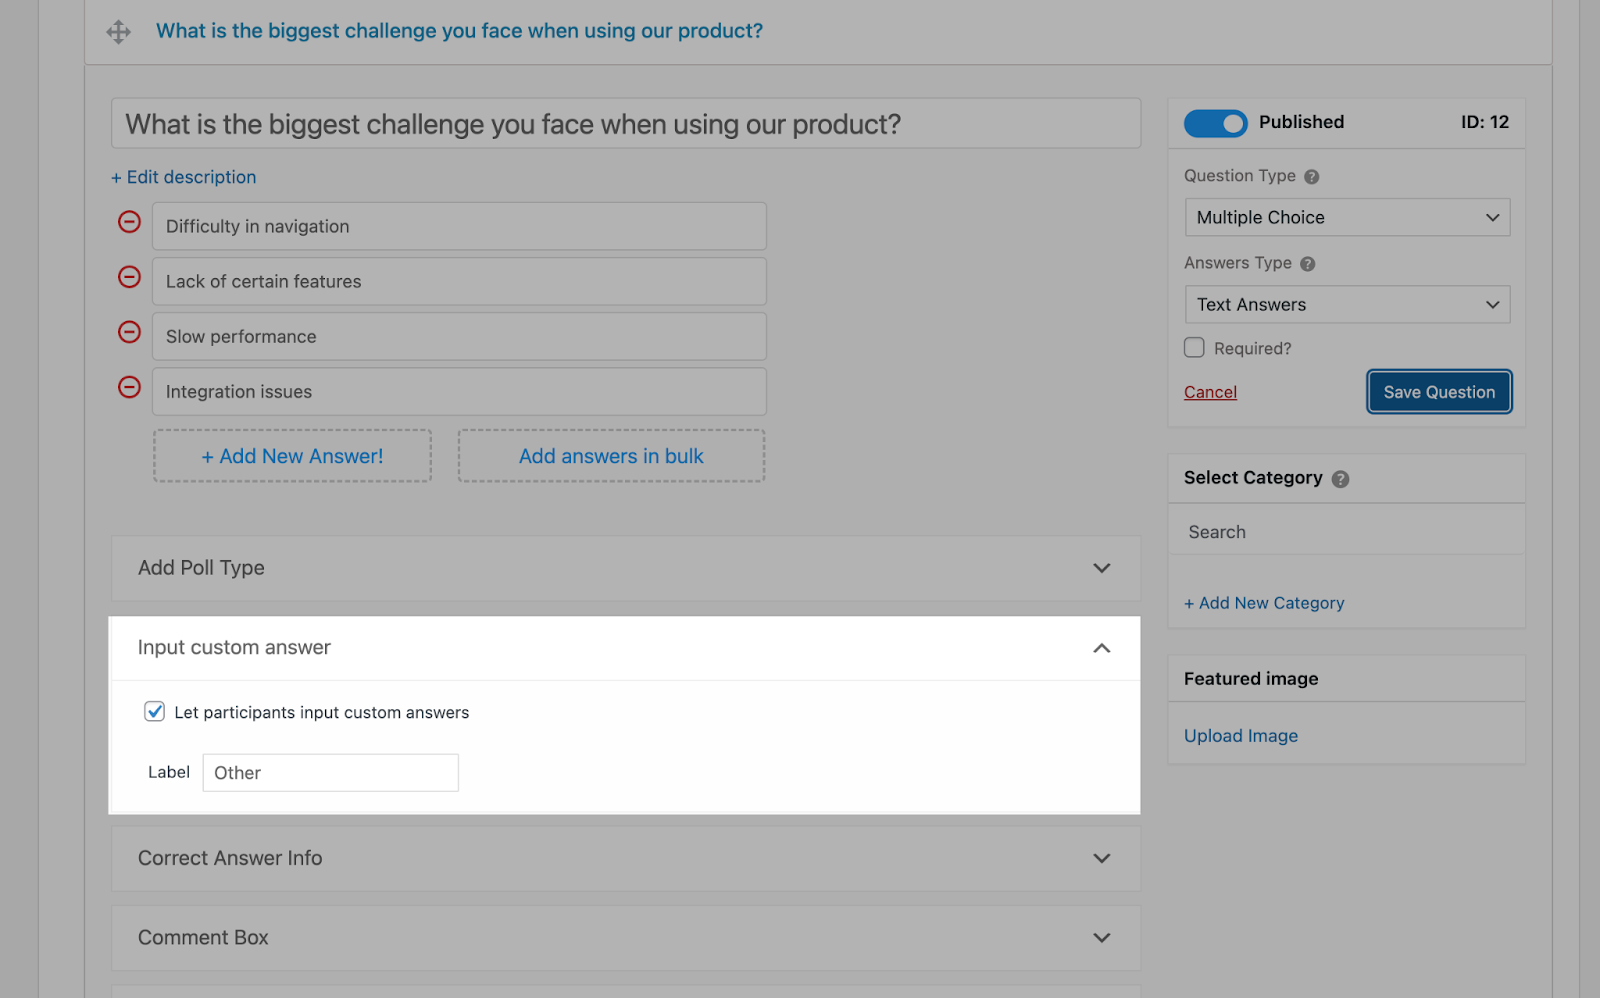
The Input Custom Answer feature allows participants to enter their own responses when none of the multiple-choice options apply.
- To set it up, in the Questions tab, add a Multiple Choice question and its answer options.
- Click on Input Custom Answer and enable Let Participants Input Custom Answers.
- Enter a label for the option, such as “Other” or “Enter Your Response”.
When participants select this option, a text box will appear for them to type their answer.
Note – The “input custom answer” feature is only available for Survey and Simple Form Type.
3. Add Poll Type in Questions
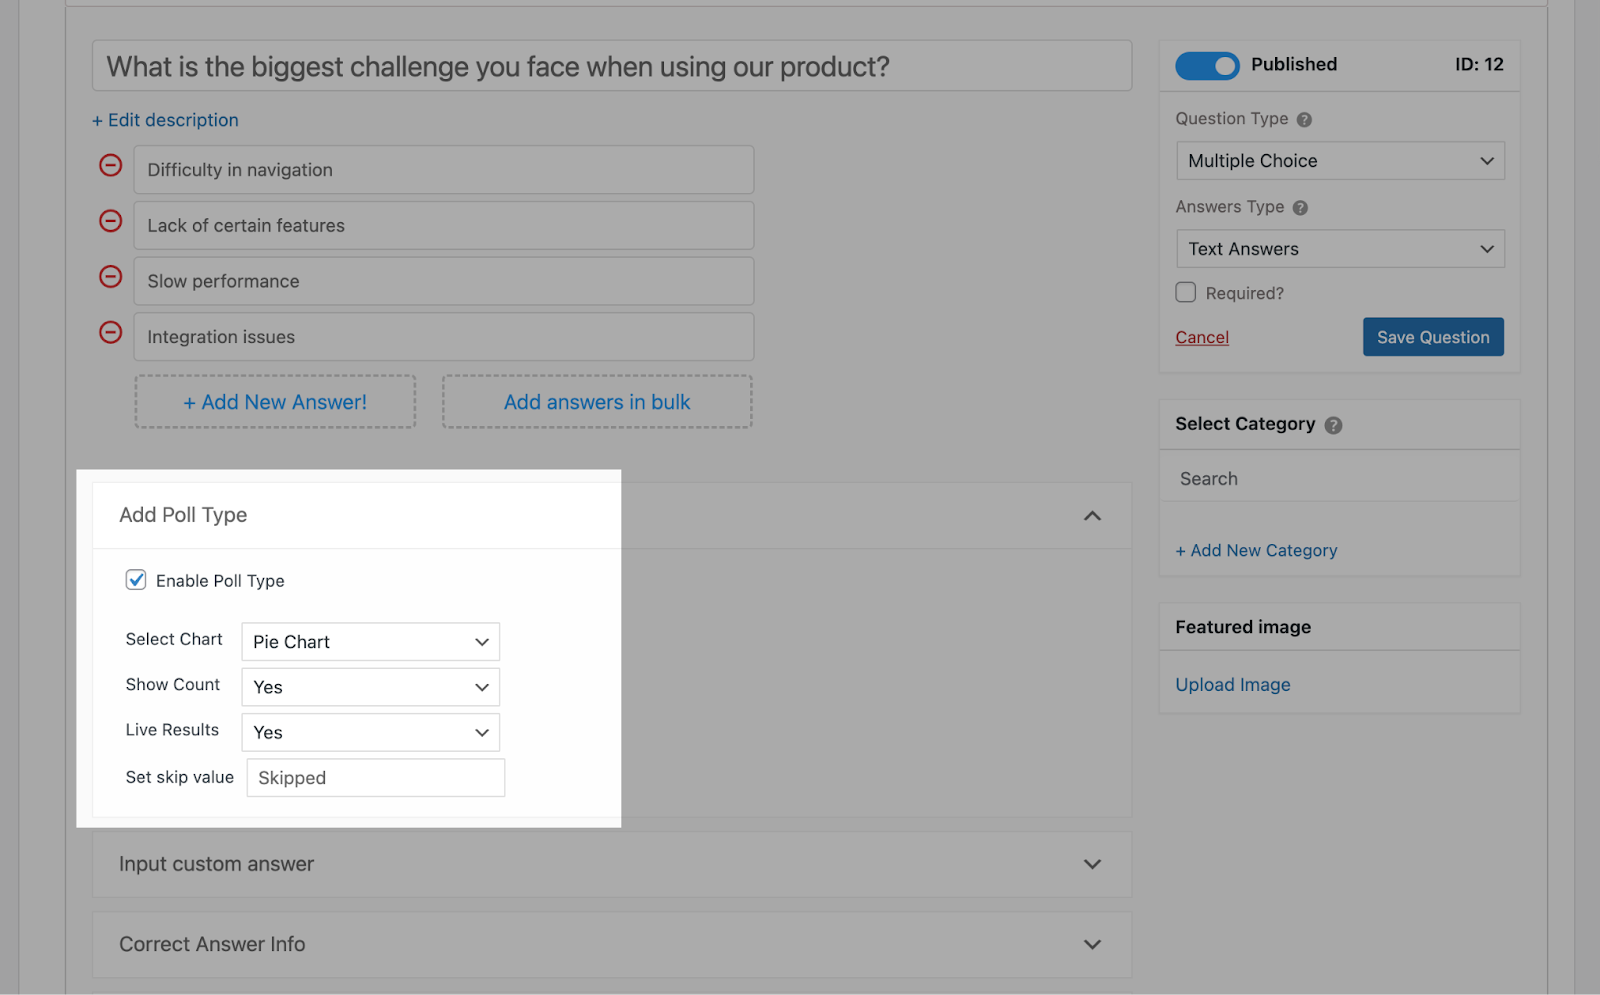
With this feature, participants can see how others have answered each question through polls, and their final results will include a graphical analysis.
To enable this feature, navigate to the Questions tab and open a question. Within the question field, enable the “Add Poll Type” option.
Once enabled, you will see the Select Chart option, where you can choose to display the poll results as either a bar graph or a pie chart.
Additionally, you can configure the following settings:
- Show Count – Display or hide the number of responses.
- Present Live Results – Show real-time poll results as participants answer.
- Set Skip Value – Define how many participants skipped the question. You can also customize the label for skipped responses (e.g., “No Answer” or “Skipped”). If left blank, skipped values will not be displayed.
Note: This feature is only available for the following question types:
- Multiple Choice (Vertical & Horizontal)
- Multiple Response (Vertical & Horizontal)
- Polar Options
Next, in the Ultimate add-on’s “quiz settings,” you can choose to enable or disable the poll type feature to generate graphs.
4. Show Progress Bar Based on Questions Attempted
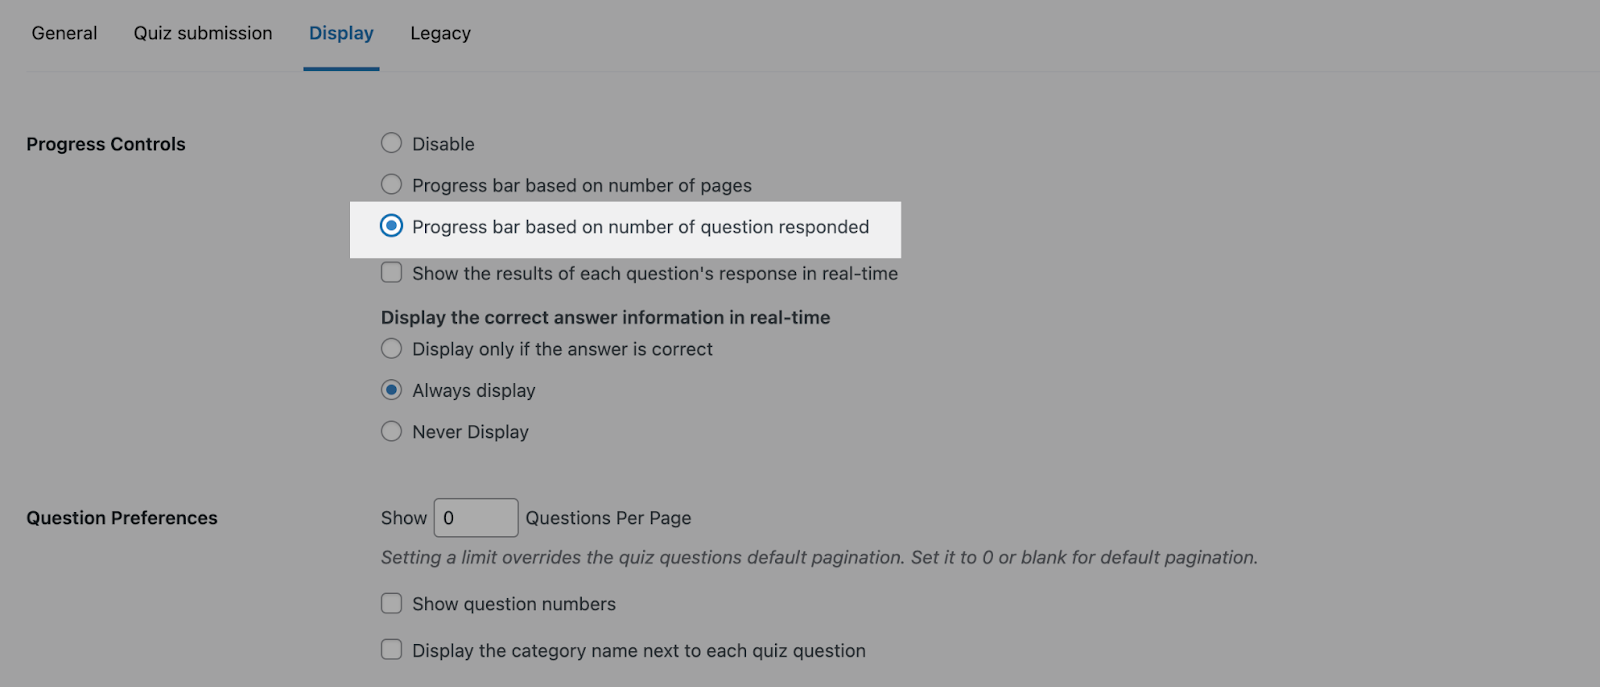
By default, QSM provides a progress bar based on the number of quiz pages. The Ultimate Add-On enhances this by offering a progress bar that updates with each answered question, giving participants a clearer view of their progress.
To enable this feature:
- Navigate to the Options tab and open the Display Settings section.
- Under Progress Controls, select Progress Bar Based on the Number of Questions Responded.
- The progress bar will now update in real time as participants answer each question.
This feature works for both single-page and multi-page quizzes, ensuring an improved user experience.
5. Show Results After Collecting Email
The QSM Ultimate Add-On allows you to collect participant email addresses before displaying or sending quiz results.
To set up this feature:
- Go to the Contact tab and create a contact form.
- In the Options section under the Contact tab, enable Use Shortcode (Interim).
- Copy the generated shortcode and customize the “Submit Contact” label if needed.
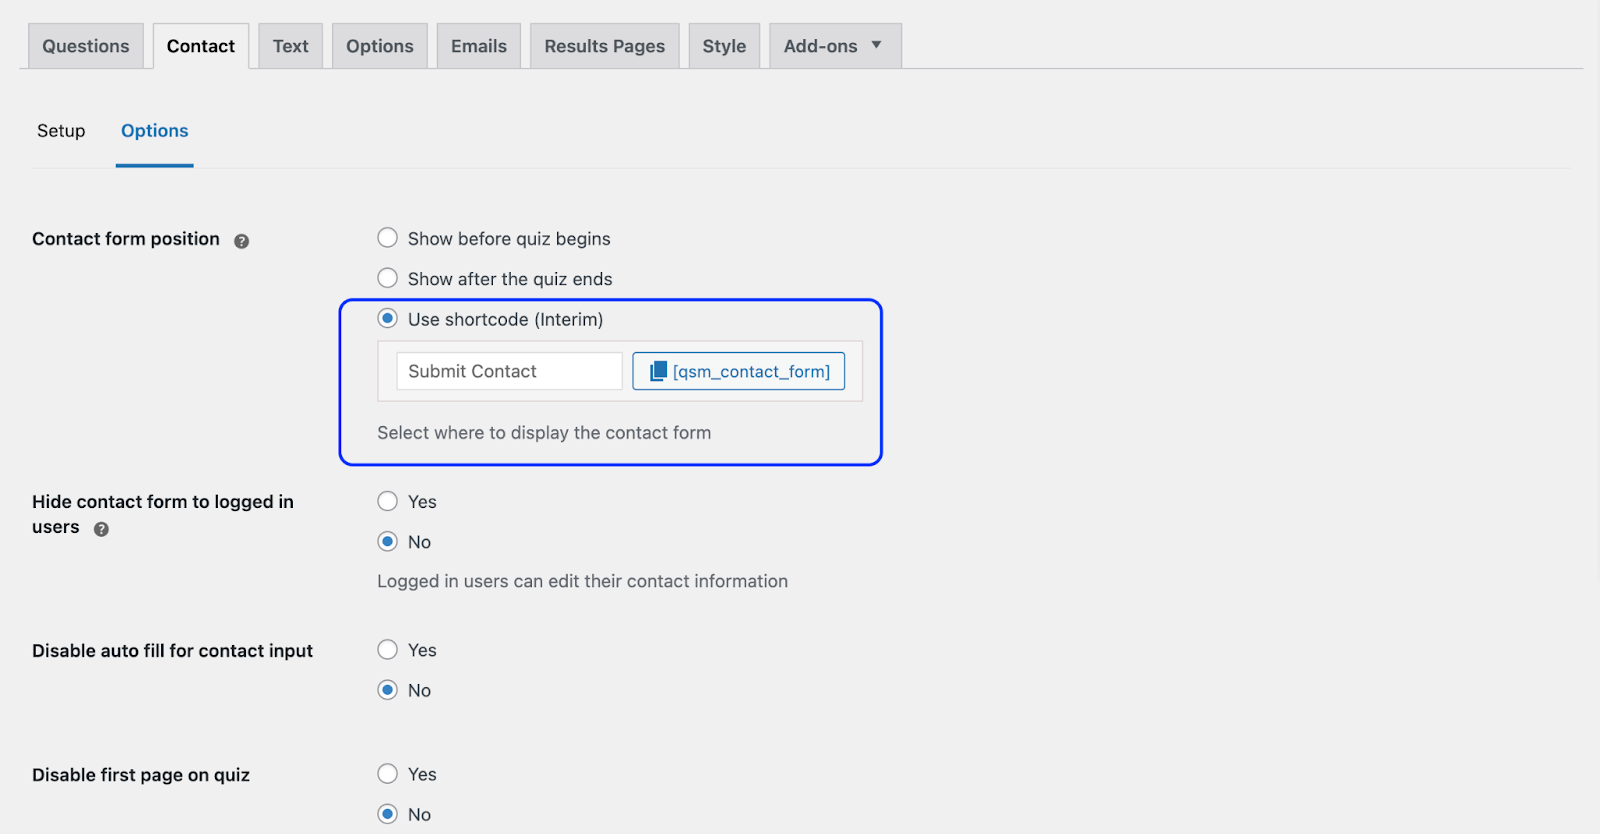
- Open the Results tab and paste the shortcode into the text editor.
- Click on the settings icon in the result box and check “Use as an Interim Result Page” to mark it as an interim results page.
- Navigate to the Email tab and set up an email template to send quiz results to participants.
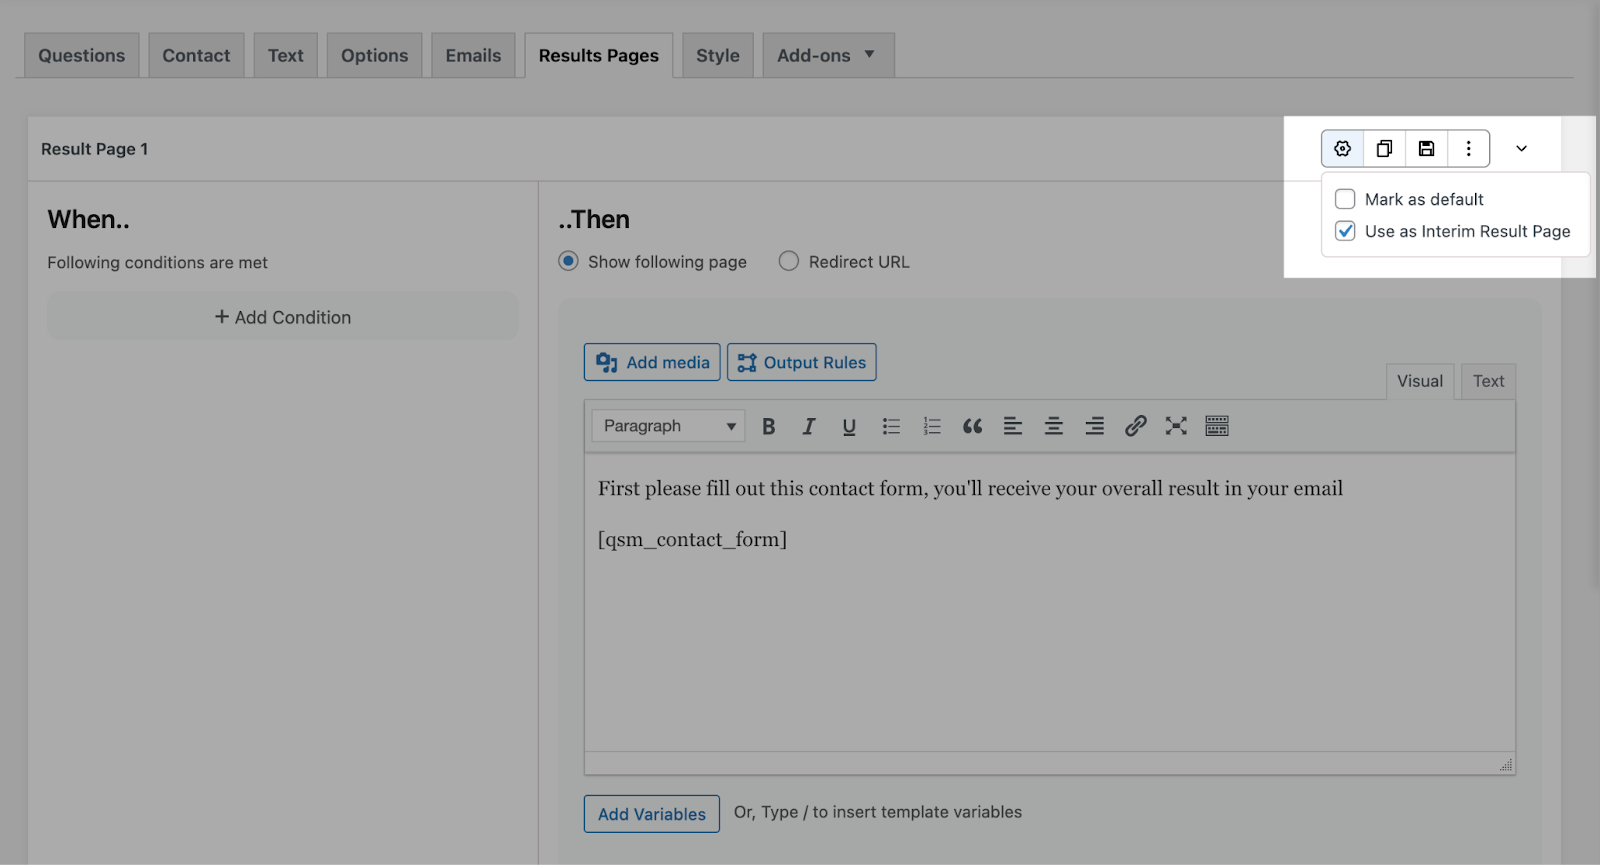
This feature helps collect and manage participant data efficiently while ensuring that your non-logged-in users receive their quiz results as well.
6. Add Confetti to Result Pages
To make your results more engaging, add confetti effects to your result pages.
- When creating a result template, click the settings icon on the right side of the result template section.
- Click Apply Confetti.
- Select a confetti effect from the dropdown of available options.
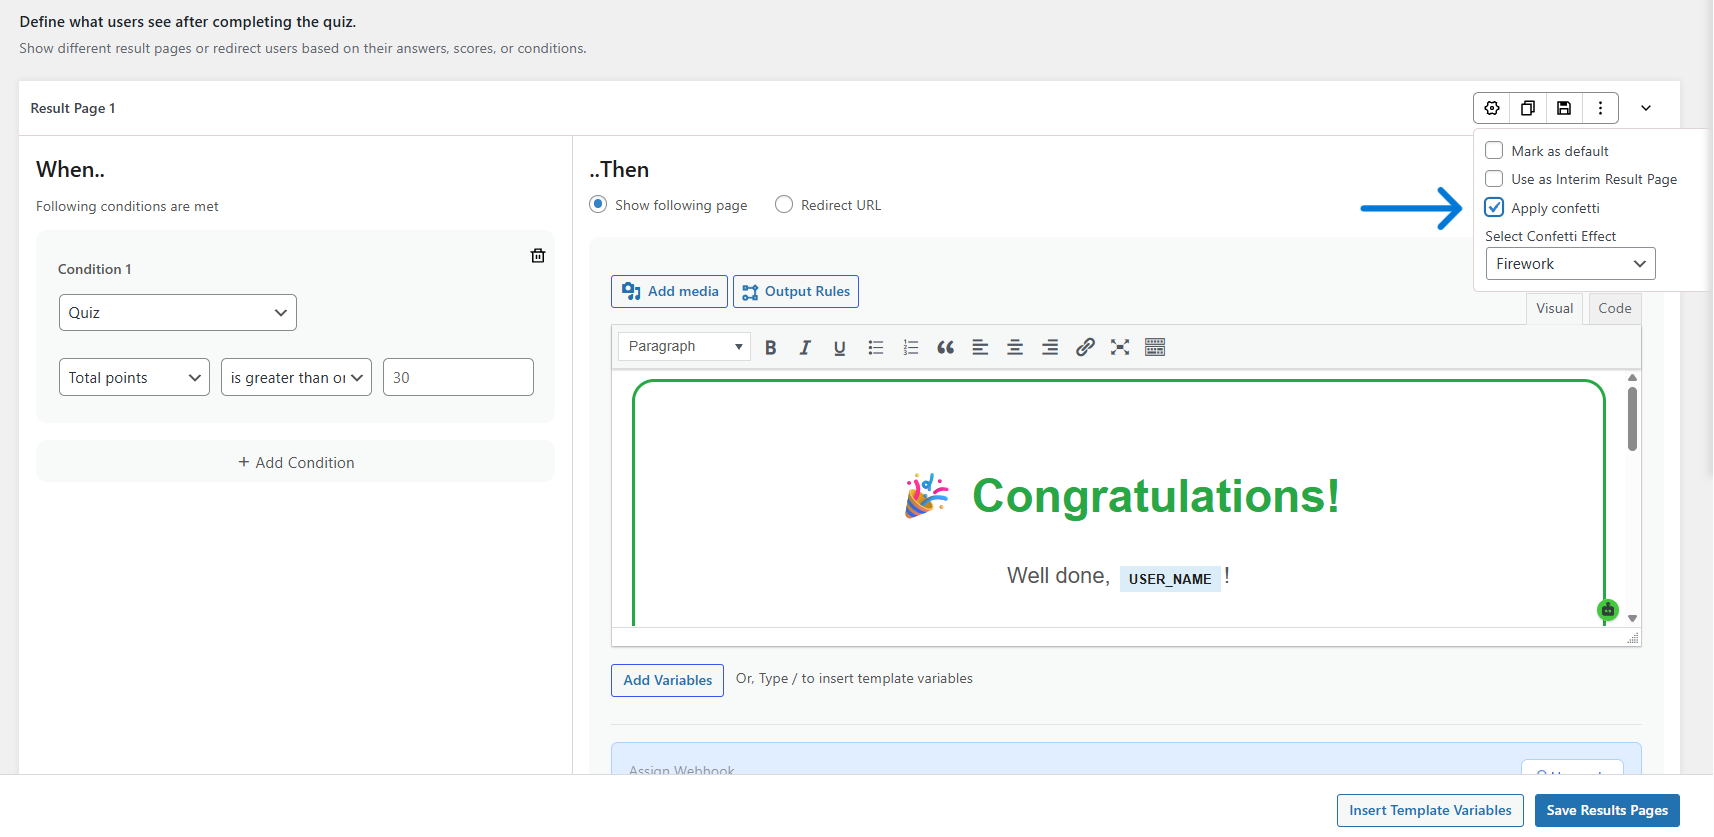
How Confetti Works with Different Result Conditions
- With a condition: If you’ve added a condition to the result and enabled confetti, it triggers based on that condition. For example, if you set a condition where users scoring more than 30 points see a specific result, confetti will trigger for any user who meets that condition.
- Without a condition: If no condition is set, confetti automatically triggers when a user scores 60% or higher.
Note: If you’re using conditions on result pages, define conditions for all result pages you create. Otherwise, the confetti may not function as expected.
7. Customize the Default Theme
The Ultimate Add-On provides customization options for the default QSM theme, enabling you to modify the quiz’s default appearance to match your website’s design.
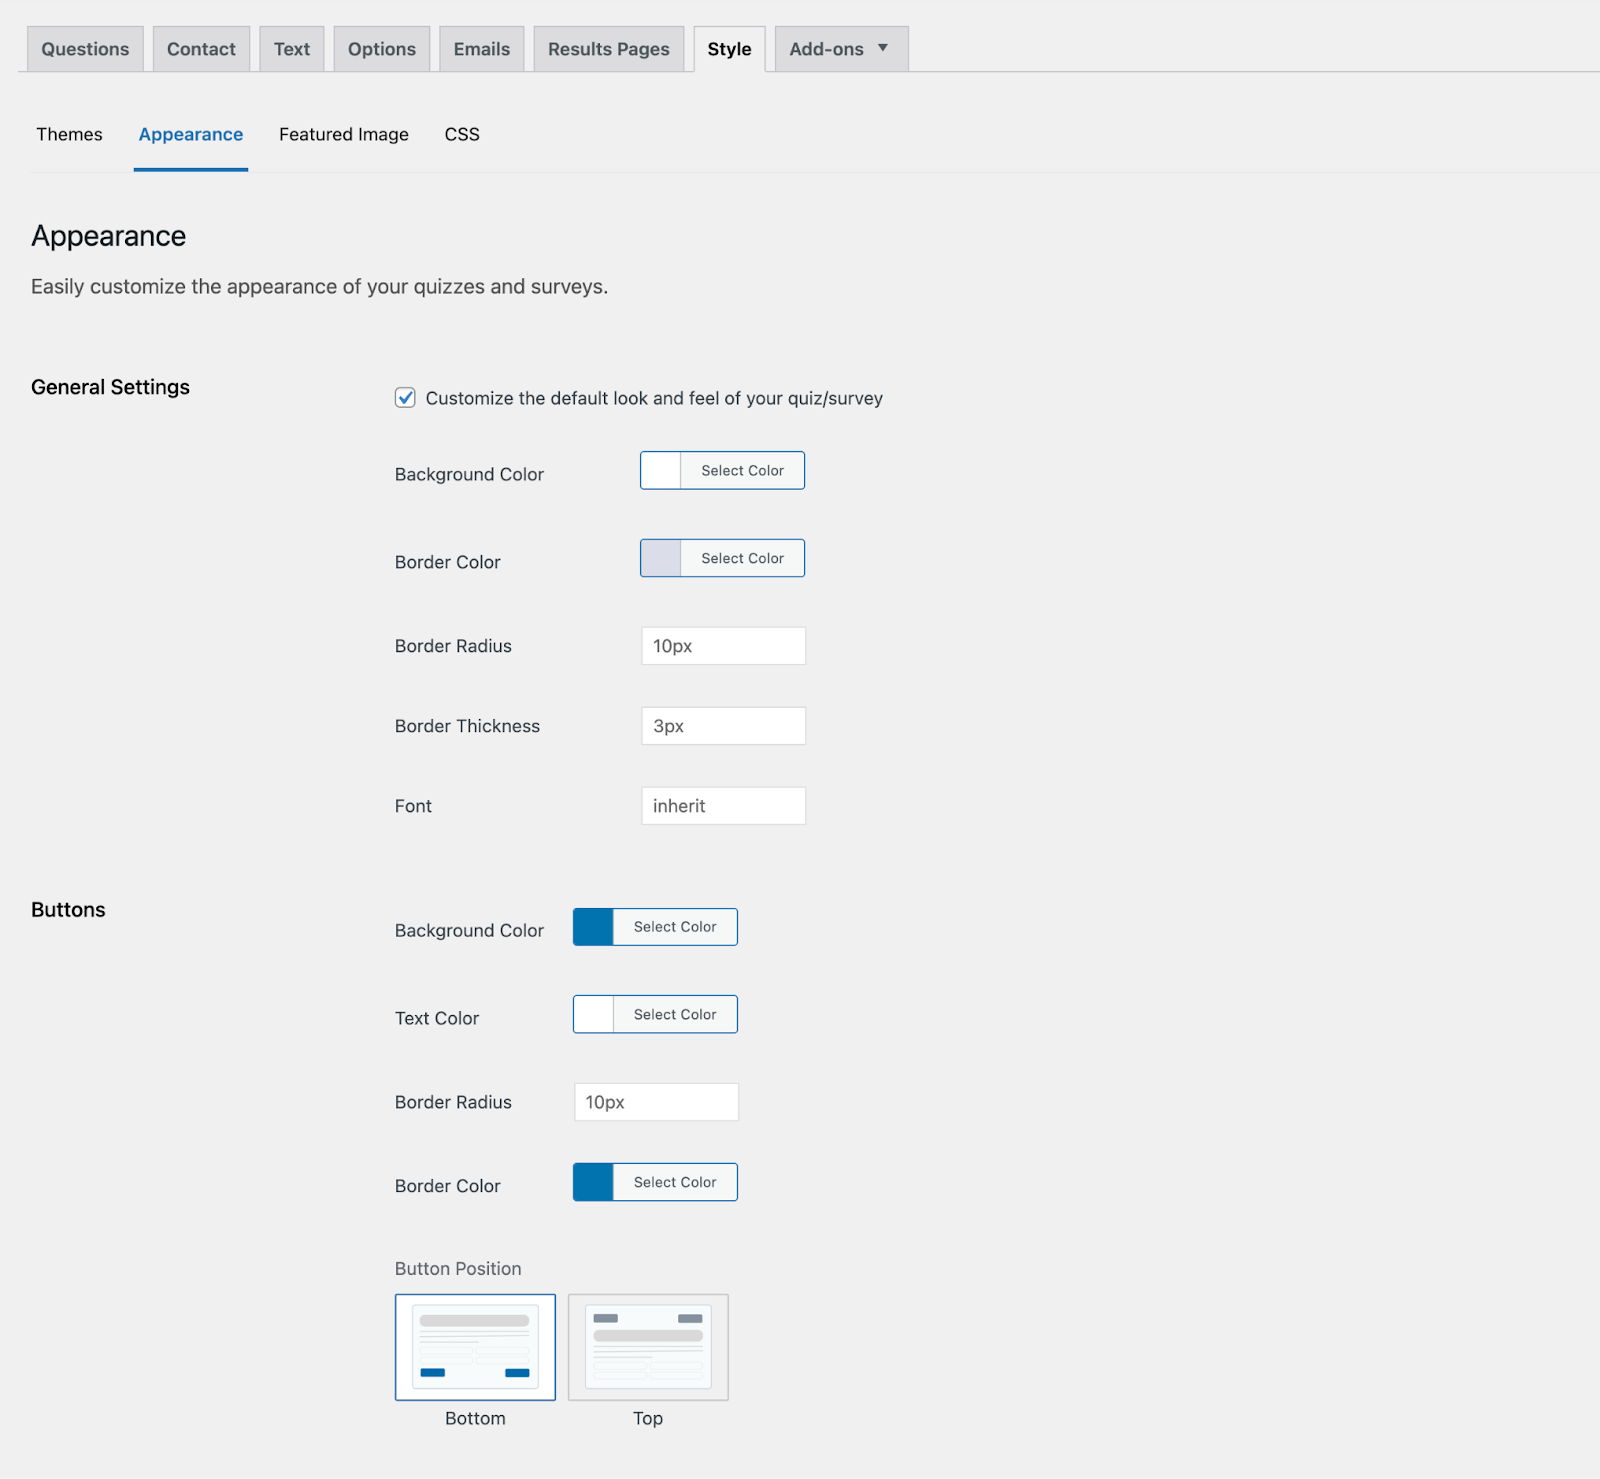
To customize the default theme, go to the Styles tab under Appearance and click the “Enable the default theme customizer” checkbox. This will display all customization settings, as follows:
General Settings – Adjust background color, font style, border color, and thickness.
Buttons – Allow you to customize button colors, borders, radius, and positioning to match your quiz design.
Answer Choices – Customize text colors, polar answer type background colors & matching answer choice colors.
Timer – Change the timer color, position, and alignment.
Page Number – Adjust the text color, position, and alignment.
Progress Bar – Adjust the progress bar’s color, height, border radius, and position.
Advanced Options – Enable the page labels for each page and customize label colors & positions.
After customizing the theme settings, save your changes.
Note: For optimal layout, set the progress bar and button positions on opposite sides (e.g., buttons at the bottom and progress bar at the top).
8. Manage User Roles and Permissions
With the Ultimate Add-On, you can control user roles and permissions for your quizzes, setting them globally for all quizzes.
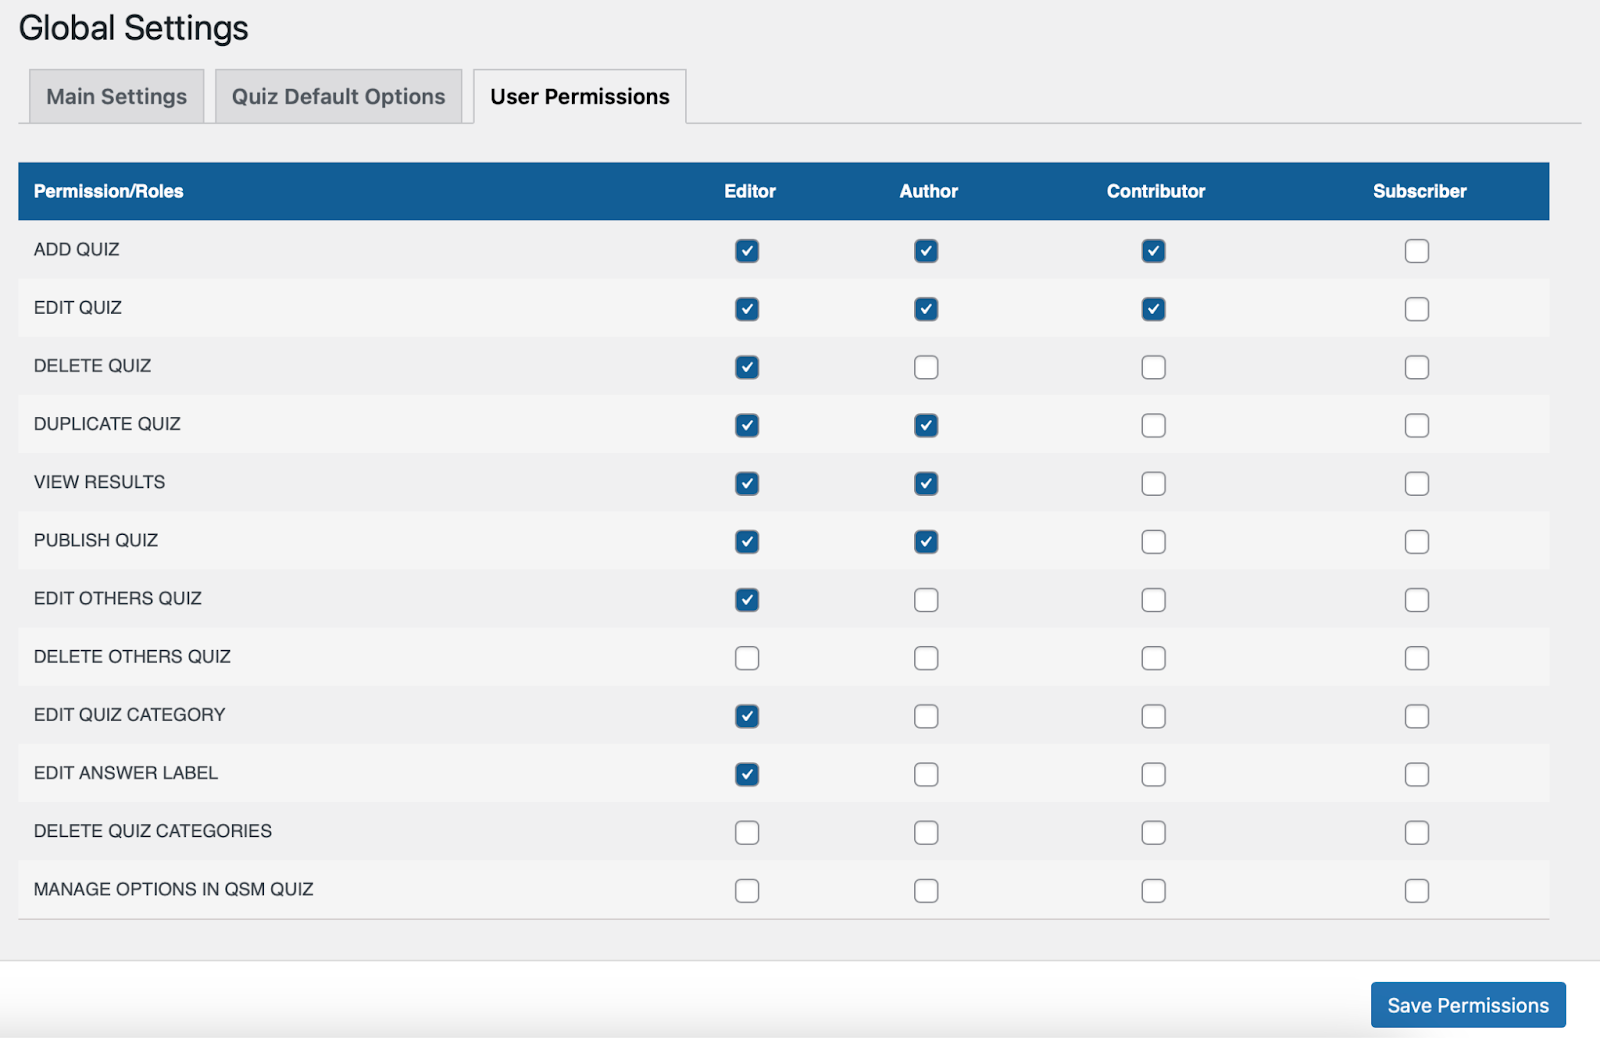
To manage user access across all quizzes, you can set global permissions for different roles.
- To set the global settings, navigate to QSM > Settings from the side panel and open the User Permissions tab.
- Here, you’ll find different roles for which you can set permissions, like delete quiz, view quiz, or edit quiz. Then there are advanced settings you can grant role permissions to:
- Delete Others’ Quizzes
- Edit Quiz Categories
- Edit Answer Labels
- Delete Quiz Categories
- Manage Options in the QSM Quiz
{By enabling Manage Options in QSM Quiz, you ensure that specific roles have full access to Global Settings, allowing them to configure essential quiz-related functionalities across your site.}
- Check the boxes under each role (e.g., Contributor, Editor) to grant specific permissions such as Edit, Delete, View, Duplicate, or Publish Quiz.
- For example, if you want Contributors to edit, delete, and publish quizzes, enable these permissions under the Contributor column.
- For example, if you want Contributors to edit, delete, and publish quizzes, enable these permissions under the Contributor column.
- After configuring the required permissions for each role, click Save to apply the changes.
Note: Additional roles may appear if third-party integrations are enabled, such as a “Customer” role for WooCommerce users. Only roles with granted permissions will have access to specified actions.
9. Manual Evaluation for Descriptive Answers
As a quiz admin, you can manually evaluate and assign scores to long and short paragraph-type answers, unlike MCQs, which are auto-evaluated by the system.
From the quiz taker’s end, once they submit the quiz, they will see the correct/incorrect status or scores for MCQs on the result page. However, for long and short paragraph answers, they will see a “Pending Review” tag, indicating that their answer is yet to be evaluated.
From the admin side, viewing a quiz result will clearly indicate which questions are still pending evaluation.
See the feature in action in the demo video below.
To manually evaluate long answers, navigate to the Results page and open the result. You will see an “Evaluate” button next to each descriptive answer that is pending review.

Clicking the Evaluate button opens a pop-up with the following options — assign a score, mark the answer as correct or incorrect, and add feedback for the quiz taker (optional).
Once done, save your evaluation, and the quiz taker will be able to see the feedback directly on their result page.

If needed, you can always come back and reevaluate a response to update your evaluation.
You can also customize the feedback heading displayed on the result page by going to the Text tab → Labels → Other → Manual Review Feedback Label.

Configuring Features in QSM Ultimate Settings
The features in the Quiz Settings tab are configured in Ultimate Settings > Add-ons tab, allowing you to manage additional quiz behaviors and user interactions.
10. Advanced Quiz Settings
Let’s first go through configuring the “Quiz Settings” tab.
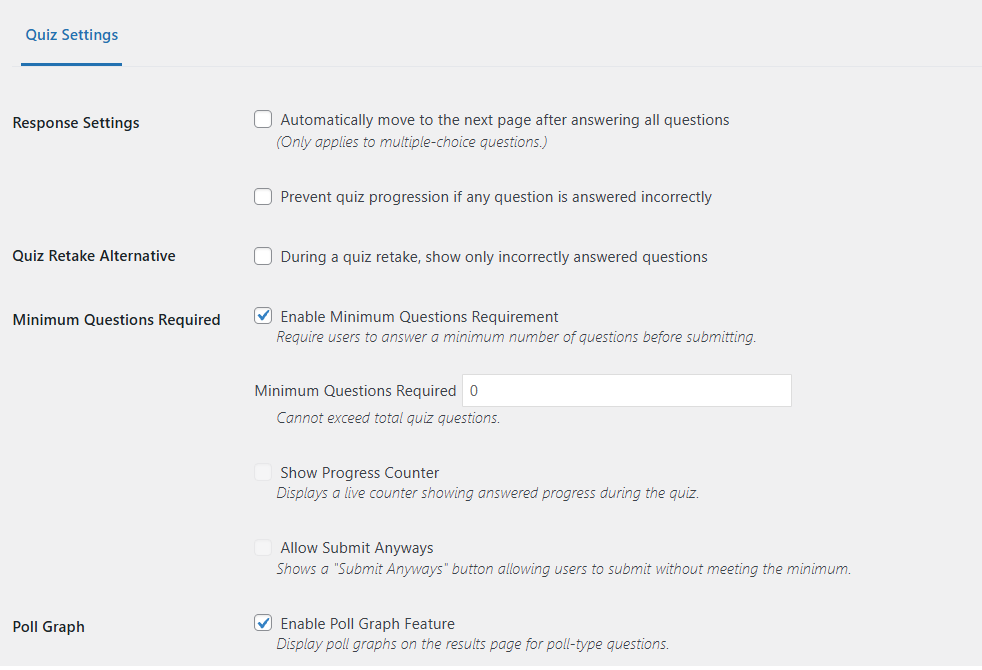
1. Response Settings
The “Response Settings” allow you to control how participants navigate through the quiz.
If you enable the “Automatically Move to Next Page After Answering All Questions” option, the quiz will automatically proceed to the next page once all questions on the current page are completed.
This removes the need for participants to manually click the Next button, creating a smoother quiz experience.
Note: This feature works only with multiple-choice questions.
Next, the “Prevent Quiz Progression if Question is Answered Incorrectly” feature prevents participants from moving forward in the quiz if they answer any question incorrectly and will not lead them to the next page until they answer it correctly.
Enable the checkbox “prevent quiz progression if any question is answered incorrectly.”
Once enabled, a text field will appear where you can customize the message that participants will see when they attempt to proceed without answering correctly.
This feature is compatible with the following question types:
- Multiple Choice (Vertical & Horizontal)
- Multiple Response (Vertical & Horizontal)
- Drop Down
- Number
- Short Answer
- Paragraph
- Date
- Fill in the Blank
- Grid (Radio & Checkbox)
- Matching Pairs
Note: To help participants see which questions they have answered correctly or incorrectly, enable the “Show the results of each question’s response in real-time” option in Progress Controls under the Options tab.
2. Quiz Retake Alternative
During a quiz retake, the Show Only Incorrectly Answered Questions feature allows participants to reattempt only the questions they previously answered incorrectly or did not attempt.
Simply, enable the “Quiz Retake Alternative” checkbox option.
Note: This feature will only be available if the “Allow Users to Retake the Quiz” option is enabled. You will find it in the Options tab > Quiz Submissions > Quiz Controls.
You can also set a limit on the number of attempts or submissions by respondents to control the maximum number of quiz retakes allowed.
Once participants submit their responses, you can review their attempts on the Results page. By default, the results will display the user’s first attempt.
To view their retake attempts, click on the “Select Revision” dropdown to switch between different attempts and track their progress.
3. Minimum Questions Required
Enable “Minimum Questions Requirement” to require users to answer a minimum number of questions before they can submit the quiz.
Set a value for the minimum number of required questions. For example, if you set this value to 5, users must answer at least 5 questions before submitting. Once they’ve met this requirement, they can submit at any time.
You can also enable “Show Progress Counter” to display a live counter tracking how many questions the user has answered during the quiz.
Enabling “Allow Submit Anyway” adds a “Submit Anyway” button, letting users submit the quiz even if they haven’t met the minimum requirement.
4. Poll Graph
If you’ve enabled the “Poll Type” question under the Questions tab for individual questions, keep “Enable Poll Graph” turned on. This setting displays poll graphs on the results page for poll-type questions.

Note: This option is enabled by default to maintain backward compatibility. You can disable it in the settings if you don’t need the poll graph functionality.
Expected behavior:
- When enabled, poll graph data is generated as usual.
- When disabled, the
qsm_poll_encrypted_datarequest is not generated.
5. Sound Effects
You can add sound effects for three events: correct answers, wrong answers, and quiz submission. You can independently enable the option for the sound effect you want to add.
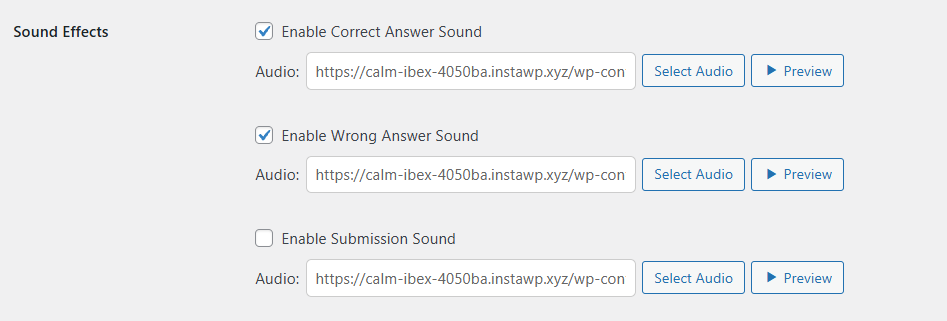
- Enable “Correct Answer Sound,” then click Select Audio to upload an audio file from your device.
- Click Preview to listen to the sound before saving your settings.
- Repeat the same steps to enable and add sounds for “Wrong Answer” and “Submission.”
Note: Sound effects only play when “Show the Results of Each Question’s Response in Real-Time” is enabled.

6. Custom CSS Classes for Buttons
The Custom CSS Classes for Buttons Custom feature allows you to monitor tracking and user interactions with quiz buttons by applying custom CSS classes to the buttons.
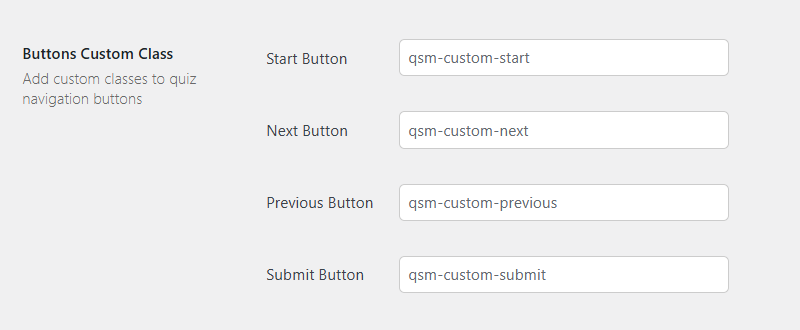
To use this feature, go to “Custom CSS Classes for Buttons” in Ultimate Quiz Settings. In this section, enter custom classes for the Start, Next, Previous, and Submit buttons.
You can add a single class or multiple classes (separated by commas), which will be applied to the buttons on the front end.
Once you’ve added the desired classes, click Save to apply the changes.
 Still stuck? How can we help?