Let’s be honest, not everyone wants to learn coding just to build a quiz on their website. Nothing wrong with learning to code (kudos if you do!), but sometimes you just want the job done without spinning your brain in HTML, CSS, and shortcodes.
That’s where a good quiz builder plugin for WordPress comes in! One that handles the technical stuff so you can focus on what actually matters: creating insightful quiz questions and result pages for your audience.
Now, the WordPress plugin world is packed with tools that promise the moon. But finding one that actually delivers, without making you want to shut your laptop down and scream in frustration, can be a whole different story. That’s why we provide you with the plugin & the steps that not only talk the talk but walk the walk (and don’t trip over bugs along the way)
In this article, we’re going to walk you through exactly how to create a quiz using the QSM Plugin (that’s Quiz and Survey Master, in case you’re wondering). Step by step, plain and simple.

Why is QSM the Best Plugin to Create a Quiz in WordPress?
Quiz and Survey Master WordPress is a free (+ premium bundle plans) WordPress quiz plugin that helps you create engaging quizzes and surveys of all types for your audience. It has over 40,000 active installations on the WordPress.org repo and receives regular feature and security updates.
Check out this Sample Quiz and Sample Survey made through our plugin for your reference.
Here’s a gist of what makes it the best quiz plugin for WordPress:
- Drag-and‑drop quiz builder interface that’s a breeze to use.
- Unlimited quizzes and surveys—no restrictions.
- Wide variety of question formats, including multiple choice, sliders, fill‑in‑the‑blank, true/false, dropdowns, and more.
- Pull questions from your question bank or import existing ones for quick reuse.
- Embed a contact form right inside your quiz or survey.
- Personalise messages and share results using flexible template variables.
- Choose from built‑in themes or style everything with custom CSS to match your site.
- AI‑powered integration add-on to instantly build quizzes and assessments
- Choose from built‑in themes or style everything with custom CSS to match your site.
- Score quizzes automatically using correct/incorrect logic or assign point values per answer.
- Show a polished, customizable results page with one‑click social sharing (Facebook, Twitter, LinkedIn)
- Rely on 365‑day support for help anytime you need it.
How to Create a Quiz in WordPress?
Now that you’re familiar with QSM more than before, let’s move directly to the steps to create your first quiz, survey, or assessment.
1. Open the QSM Plugin in WordPress
To start making a quiz, head to your QSM option in the sidebar and click on Quizzes & Surveys.
Then hit Create New Quiz (or survey, exam, etc., whatever fits your use case).
2. Add Questions Manually or Import from Your Question Bank
Once you have followed through each step of creating a new quiz, you’ll land on the Question tab.
Now, here you can add questions or import from the question bank.
To add questions manually, edit the default question field:
Choose the question type (multiple-choice, slider, true/false, etc.) from the right-hand panel.
Select the answer type — whether you want it to be text-based, image-based, or rich media.
After adding the questions as well as the answers, move ahead and assign:
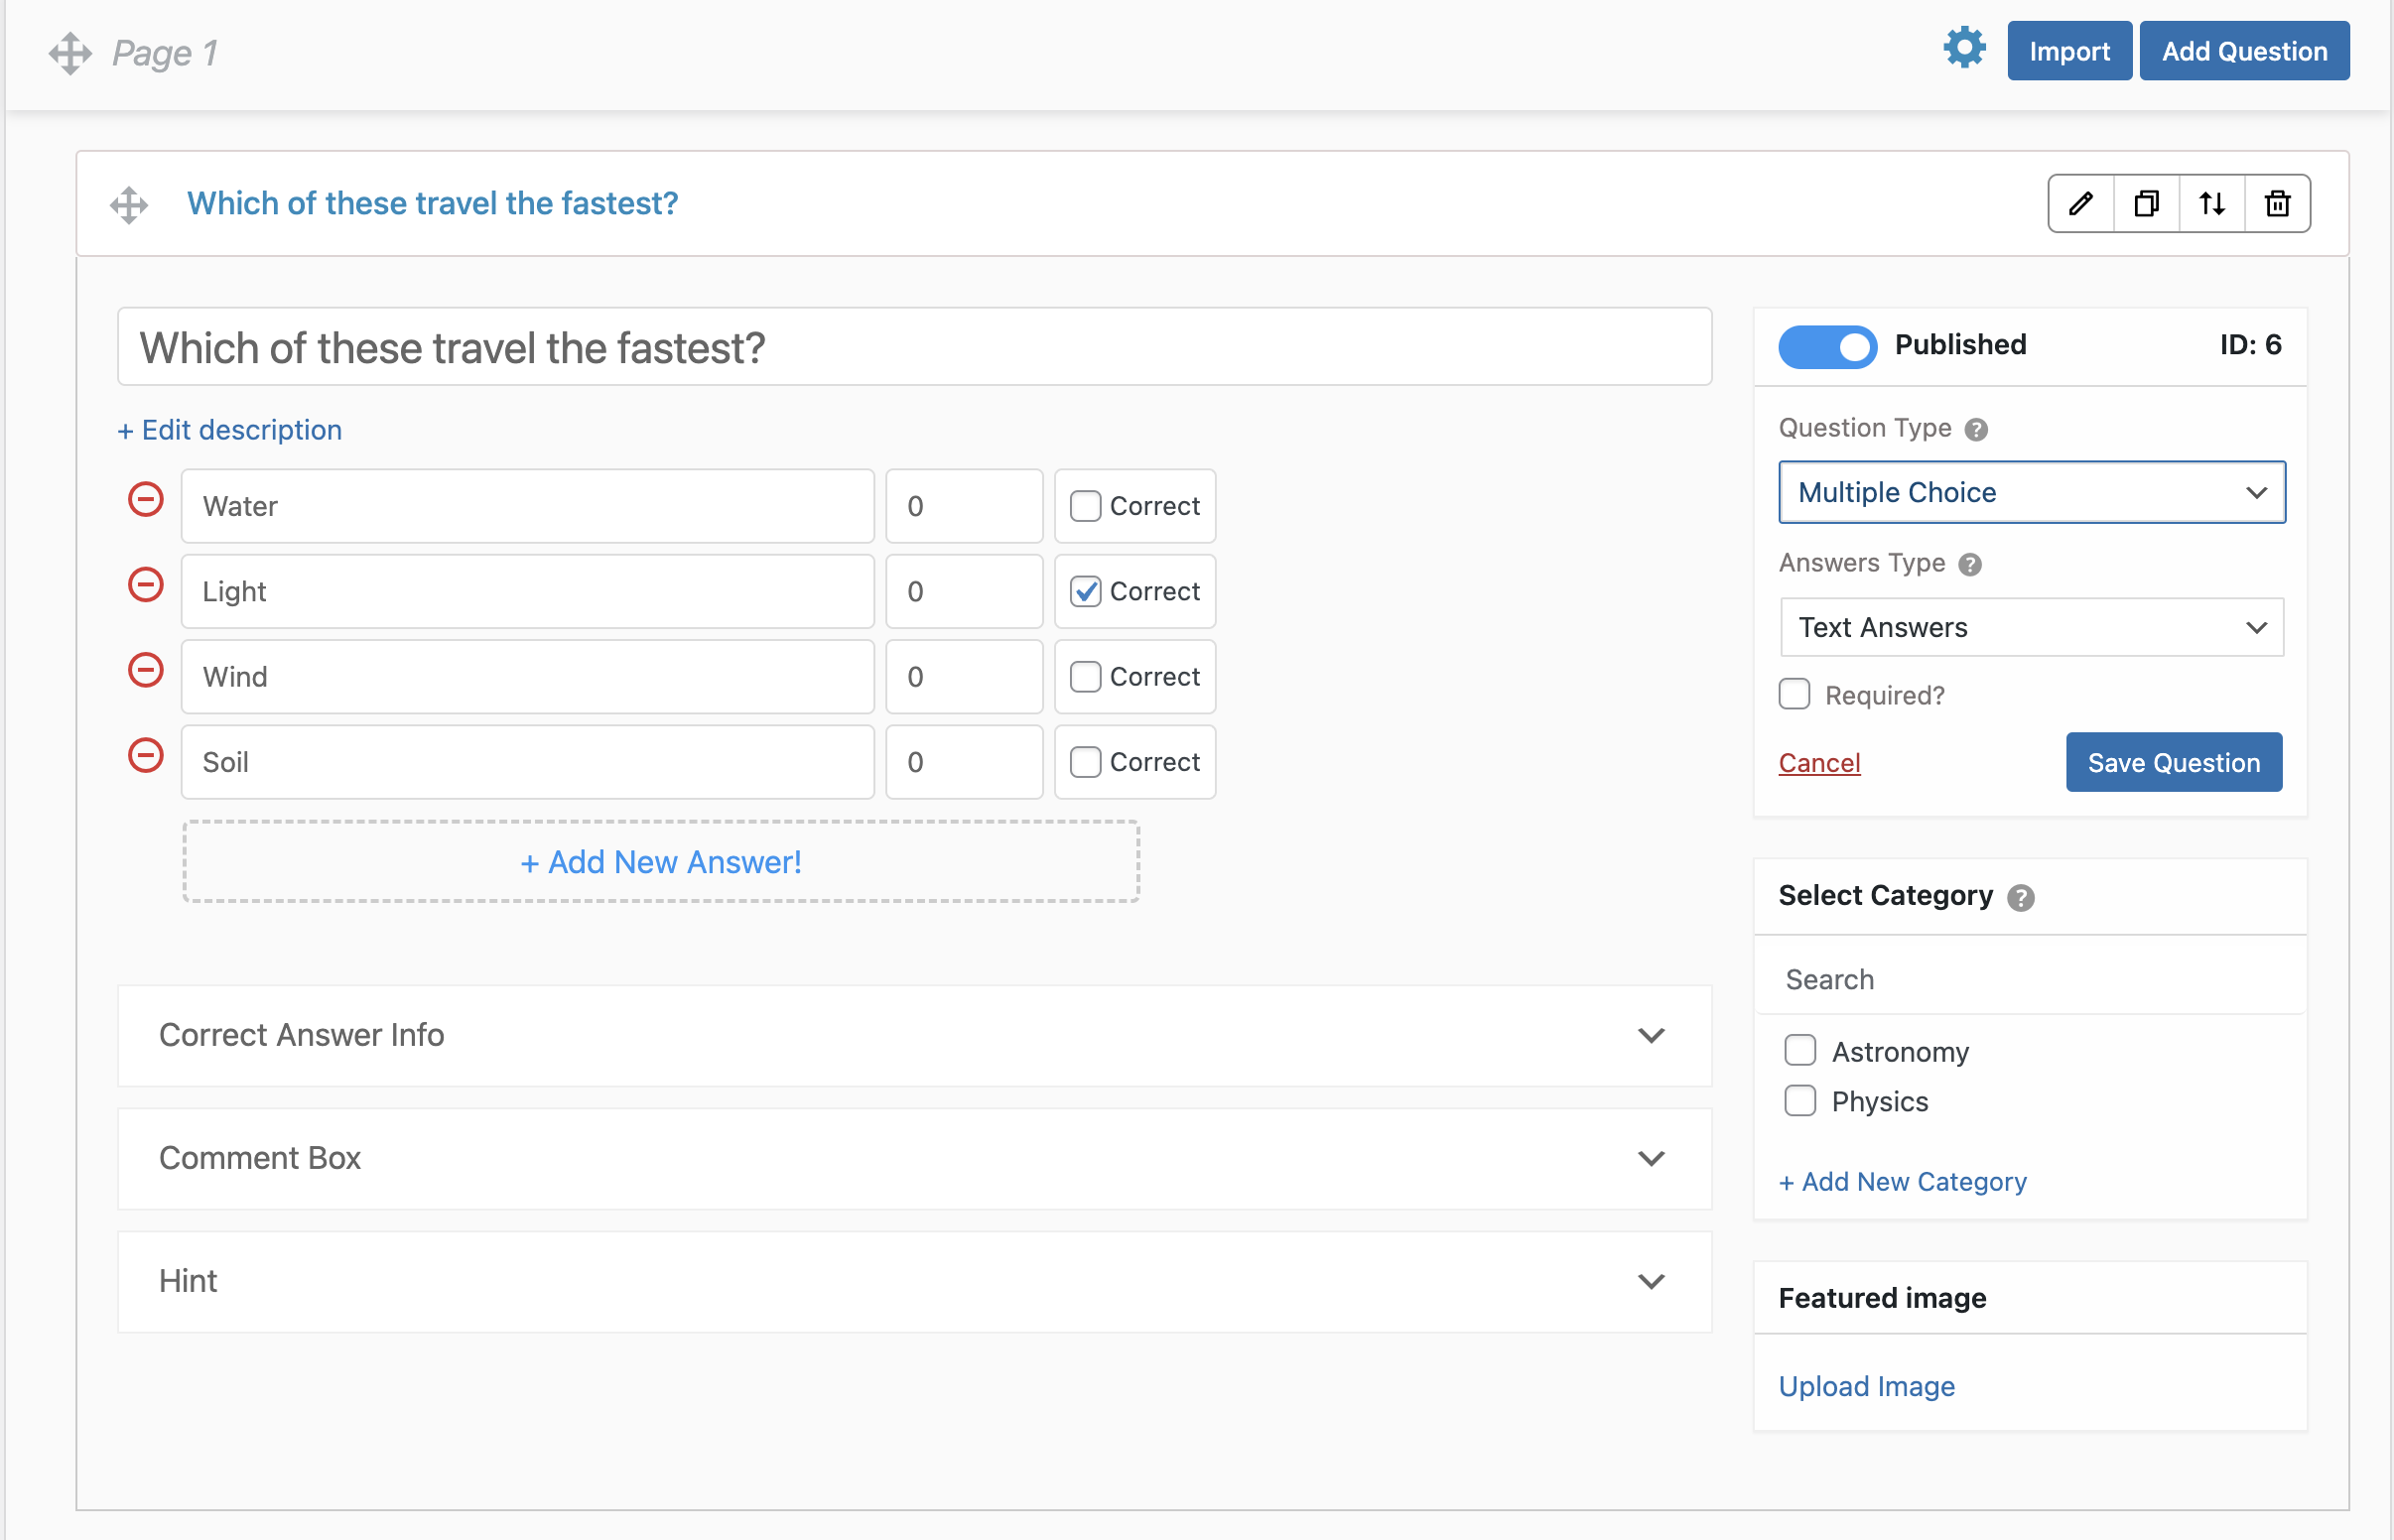
- Points or correct/incorrect marks
- Question categories
- Featured images
- Correct answer explanations
- Hints to help users during the quiz
Adding these little details will make your quiz more interactive & informative.
3. Use the AI Add-on to Generate Questions Instantly
If you want to skip the manual setup and generate questions using AI, then QSM has the AI Integration add-on to generate quiz questions in minutes.
Just enter a prompt (e.g., “Create a 5-question marketing quiz for beginners”), then set:
- The number of questions
- The page where they should appear
- Question difficulty level
- Points for correct answer
You can even regenerate individual questions or answers using AI if you’re not happy with the result. It’s fast, smart, and super helpful when you’re in a rush or need inspiration.
4. Add Contact Fields to Capture Leads
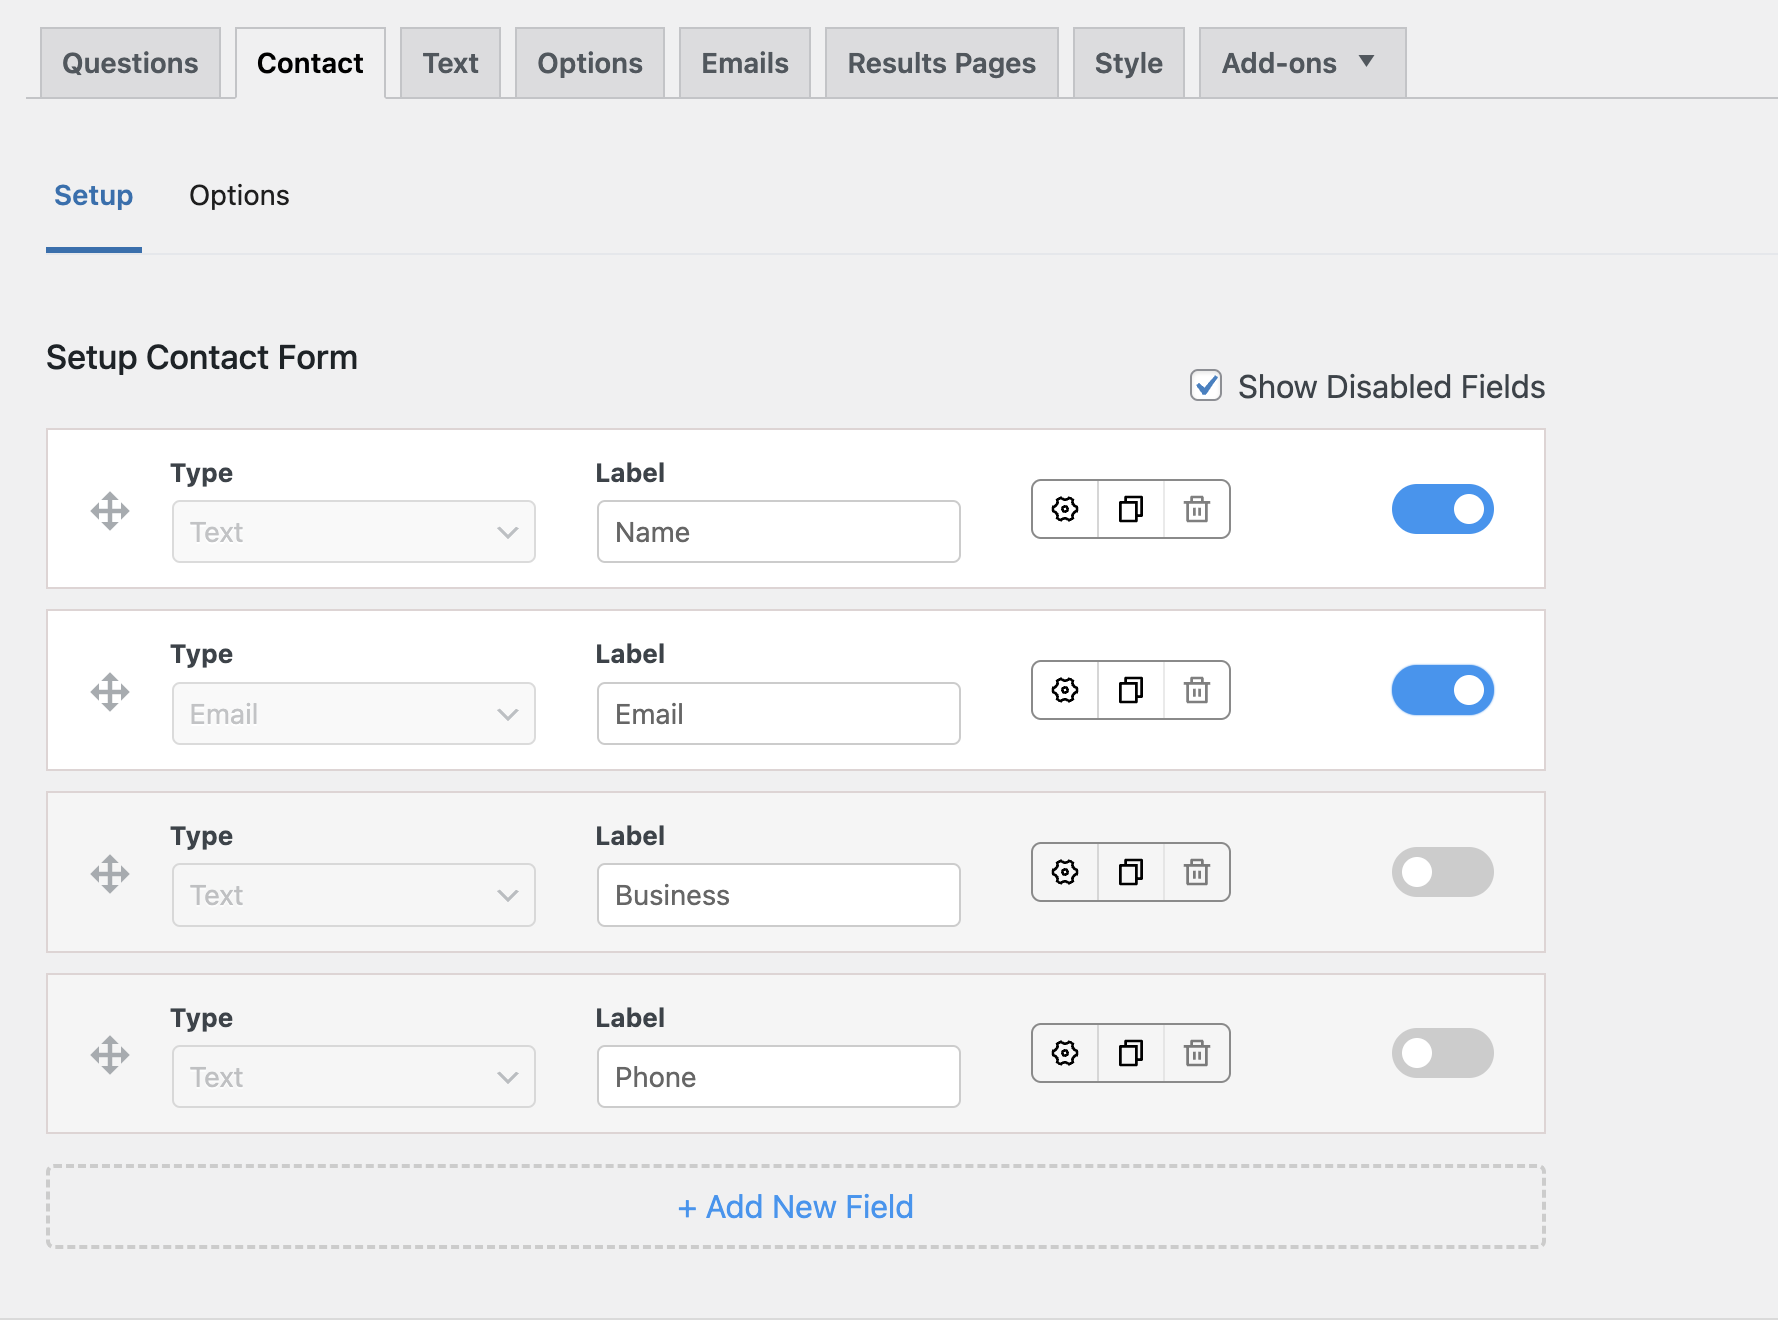
Next, head to the “Contact” tab. Here, you can add custom contact fields to collect valuable user information such as:
- Name
- Email address
- Phone number
- Business/Company Name
- Any other field you want to include
This step is useful if you’re using quizzes as part of your lead generation strategy. It turns your quiz from just an interactive element into a direct connection platform with your audience.
Quizzes are a great way to not only entertain your audience but also build trust. And when you follow it up by asking for their contact info (politely and with purpose), you’re opening the door to ongoing communication and conversions.
5. Customise Quiz Behaviour with the Options tab
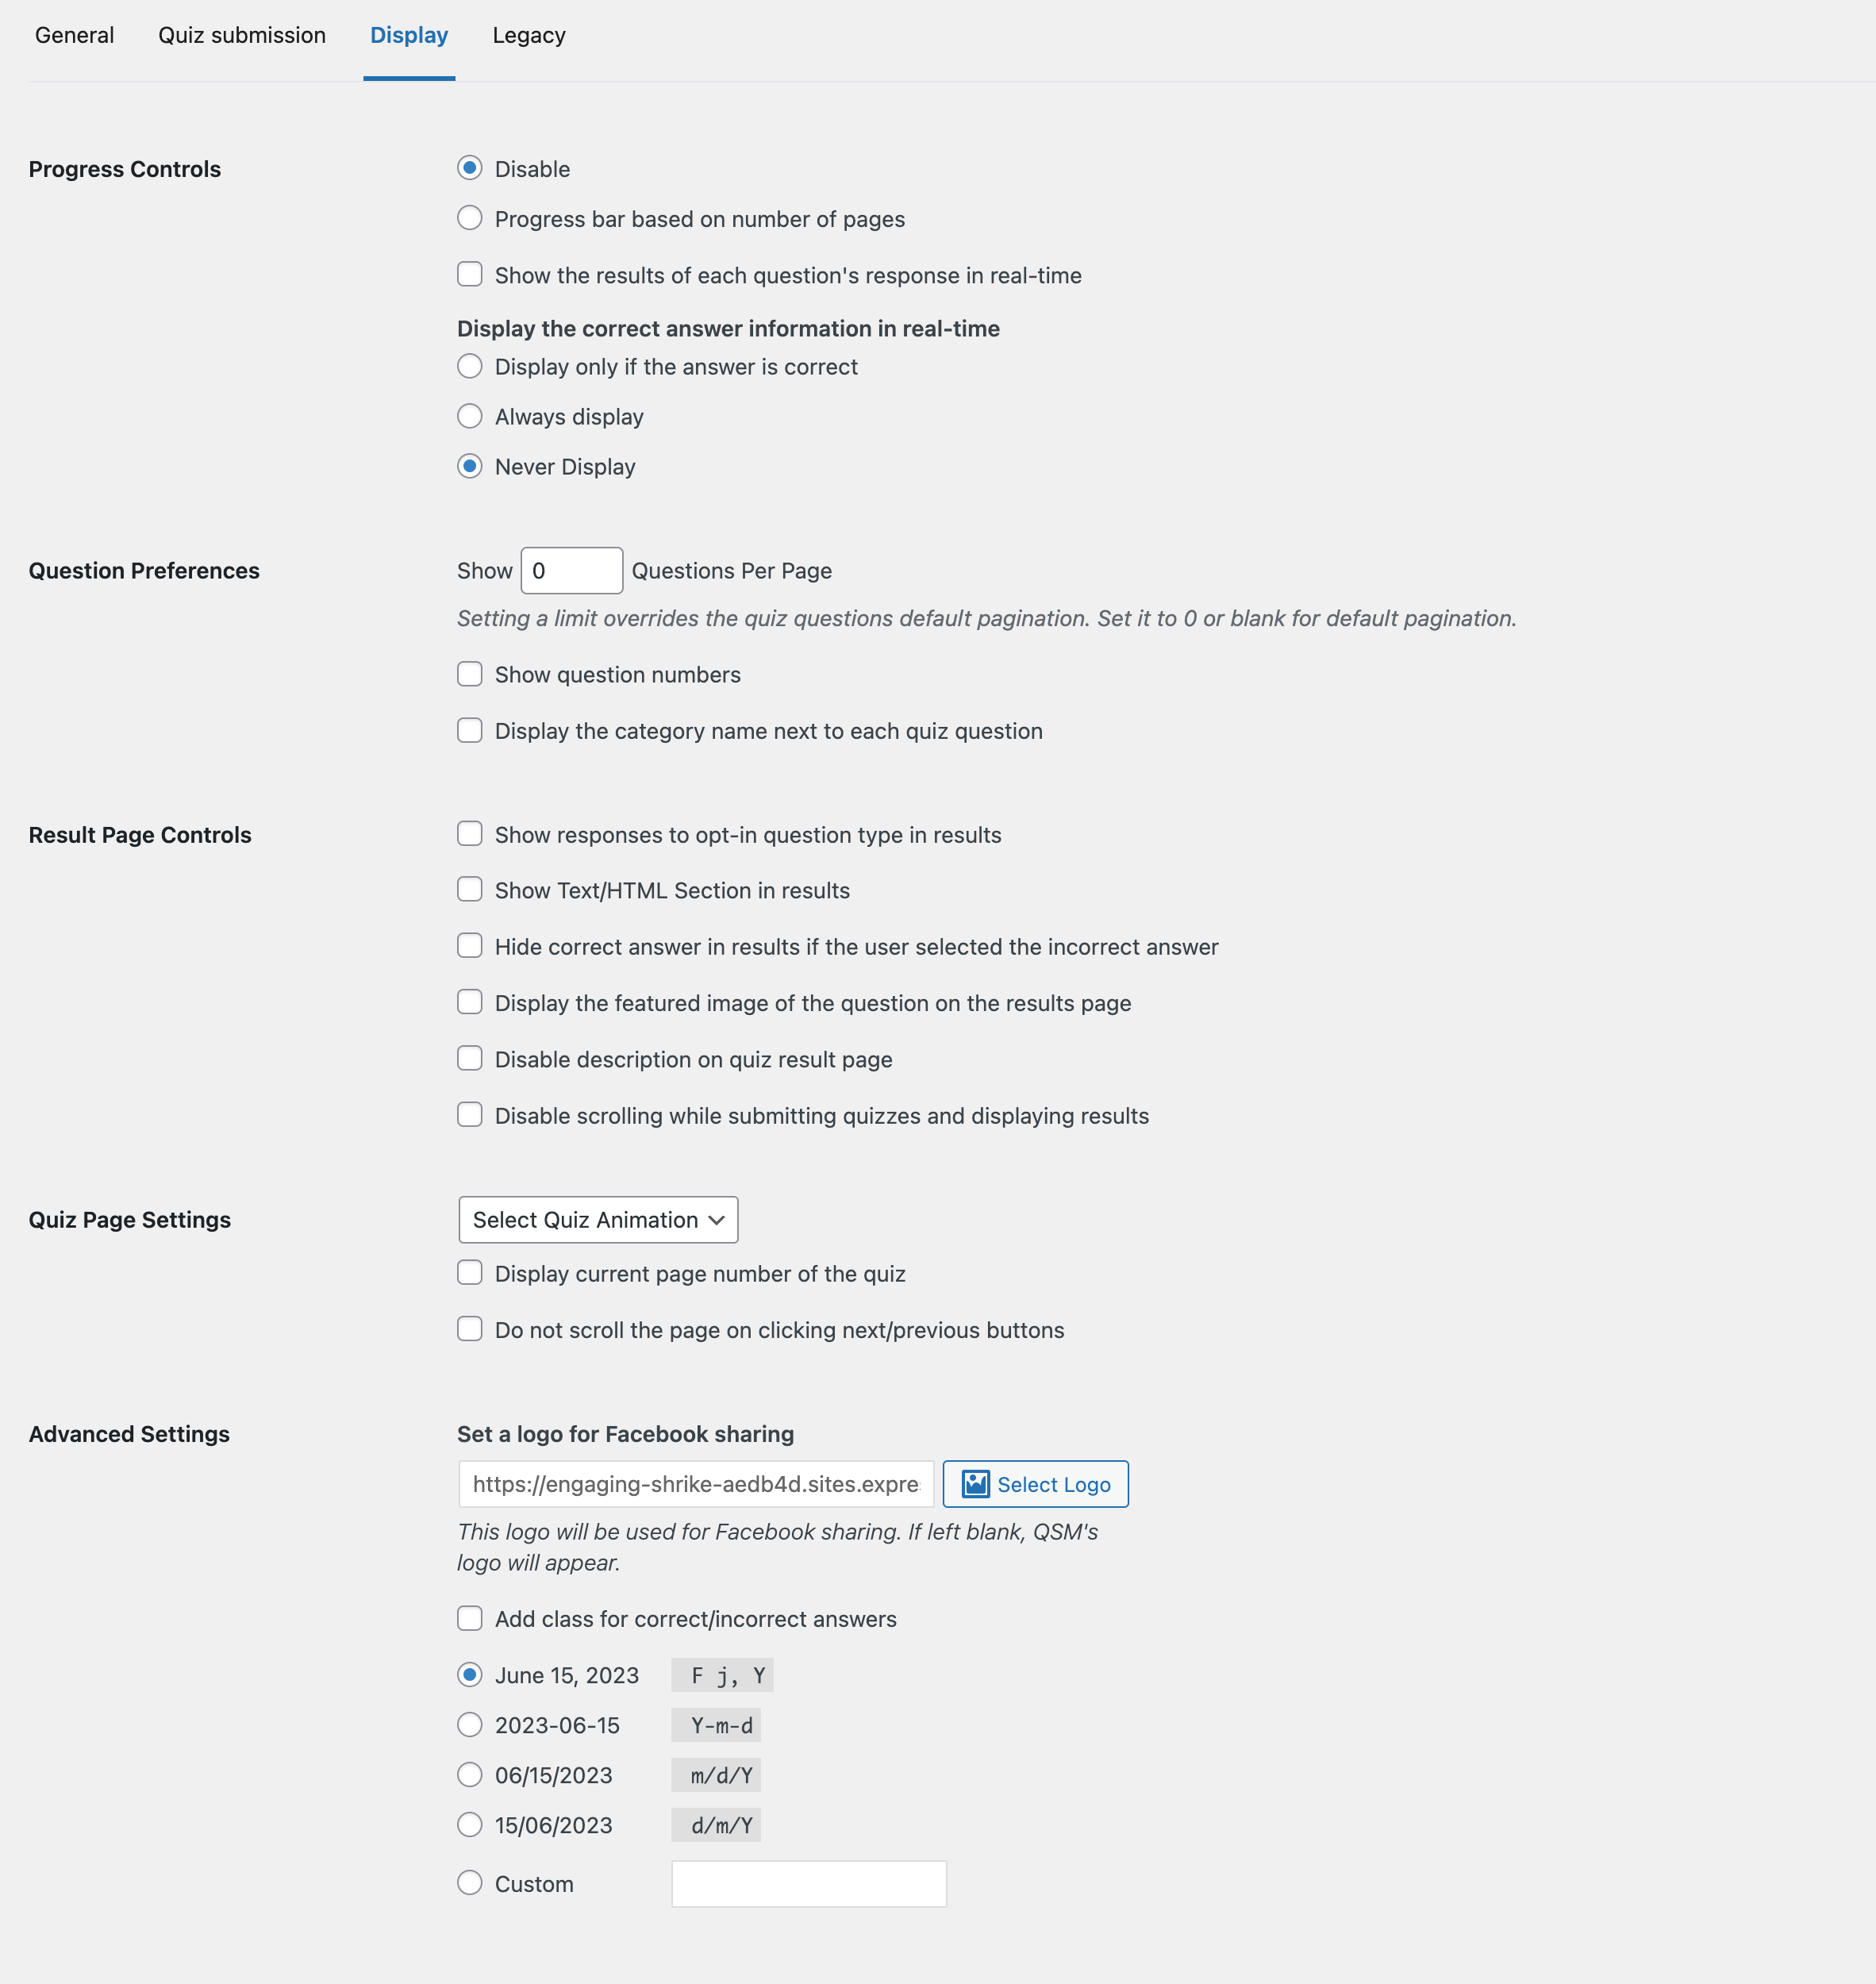
Once your questions and contact form are ready, head over to the Options Tab, where the quiz behaviour is customised. Think of it as a quiz control center, where everything is configured that make your quiz better.
You can adjust the correct answer logic, quiz submission rules – when & how the quiz is submitted, and display options like navigation and progress bar.
Plus, you configure submit quiz actions, question preferences, result page controls, and more.
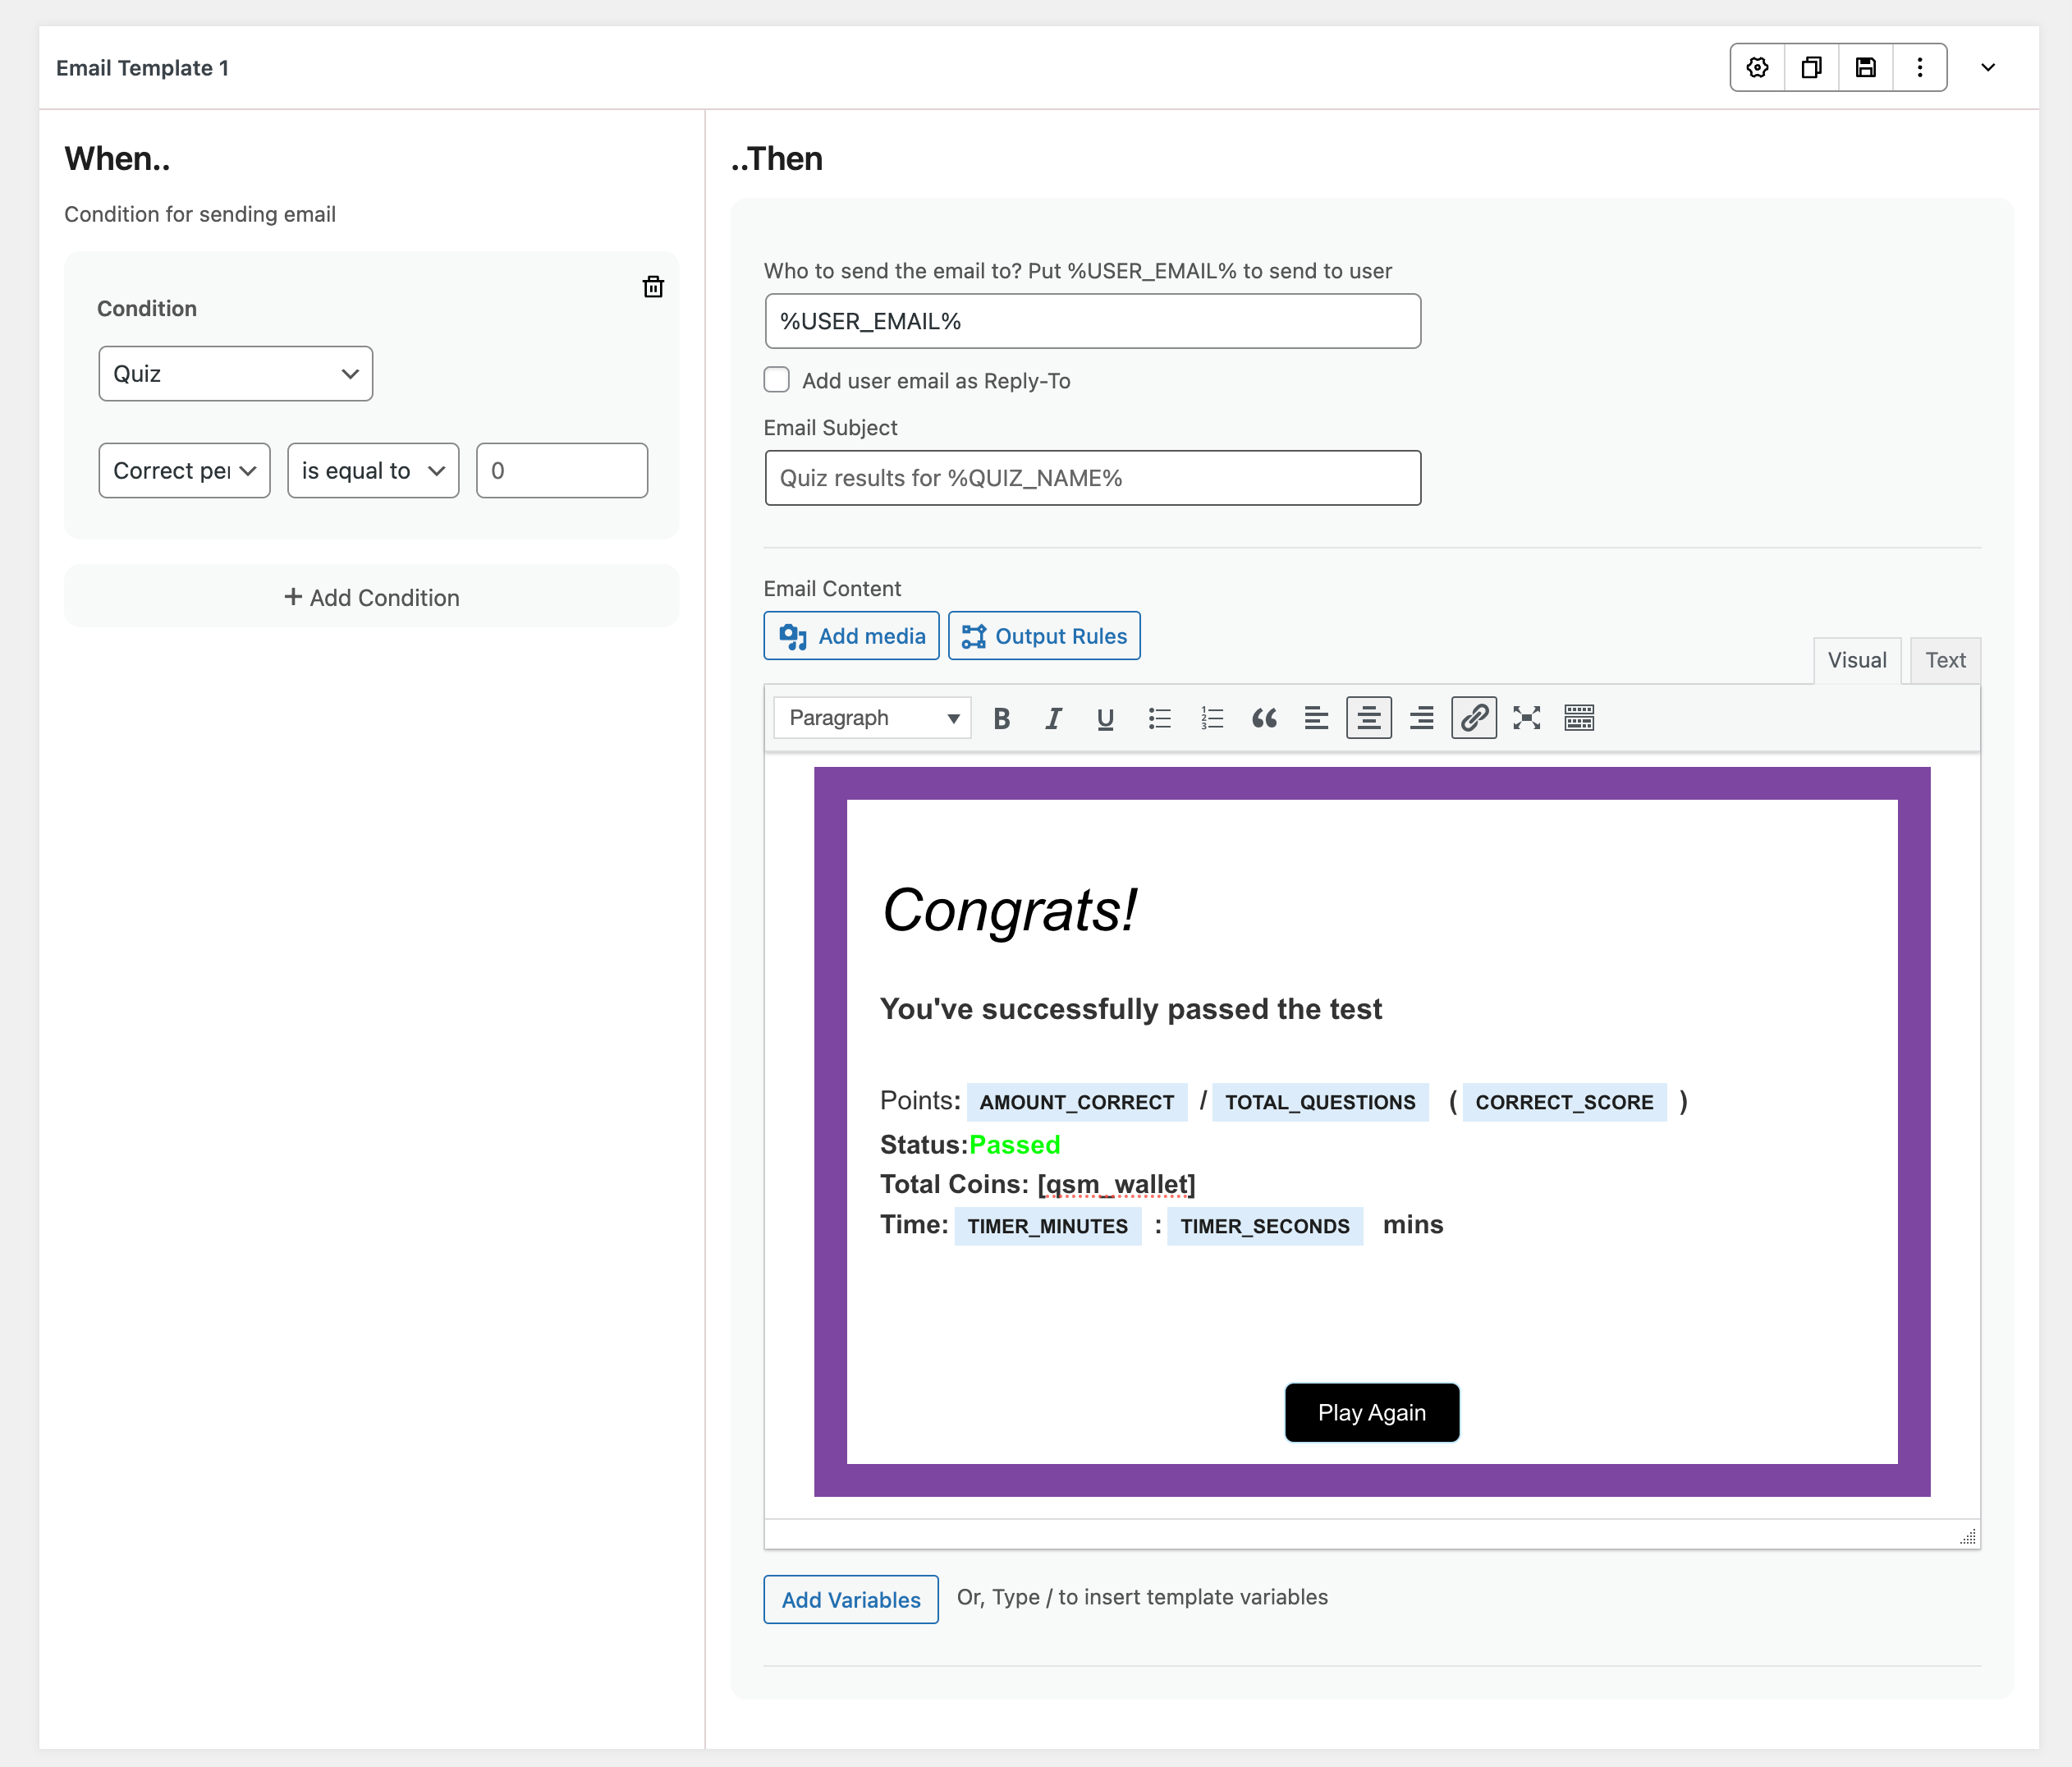
6. Set up Automated Email Notifications
Once the options are in place, it’s time to set up automated communication.
Go to the Emails tab to configure the emails your users (and you) will receive once the quiz is submitted.
In this section, you can:
- Create different emails based on user score or conditions.
- Use the default email templates or start from scratch using the custom editor.
- Add personalization using template variables (like name, score, etc.).
- Send admin notifications to stay in the loop on every submission.
Pro tip: If you’re using your quiz for lead generation or onboarding, crafting a follow-up email is a must. This is your moment to say thank you, offer something extra, or invite users to take the next step.
7. Customize Result Page for Post-Submission
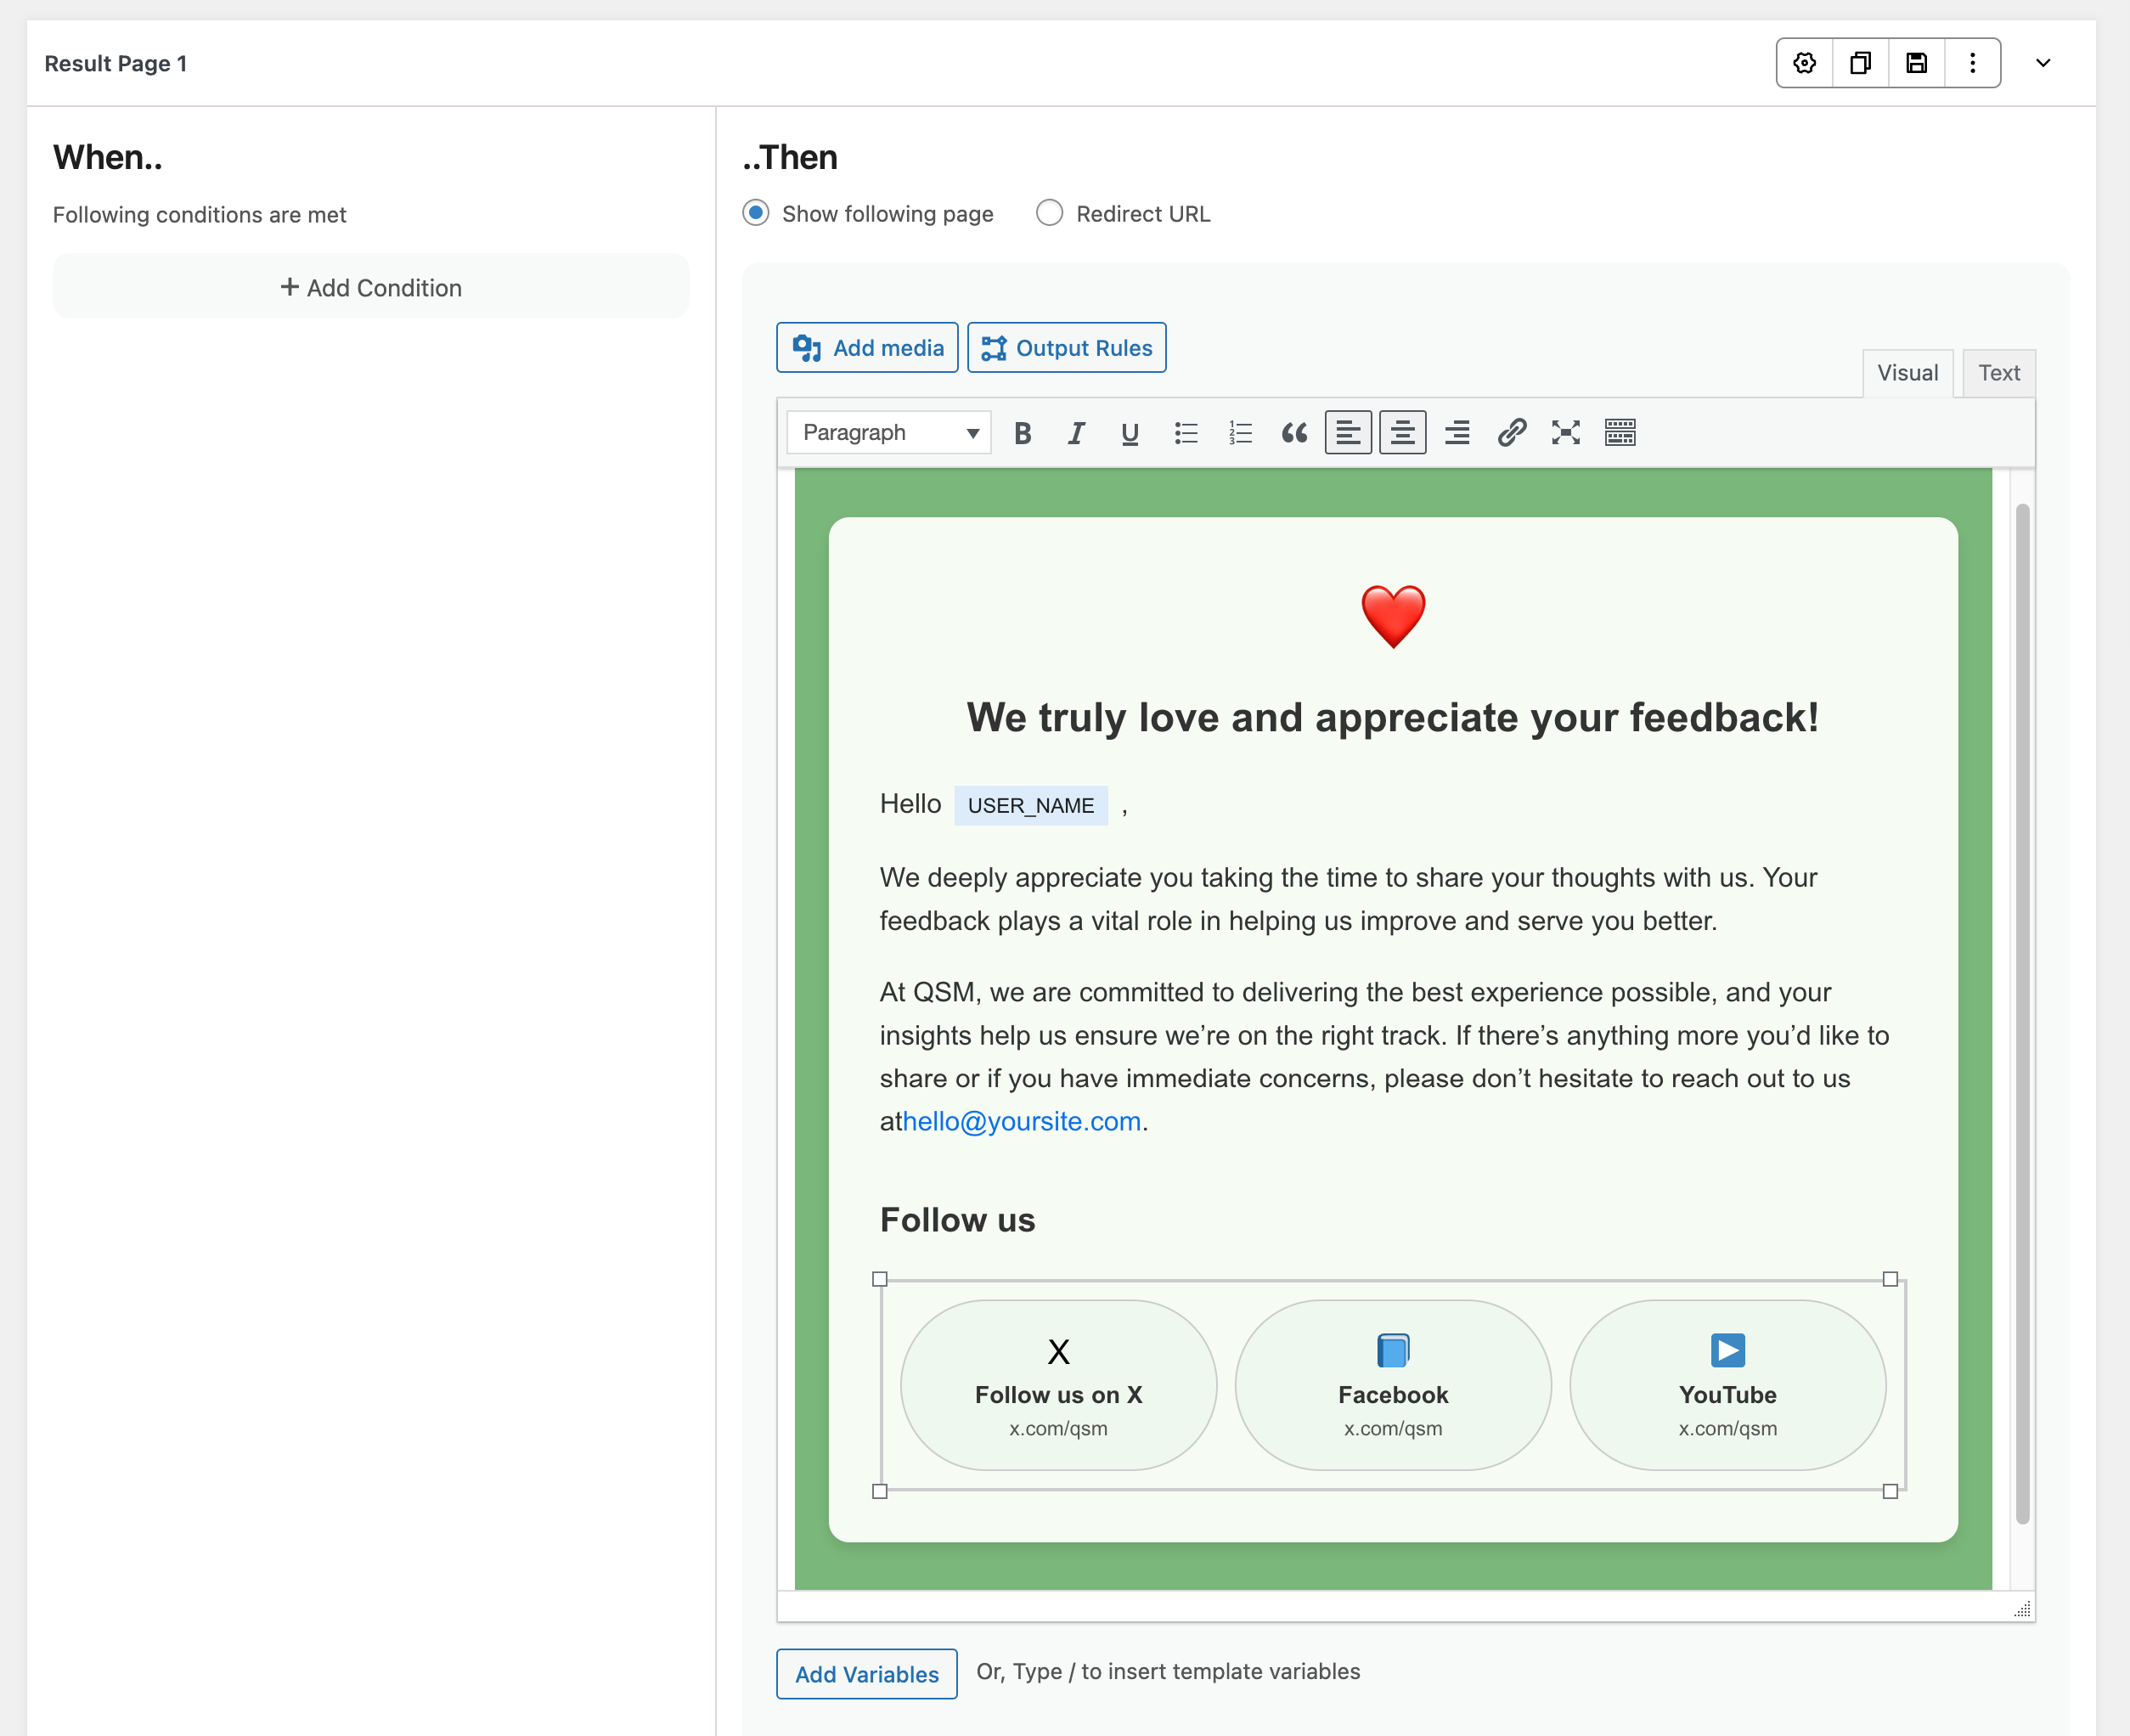
Finally, make your results shine. The Results Page tab lets you control exactly what your users see after finishing the quiz. You can show them:
- How much they scored
- How many questions they attempted, total correct answers
- The time taken to complete the quiz
- References for taking up another quiz or recommending products/services
- Custom feedback based on performance
All these, you can either create on a blank canvas or take the help of pre-built templates and customize them according to your message.
You can even display different result pages based on user performance (e.g., one message for 80%+ scores, another for those below 50%).
Once you have created the quiz, publish it and embed it in your website.
QSM Addons (Free)
1. Leaderboards

Quiz and Survey Master Leaderboard addon will allow you to show a simple leaderboard with the top 5 quiz takers at the end of the Quiz. You can customize the text and add template variables to enhance the results page. Check out the demo.
2. Certificate

With the Certificate Addon, you can congratulate the users and appreciate their efforts in attempting the Quiz/Survey by providing a certificate with their name. Also, you can customize the title of your certificate, its message, and the background, and add a custom logo.
QSM Addons (Pro)
Though the Standard Quiz and Survey Master Plugin is totally free and is enough to create an exciting Quiz/Survey, you can customize more and have more advanced functionality by purchasing the Pro Addons.
1. Gamify Addon
The Gamify add-on takes your quizzes to the next level by adding a fun, interactive twist. Instead of just answering random quizzes, participants can move through different levels—unlocking new quizzes based on conditions you set. Want to make it even more engaging? You can also organize quizzes by categories, so users pick a topic before they start and only get questions from that category.
2. Reporting and Analysis
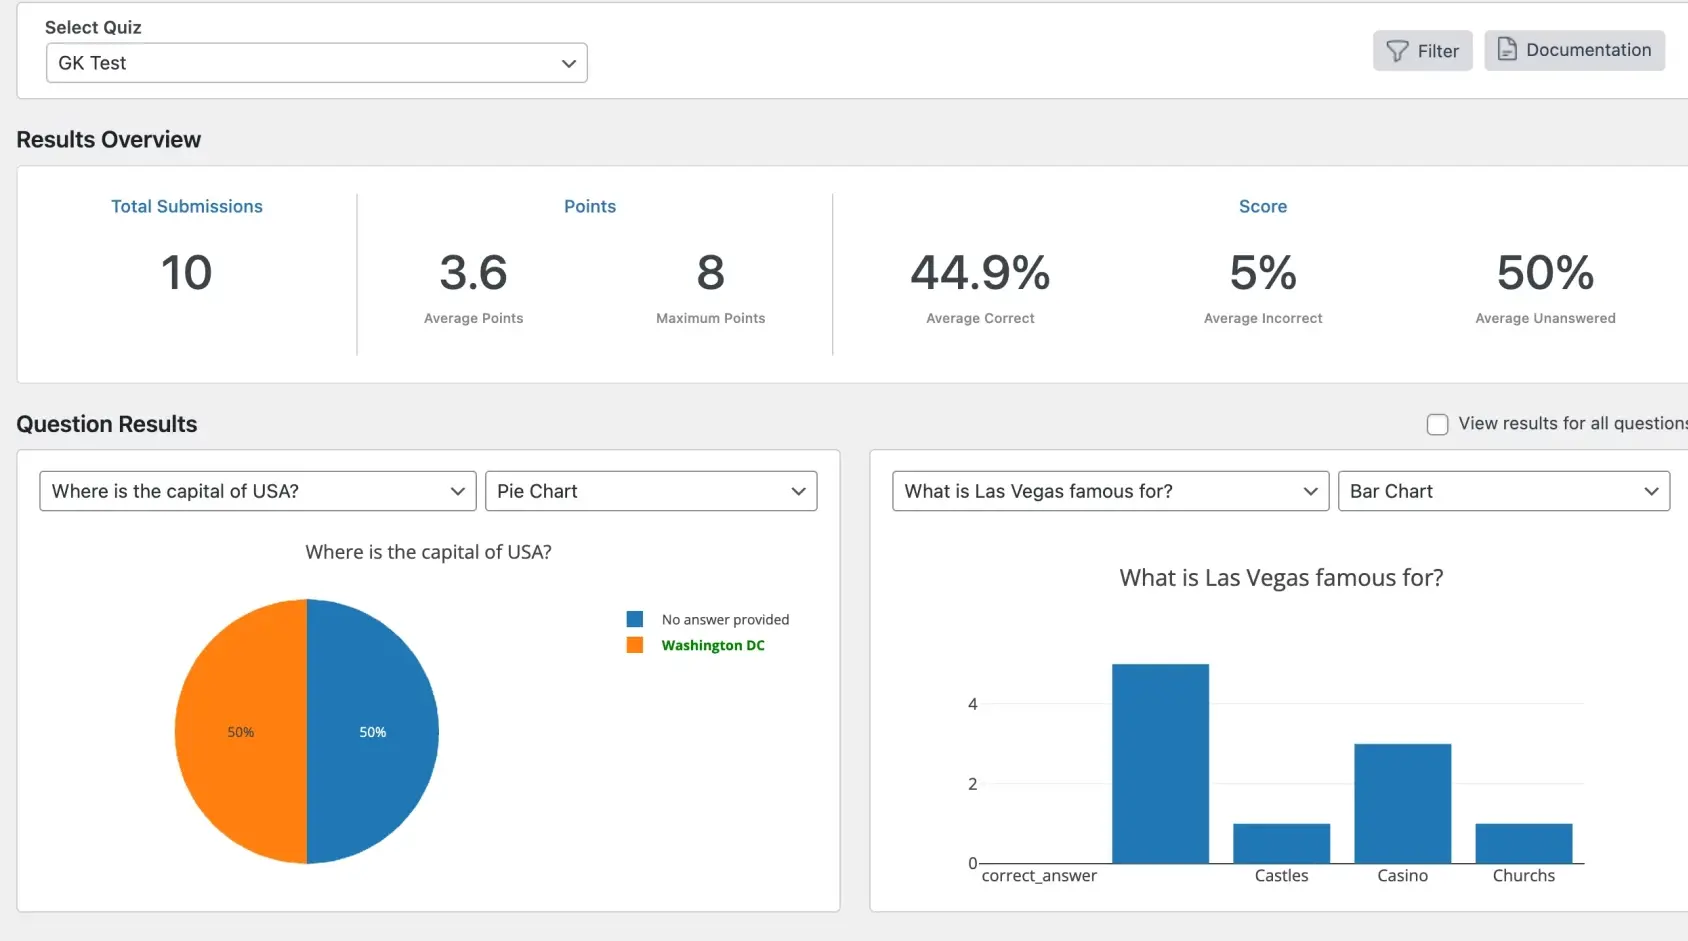
With the Reporting and Analysis Addon, you geta detailed Analysis of the Quiz Results. You get the data displayed in a Pie chart, Bar chart, Word Count chart, and Blox Plot chart. You also get to see the average score for each question and filter the results. You can then export the graphs to an image file. Print the graphs off, use them in a presentation, or use them in a document. You can also export the data to a CSV file.
2. Google Sheet Connector

Google Sheets Connector saves the QSM quizzes/survey results to the Google Spread Sheets. You can store the Quiz results and let other users within your organization see and discuss the Quiz/Survey performance.
3. PayPal and Stripe Integration
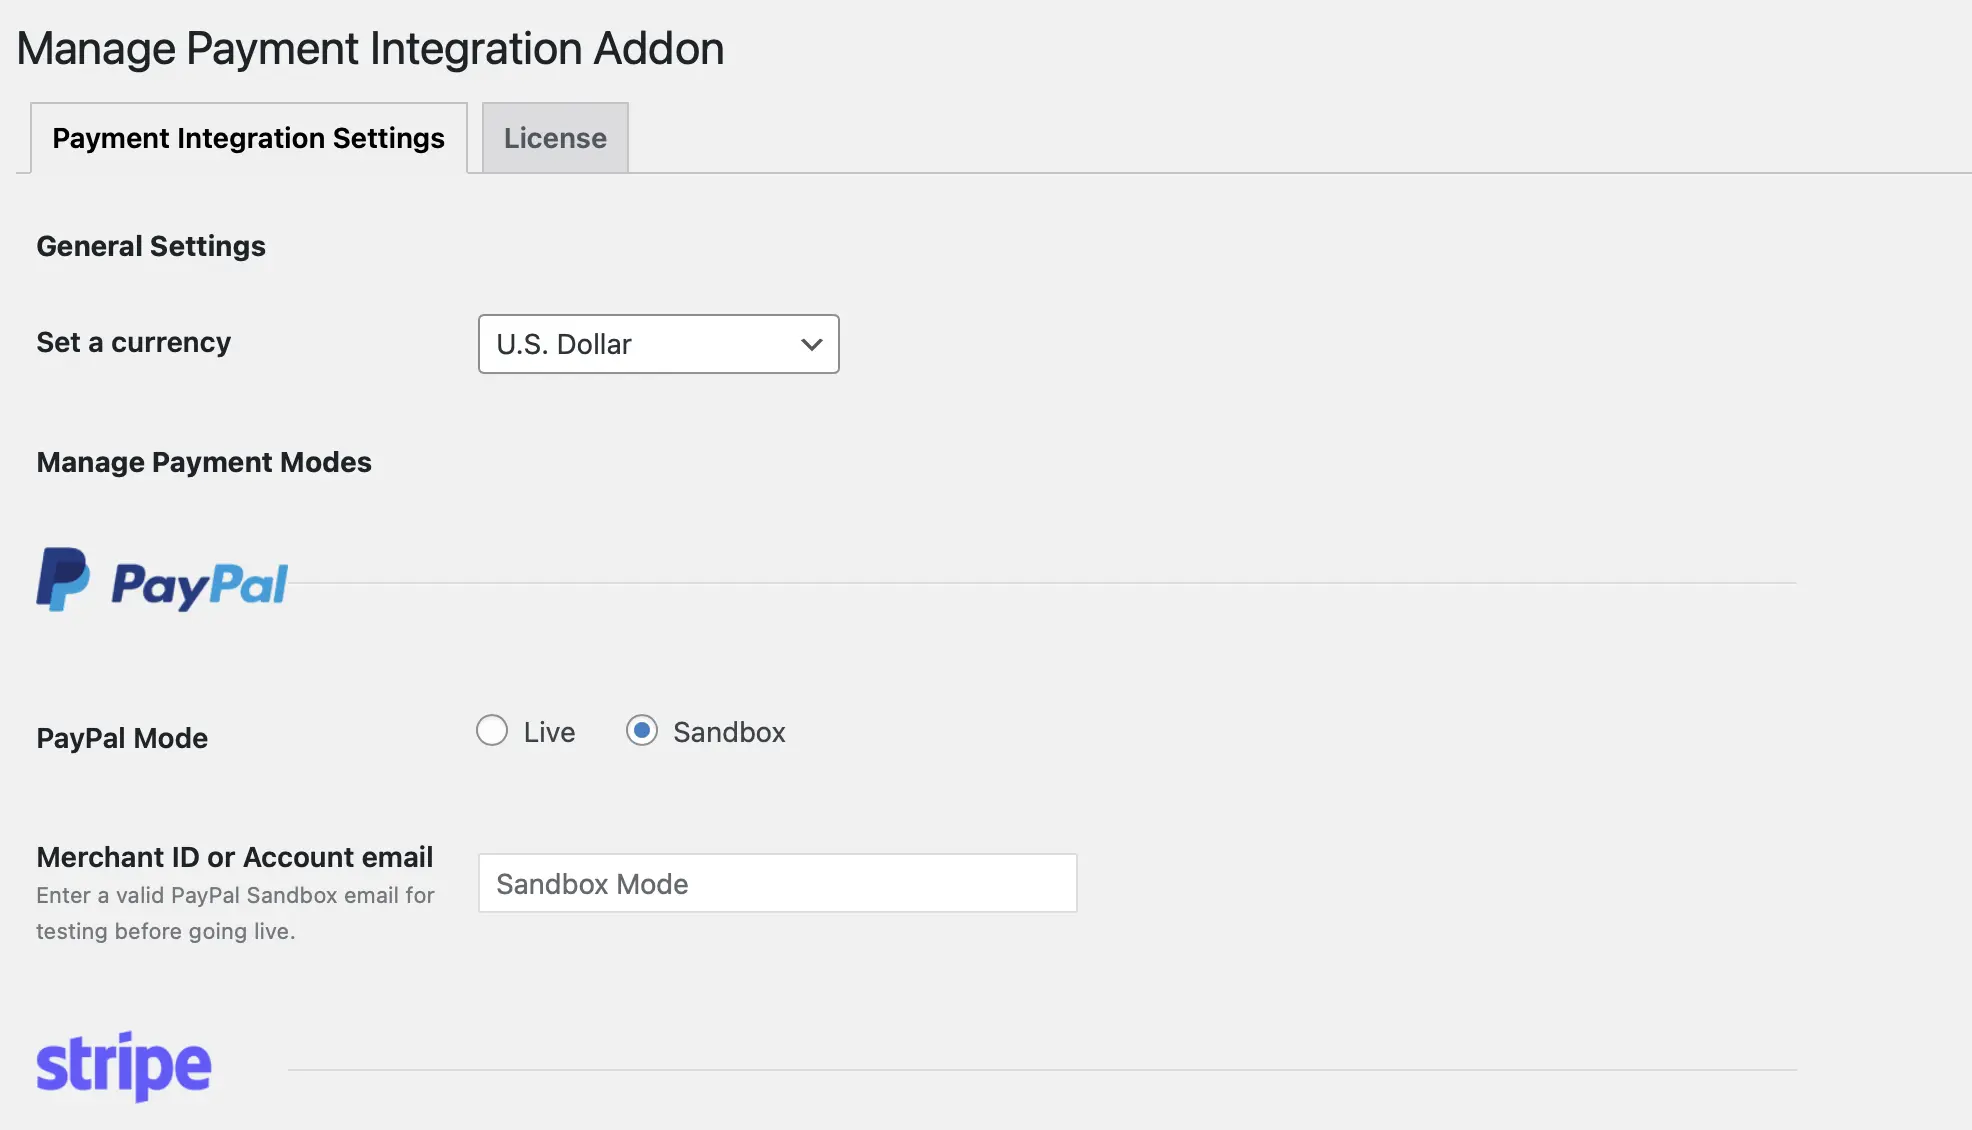
PayPal and Stripe Integration Addon allows you to accept online payments for exclusive Quizzes/Certification Exams where the user pays the specified amount and then is able to access the quiz.
QSM has 30+ Addons, these Pro Addons are sold separately on the QSM Website. Once purchased and activated you can use these Addons on Multiple Sites.


