Did you know you can create a form and link with PayPal or Stripe? This article explains how you can create a quiz/form in WordPress and accept payments from the users to access the form data.
You may want to have this functionality for various reasons. Let’s say you’re running an exclusive quiz that requires users to pay some amount in order to access the quiz data. Or you may create a certification exam that has a fee of $15 and the users who pass the exam successfully would be awarded a certificate.
Or you want to create an Online Quiz Contest where the participants need to pay an entry fee to access the quiz and the highest scorer will receive certificates/vouchers. What I’m trying to say is that its applications are endless.
Accepting payments through a payment gateway is another important aspect. Among the many emerging payment gateways, only two remain most popular and highly preferred by the developer community. They are PayPal and Stripe.

PayPal has been in the business for quite a long time and is one of the easy payment solutions for eCommerce sites. However, Stripe was an instant hit as it has lower transaction fees and a flexible API.
You don’t need to worry about not knowing to code as we are going to create a form/quiz using visual methods and add the payment functionality to our form/quiz using WordPress Plugin. The main plus point of using WordPress is its ability to add advanced functionality in the form of a plugin.
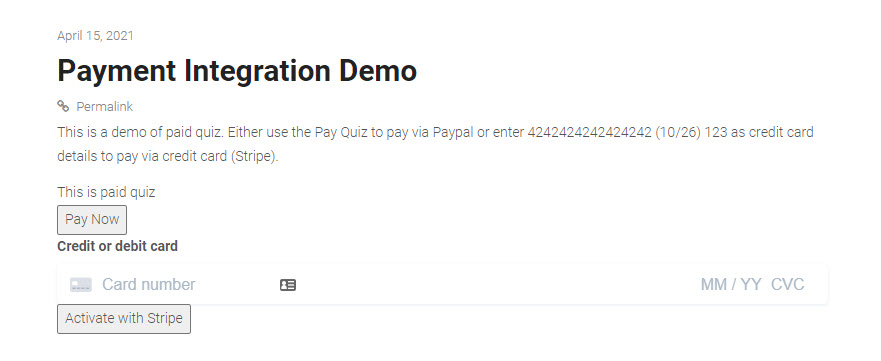
Here’s a Quick Demo of QSM’s PayPal and Stripe Integration Addon.
To be able to achieve this functionality follow the steps mentioned below.
Steps to Create a Form and Link with PayPal or Stripe
#1 Install the Quiz and Survey Master(QSM) Plugin from WordPress
#2 Build a Quiz with Quiz and Survey Master
#3 Create a Contact Form
#4 Add PayPal and Stripe Payment Integration
#5 Configure the Payment Integration Addon
#6 Choose the Payment Method, Amount and make the Quiz Live
Install the Quiz and Survey Master(QSM) Plugin from WordPress
The very first step in this process is to install the Free Quiz and Survey Master Plugin. Quiz and Survey Master is an all-in-one quiz plugin that can be used to build different types of Forms, Questionnaires, Surveys, Quizzes, Polls, etc.
Using the Free Quiz and Survey Master’s Core Plugin we will be building a form and then add Payment Integration using the PayPal and Stripe Addon.
After Installing the Plugin, Activate it and Create your first form.
Build a Quiz with Quiz and Survey Master
Building a Form/Quiz is very simple with Quiz and Survey Master.
Open the QSM Menu and you will see the QSM Dashboard. The Dashboard consists of all the info. that you need to run the QSM Plugin.
To Create a Form, hit the “Create New Quiz/Survey Button“. And, Enter the Name you want the Form to be named as.
You need to choose the form template, so if you want to build just a contact form then go with the default settings that is ‘Start from Scratch’, or if you want to create a Quiz then select the Simple Quiz/Time Based Quiz template and hit the Create Quiz Button.
If you just want to build a contact form then go to the next step. If you want to build a full-fledged Quiz then you can go ahead and add questions and answers to the Quiz.
You can add numerous questions to your Quiz. If you need, you can display all the questions on a single page or disperse them into multiple pages.
Enter the Question in the Question Field. If the Question is too long or has many conditions then you can make use of the ‘Add Description’ button and add the supporting description along with an image, audio, video, or a downloadable document file.
Also Read: 10 Reasons to use the WordPress Survey Plugin on your website
Choose the Question Type according to the type of Question you are asking to the responder from ‘15+ Questions Types‘ and also choose the Answer Type.
If you want the responder to not skip the question you can check the ‘Required’ checkbox to force the user to answer that particular question. You can even add a Category. Example to store questions of a category called Verbal Reasoning Test, Numerical Reasoning Test, etc.
You can have unlimited questions and their answers. You can add the answers and allot them some points and check the correct answer in the checkbox.
You can add correct answer info if you want to let the responders know why the correct answer is the correct answer.
Remember if you add all the Questions on a Single Page then those questions will be shown on one page to the person taking the assessment test as well.
Create a Contact Form
To collect the respondent’s name, email, phone, and other information we can configure a form that the respondents need to fill.
For accepting Names, In the Field Type choose Small Open Answer, Give it a Label, and select Name in the Used For dropdown. Also, if the information needs to be strictly filled then make sure you tick the required checkbox.
Similarly for accepting Email Ids, In the Field Type choose Email, Give it a Label, and select Email in the Used For dropdown.
The same goes for Business and Phone. If you want to accept more info then you can select the field type as Small Open Answer and give any name in the label and keep the Used For option as it is. This way you can accept more information and make a detailed form.
After successfully creating a contact form you can do various customizations to your Quiz like Displaying Welcome Information to the user before they commence the quiz, Configure the quiz with a timer, schedule the quiz display time, show a progress bar, limit the number of questions to display, show retake quiz button and do lot more…
Here is an article that you need to read that can help you Create Detailed Quizzes/Online Exams with Quiz and Survey Master Plugin.
Add PayPal and Stripe Payment Integration
Stripe & Paypal are two secure payment gateways that accept all major credit cards and allow you to retrieve the order info and user details.
To implant, the Payment Integration functionality to the newly created Form/Quiz you will need to purchase and install the ‘Paypal and Stripe Payment Integration‘ Addon from the QSM Addons Page.
Payment Integration is an extremely simple payment solution by Quiz and Survey Master. By purchasing this addon, you can now charge any amount of your choice to anyone who registers for a paid quiz/certification exam.
Also Read: Seven Benefits of WordPress Survey Plugin on Modern Business Sites
The Payment Integration addon allows you to set various options like the Currency Details, PayPal Live and Sandbox Account, Stripe Test and Live Publishable Key and Secret Key, Add a button label, etc.
By adding a paywall on any of your quizzes or surveys. Payment Integration Addon becomes the very first step to building your own monetization model on QSM.
Configure the Payment Integration Addon
After Installing the Payment Integration Addon it’s now time to configure it.
For that, you need to navigate to the Payment Integration Addon Settings which can be found inside QSM Menu > Addon Settings from your WordPress Dashboard.

The very first step is to enter the Addon License Key, which can be found from your QSM Account to receive future automatic product updates.
Next, you need to specify the currency in which you are going to accept payments from the user.
PayPal Details

In PayPal Details Section, Enter the PayPal Live account Merchant email id to receive payments via. PayPal. You can enter a valid Merchant account ID or any PayPal email id
You can even enter a Sandbox Account (a fake account used for testing purposes) used for testing. This is useful to make sure your PayPal account and settings are working properly before making it live for the users.
Stripe Details

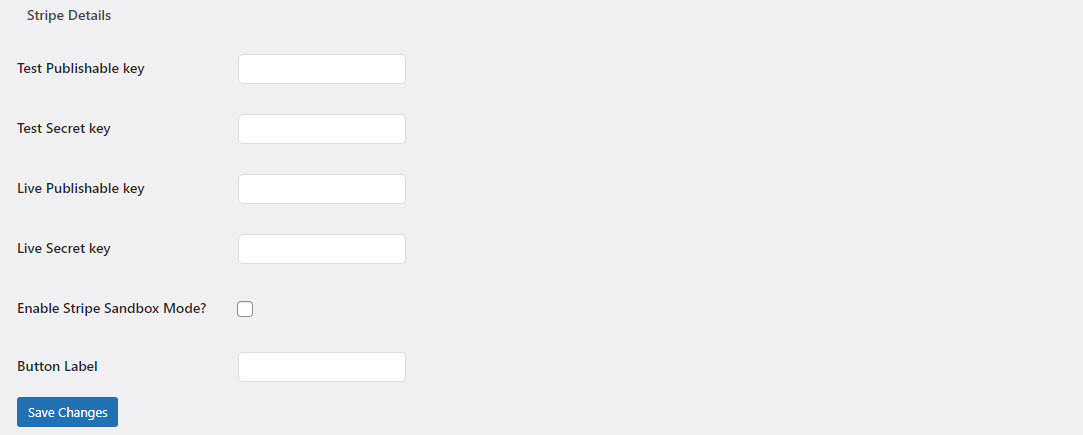
In Stripe Details Section, Enter your Stripe Publishable Key, Test Secret Key, Live Publishable Key, and live Secret key. You can get this information from your Stipe Dashboard.
- Goto your Stripe Dashboard and click “Get your test API keys”, which opens up with Test Publishable Key and Secret Key.
- Copy both the keys and paste them into the Addon text fields.
- Now, if your Stripe account is activated you would get the Live API key and Secret key when clicked on the “Get your Live API Keys” dropdown.
- Again, copy both the keys and paste them into the Addon text fields.
When you are done will all the changes, don’t forget to hit the ‘Save Changes‘ Button.
Choose the Payment Method, Amount and make the Quiz Live!

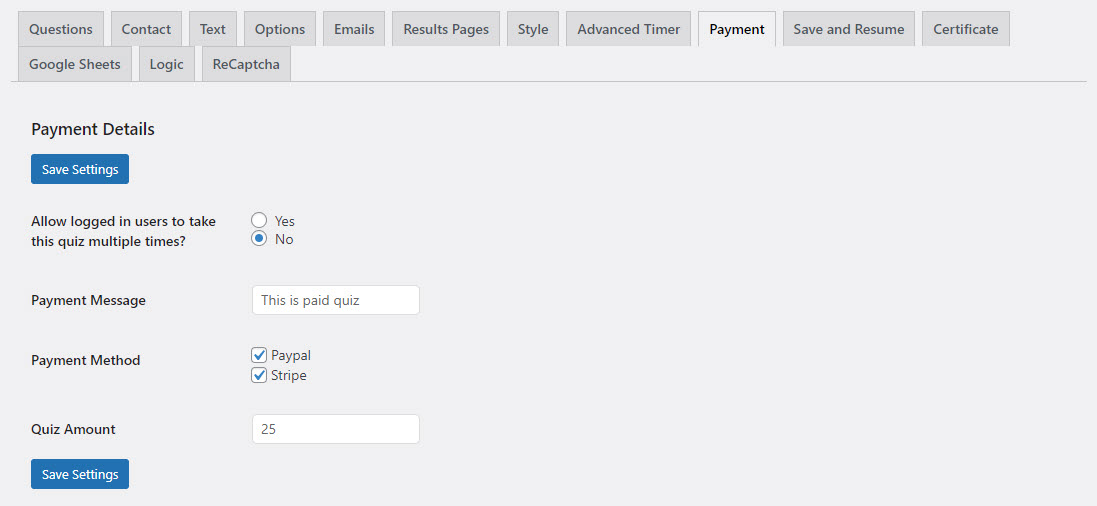
To make the payment integration service Live and to choose the payment method you need to navigate to your Quiz and you will find a new ‘Payment Tab‘ that just got added.
The very first option says “Allow logged in users to take this quiz multiple times” choose accordingly.
In the ‘Payment Message’ option, you can display any message to the user alerting them about the quiz and the Quiz amount.
Also Read: Best Shopify Apps in 2022: Create a Better eCommerce Store
Choose the Payment Method, you can choose to display both PayPal and Stipe payment methods or any one of them.
And lastly, set the Quiz Amount, this is the amount the user will pay in order to gain access to the Quiz/Form/Test.
Note: The amount you enter will be in the currency that you chose in the Addon Settings.
After, making the changes hit the ‘Save Settings Button’. And publish the Quiz by hitting the ‘Publish Quiz‘ button that is positioned at the top-right corner of the page.

To display the Quiz/Form on a page or a post on your website you need to copy the Embed Shortcode/Link Shortcode from QSM > Quizzes/Surveys > Shortcode.
Conclusion
This is how you can create a form and link it with PayPal or Stripe using the Quiz and Survey Master’s Payment Integration Addon.
Some of the very popular QSM Addons include:
- Certificate – to offer a test or quiz certificate to your WordPress users
- Advanced Timer – create a quiz with timer functionalities
- Google Sheets Connector – automatically sync your quiz results with Google Sheets (Google Spreadsheets)
- Logic – to hide or show different questions based on what the user selects for other questions
- MailChimp Integration – to add users who take your quiz to your lists in MailChimp
Quiz and Survey Master has many useful addons that can be used for varied purposes. View the complete list of QSM Addons and know their applications.


