Configure the Quiz/Survey behaviour from the QSM plugin’s Options tab. You will find all the settings required for the proper functioning of the quiz/survey here. All the options are divided in 4 Menus – General, Quiz Submission, Display and Contact Form.
The Legacy options menu is temporary and will be deprecated in the future releases.
Note: Based on the Form Type you have chosen during the initial Settings the options are set accordingly. You can however change the Form Type according to the needs.
Following are all the options available:
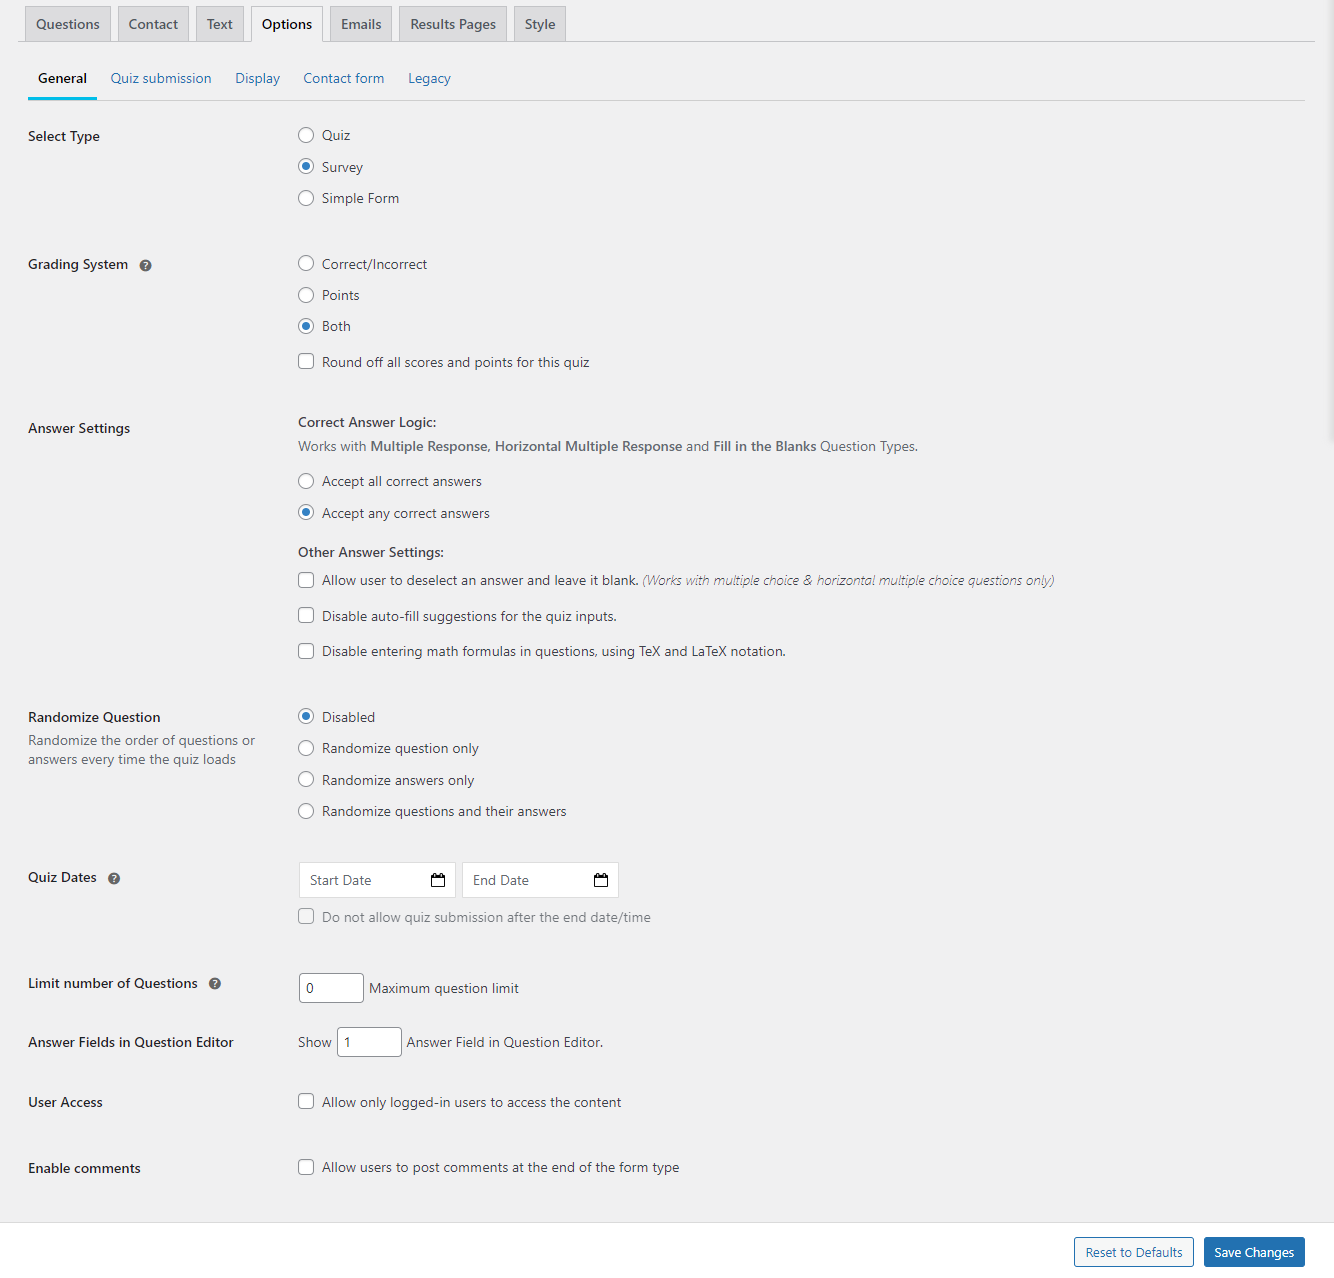
General
This menu tab contains all the general quiz/survey options.

Select Type
- Quiz – Select Quiz to make a quiz
- Survey – Select Survey if your form is a survey form
- Simple Form – Gives you a simple form
To limit the form access, you can check the “Allow only logged-in users to access the content” checkbox and then the form will only be accessible to the logged-in users.
Grading System
Quiz and Survey Master offers three different types of grading systems: Correct/Incorrect, Points and Both.
Correct/Incorrect
Create quizzes with results shown as percentages. Choose correct answers to tailor result pages or emails based on scores.
Points
Assign points to answers, with totals determining custom result pages or emails.
Both
Combine both Correct/Incorrect and Points systems for versatile grading.
Answer Settings
1. Allow users to deselect answers – The option lets users deselect a chosen answer and keep the response unanswered. This feature however is available only for multiple choice and horizontal multiple choice question types.
2. Disable the auto-fill suggestions – This prevents the quiz interface from offering automatic completion suggestions when users start typing their answers, ensuring they enter responses without prompts.
3. Disable the use of math formulas – In questions related to mathematics and technical subjects, specifically those that utilise TeX and LaTeX notation for creating complex equations
Random Questions
The Random Questions settings lets you Randomise the order of questions or answers every time a quiz loads.
- Random Questions: This setting shuffles questions from all categories to appear in a random order in the quiz.
- Random Questions and Random Answers: This option randomises both the questions and their answer options. For instance, in multiple-choice questions, the answer choices will appear in a different order each time.
- Random Answers: With this setting, only the answer options are shuffled, while the questions stay in their original order.
- Disabled: When turned off, both questions and answers appear in the set order, as arranged in the Questions Tab. This is the default setting.
Quiz Dates
Set a start and end date for the quiz. You can even make the Quiz exclusive to the set dates and it can only be accessed within these dates. If they try to access it after the end date, it won’t be available. The default setting for these dates is unset.
Note: You must tick the “Do not allow quiz submission after the end date/time” checkbox to make it exclusive to the set dates.
Limit number of Questions
- Maximum question limit: This option lets you choose how many questions show up in the quiz. For example, setting it to 5 means only 5 of 20 questions will appear. To show all 20 questions, set it to 0. The default setting is 0.
- Limit Questions Per Category: This setting lets you specify how many questions from each category are displayed. Set it to 0 to show all questions. You must also set an overall question limit and choose the categories for this to work.
Questions Categories
Choose questions from specific categories to include in the quiz. This requires you to have previously categorised your questions in the Question Tab.
Set Default Answer Count
This feature allows you to decide how many answer options are automatically generated for each question in a quiz or survey. It’s initially set to 1, but you can adjust it. After setting your preferred number, that many answer fields will be created automatically. If you need more options, you can add them by clicking the “Add New Answer” button.
Enable Comments
This feature provides a comment box at the end of the quiz, letting participants leave comments and suggestions. Initially, this option is turned off.
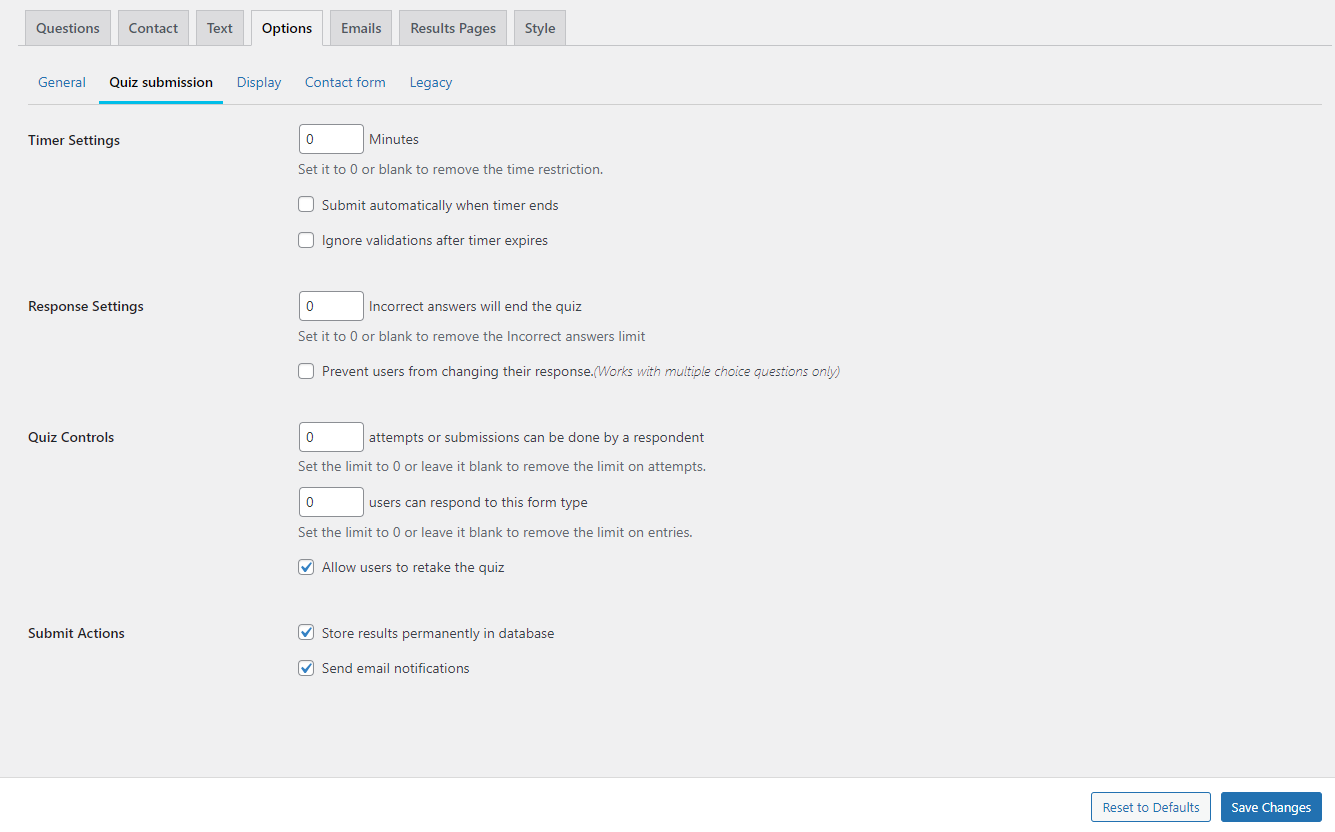
Quiz Submission
This tab consists of the quiz submission related to settings that control how the quiz is submitted.

Timer Settings
You can add a countdown timer to your quiz. When participants start the quiz, the timer begins and warns them about the remaining time and when time is up. The timer is shown at the bottom-right of the quiz page. By default, there’s no timer (value is set to 0).
- Auto-Submit on Timer Expiry: If enabled, the quiz automatically ends when the time is up, and shows the results to the user. This works only if a specific time limit is set.
- Ignore validations after timer expires: Enabling this allows the quiz to bypass any checks or validations if the timer runs out.
Answer Controls
Incorrect answers will end the quiz: This setting allows the quiz to end after a user gives a certain number of incorrect answers. You can specify this number as any positive digit. Setting it to 0 means the quiz continues regardless of wrong answers.
Note: This only applies to certain question types like multiple choice and multiple response, both vertical and horizontal, and drop-down.
If you enable manual pagination (set Questions per Page to a non-zero value), and users answer incorrectly, the quiz doesn’t immediately end. Instead, users can correct their mistakes, and the quiz only finishes once the Next button is pressed.
Prevent users from changing their response: When enabled, users can’t change their answers after making a selection. By default, users can change their answers.
Note: This feature works only with multiple choice questions.
Quiz Controls
Number of attempts:
Controls how many times a user can try the quiz. Setting it to 1 means if a user tries again, they’ll see a message like “You have utilized all of your attempts to pass this quiz.” You can customize this message. The default limit is 0, meaning unlimited attempts.
Number of Entries:
This option sets a cap on how many users can attempt the quiz. For example, if set to 10, the 11th user will receive a message such as “Unfortunately, this quiz has a limited amount of entries it can receive and has already reached that limit.” This message can also be customized. By default, there’s no limit, set at 0.
Retake Option:
When turned on, users can retake the quiz. They’ll see a “Retake Quiz” button after finishing the quiz and seeing their results. Initially, this feature is off.
Submit Actions
Store Results Permanently in Database:
Turning this on keeps quiz answers and scores in the database forever, accessible to the quiz administrator at any time. This is usually enabled by default.
Send Email Notifications:
When activated, this sends emails about quiz completions to users or the quiz admin.
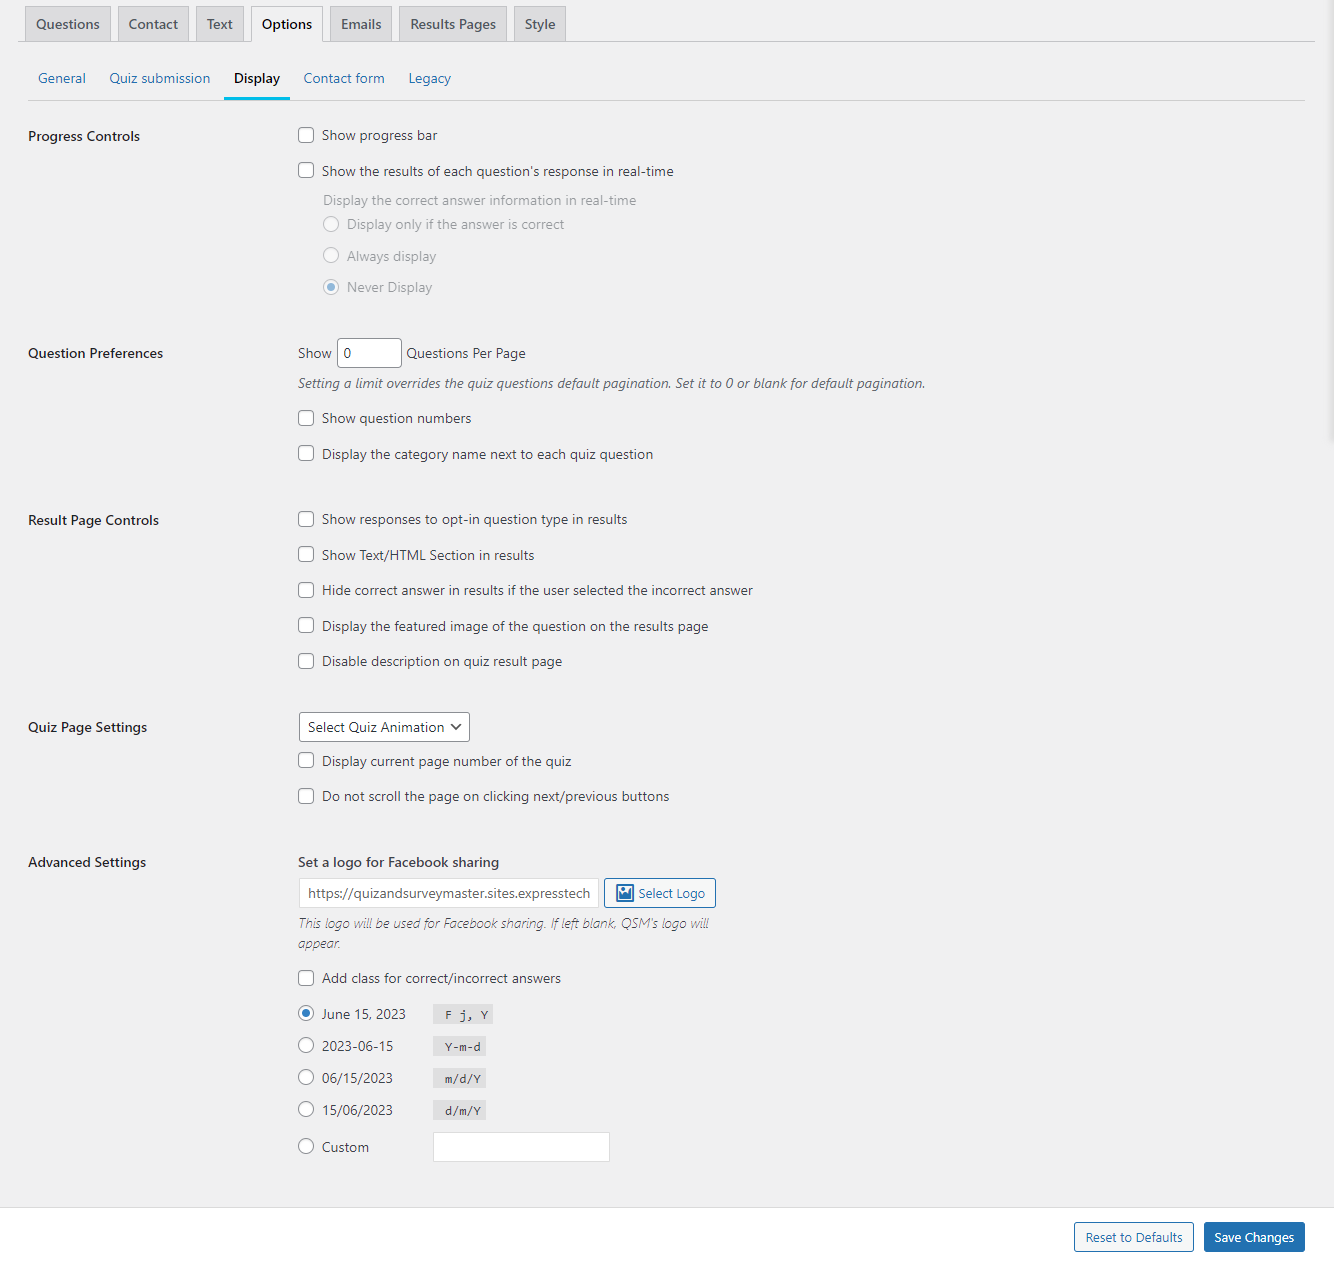
Display

Progress Controls
Show Progress Bar:
When enabled, participants will see a progress bar indicating how much of the quiz they’ve completed and what remains. This feature is only available for quizzes with multiple pages.
Show Results Realtimer:
This setting allows showing the right answer immediately after a question is answered. There are three modes:
1. Display only if the answer is correct – Only displays the correct answer if the user’s answer is right.
2. Always display – Displays the correct answer whether the user’s answer is right or wrong.
3. Never Display – Does not display the correct answer at all.
This feature is applicable only to multiple choice, short answer, and number question types.
Question Preferences
Questions Per Page:
Set how many questions to show on each quiz page.
- Manual Paging: Set to 0 means you manually choose how many questions each page has through the questions tab.
- Auto Paging: Setting a specific number means that many questions will automatically appear on each page.
Show Question Numbers:
Turn this on to display question numbers before each quiz question. It’s off by default.
Display Category Name:
Enabling this shows the category name to users during the quiz. This is also off by default.
Result Page Controls
Opt-in Answer Visibility:
Turning this off hides opt-in type answers from users.
Text/HTML in Results:
Enable this to show Text/HTML content on the results page.
Hide Wrong Answer Correctness:
This hides the correct answer in the results if the user’s answer was wrong.
Featured Image on Results:
Displays question’s featured images on the results page. Ensure you’ve added images to your questions for this to work.
Disable Descriptions from Results:
This option removes question descriptions from the results page, showing only the question titles.
Quiz Page Settings
Set Quiz Animation:
Choose an animation for the quiz loading screen. Options include bounce, flash, pulse, rubberband, shake, swing, tada, wobble, jello, and heartbeat. No animation is the default setting.
Advanced Settings
Facebook Share Logo:
Enter the URL for an image to use as a logo when sharing your quiz on Facebook.
Highlight Answers:
Enable to automatically mark answers as correct or incorrect with a special class after selection. This is only for multiple choice questions and is off by default.
Prevent Scrolling with Navigation:
Activating this stops the page from scrolling when you click the next or previous buttons.
Choose Date Format:
Select your preferred date format for the quiz. Formats include “F j, Y” (April 15, 2022), “Y-m-d” (2022-04-15), “m/d/Y” (04/15/2022), or “d/m/Y” (15/04/2022). Set a global default in the settings menu.
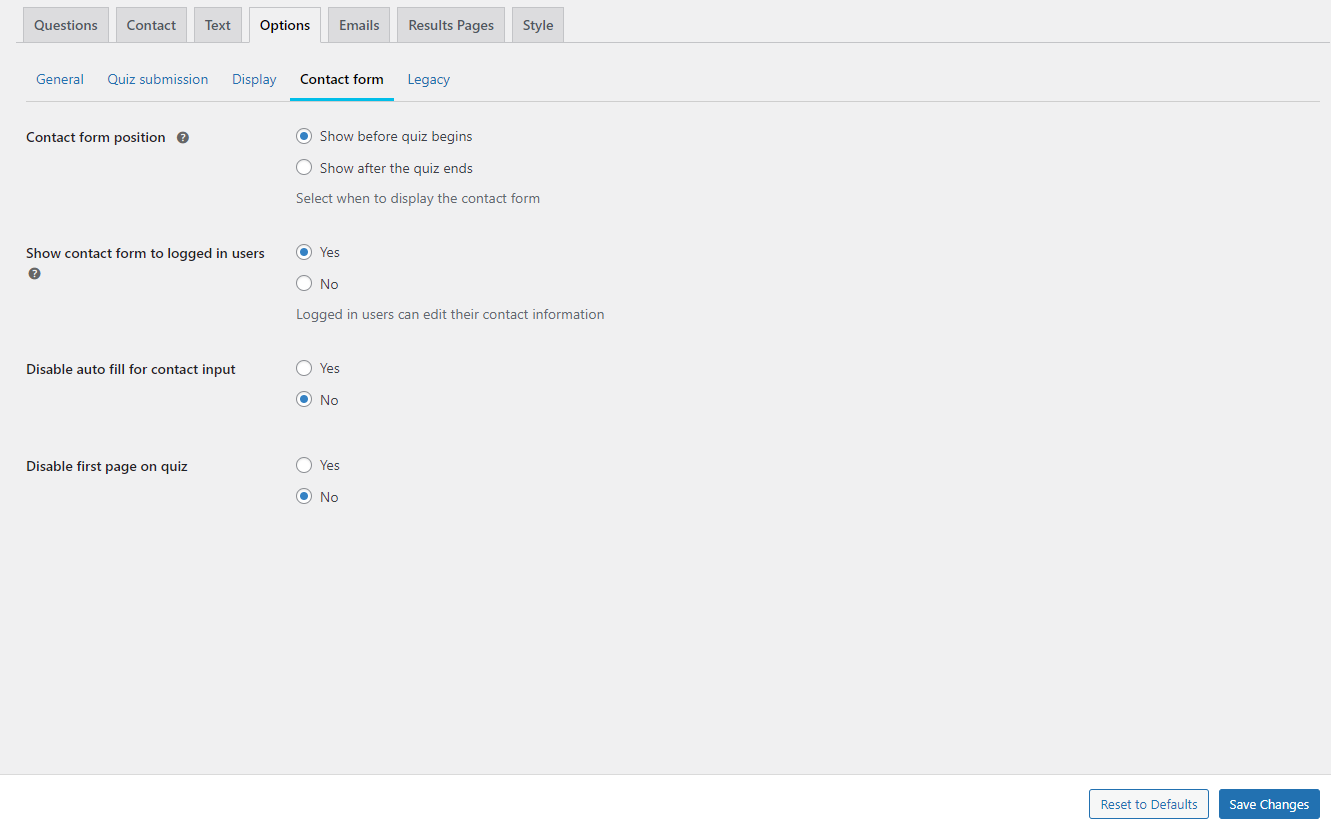
Contact Form

Contact form position
Choose where the contact form appears: before the quiz starts or after it ends. This is only relevant if you’ve set up a contact form. By default, it shows before the quiz.
Show Contact Form to Logged-In Users:
Only logged-in users will see the contact form, and they can update their contact details. If turned off, the form still saves information.
Disable Autofill for Contact Form:
Turning this on stops autofill suggestions on the contact form.
Disable first page on quiz:
If enabled, the quiz’s first page will not be displayed to users.


